Optimizing Fixation Methods for Whole-Mount Embryo Immunofluorescence: A Comprehensive Guide for Biomedical Research
Whole-mount immunofluorescence provides unparalleled three-dimensional spatial context for studying protein expression during embryonic development.
Optimizing Fixation Methods for Whole-Mount Embryo Immunofluorescence: A Comprehensive Guide for Biomedical Research
Abstract
Whole-mount immunofluorescence provides unparalleled three-dimensional spatial context for studying protein expression during embryonic development. This article delivers a complete guide to fixation methodologies, crucial for preserving tissue architecture and antigenicity. We cover foundational principles of common fixatives like paraformaldehyde and methanol, detailed protocols for various model organisms including mouse and zebrafish, and advanced troubleshooting for challenges like poor antibody penetration and high background. The content also addresses validation strategies and compares fixation efficacy across different embryonic stages. This resource equips researchers and drug development professionals with the knowledge to obtain reliable, high-quality data from their whole-mount immunofluorescence experiments, thereby accelerating developmental biology and disease modeling research.
Understanding Fixation Fundamentals: Principles and Reagent Selection for Embryo Preservation
The Critical Role of Fixation in Preserving Antigenicity and 3D Architecture
In whole mount embryo immunofluorescence research, the fixation step is a critical determinant for the success of an experiment, fundamentally influencing the reliability and interpretability of the results. This process must achieve a delicate balance: it must preserve the native 3D architecture of delicate embryonic tissues while simultaneously maintaining the antigenicity of target proteins for antibody recognition [1]. The choice of fixative and protocol directly impacts the visualization of dynamic molecular processes governing embryogenesis, from the subcellular localization of transcription factors to the intricate organization of the cytoskeleton and membrane-bound proteins [1].
Achieving this balance is technically challenging. Over-fixation can destroy antigenicity by masking or denaturing epitopes, whereas under-fixation leads to poor structural preservation and potential redistribution of antigens [2]. This application note, framed within a broader thesis on fixation methods, provides a comparative analysis of paraformaldehyde (PFA) and trichloroacetic acid (TCA) fixation, and introduces cryofixation, to guide researchers in selecting and optimizing protocols for their specific experimental aims in developmental biology.
Fixation Methods: A Comparative Mechanistic Analysis
Fixatives stabilize biological specimens through distinct chemical mechanisms. The following table summarizes the key characteristics of PFA, TCA, and cryofixation.
Table 1: Comparative Analysis of Common Fixation Methods for Whole Mount Embryo Immunofluorescence
| Fixative Method | Chemical Mechanism | Impact on Morphology | Impact on Antigenicity | Optimal For | Considerations |
|---|---|---|---|---|---|
| Paraformaldehyde (PFA) [1] [3] | Cross-links proteins and amines via methylene bridges. | Excellent preservation of tissue architecture and spatial organization. | Can mask epitopes; may require antigen retrieval. | Nuclear transcription factors (e.g., SOX, PAX) [1]; general-purpose use. | Crosslinking can reduce antibody penetration and accessibility. |
| Trichloroacetic Acid (TCA) [1] | Precipitates proteins by acid-induced denaturation and coagulation. | Alters nuclear morphology (larger, more circular nuclei); provides permeabilization. | Can unveil hidden epitopes inaccessible to PFA; may denature some targets. | Cytoskeletal proteins (e.g., Tubulin) and membrane-bound cadherins [1]. | Suboptimal for many nuclear transcription factors. |
| Cryofixation (CryoChem) [4] | Physical immobilization via high-pressure freezing; no chemical cross-linking. | Near-native state preservation; minimizes morphological artifacts. | Excellent preservation of protein structure and antigenicity. | High-resolution ultrastructural studies and correlated light and electron microscopy (CLEM). | Technically demanding; requires specialized equipment. |
Experimental Data: Quantitative Effects of PFA vs. TCA
A systematic investigation in chicken embryos compared the effects of PFA and TCA fixation on the fluorescence intensity and appearance of proteins localized to different cellular compartments [1]. The findings underscore the importance of target-specific fixation.
Table 2: Quantitative and Qualitative Outcomes of PFA vs. TCA Fixation on Protein Localization in Chicken Embryos
| Protein Target (Localization) | PFA Fixation Outcome | TCA Fixation Outcome | Interpretation |
|---|---|---|---|
| Transcription Factors (e.g., SOX9, PAX7) - Nucleus [1] | Optimal signal strength and clear nuclear localization. | Subpar signal strength; altered appearance. | PFA's cross-linking is superior for preserving nuclear epitopes. |
| Cytoskeletal Proteins (e.g., TUBA4A) - Cytoplasm [1] | Adequate signal strength. | Optimal visualization; potentially enhanced detection. | TCA's precipitating action may better expose cytoskeletal epitopes. |
| Cell Adhesion Proteins (e.g., E-Cadherin, N-Cadherin) - Membrane [1] | Adequate signal strength. | Optimal visualization; reveals distinct protein domains. | TCA can uncover membrane protein epitopes that are inaccessible with PFA. |
| Nuclear Morphology [1] | Standard nuclear size and shape. | Larger and more circular nuclei. | TCA's mechanism directly alters nuclear appearance, a critical factor for morphological analyses. |
Detailed Protocols for Whole Mount Embryo Immunofluorescence
Protocol A: Paraformaldehyde (PFA) Fixation
This protocol is optimized for preserving nuclear antigens and general tissue architecture in chicken embryos [1].
Reagents & Materials:
- 4% PFA in 0.2M Phosphate Buffer (pH 7.4)
- Tris-Buffered Saline (TBS) or Phosphate Buffered Saline (PBS)
- Triton X-100
- Blocking solution (e.g., 10% normal serum in TBST/PBST)
- Primary and secondary antibodies
- Ringer's Solution
Procedure:
- Dissection & Collection: Dissect embryos from incubated eggs onto filter paper and place into room temperature Ringer's Solution [1].
- Fixation: Transfer embryos to 4% PFA. Fix at room temperature for 20 minutes [1].
- Washing: Aspirate PFA and wash embryos 3x with TBS or PBS containing 0.1-0.5% Triton X-100 (TBST/PBST) [1].
- Blocking: Incubate embryos in blocking solution for 1 hour at room temperature or overnight at 4°C to reduce non-specific antibody binding [1].
- Primary Antibody Incubation: Incubate embryos with primary antibody diluted in blocking solution for 72-96 hours at 4°C [1].
- Washing: Wash embryos 3x with TBST/PBST to remove unbound primary antibody.
- Secondary Antibody Incubation: Incubate with fluorophore-conjugated secondary antibodies (e.g., AlexaFluor) diluted in blocking solution overnight (12-24 hours) at 4°C, protected from light [1].
- Final Wash & Post-fixation: Wash embryos with TBST/PBST. For PFA-fixed embryos, a second post-fixation with PFA for 1 hour at room temperature is recommended to stabilize the fluorescence signal [1].
- Imaging: Proceed to mounting and imaging.
Protocol B: Trichloroacetic Acid (TCA) Fixation
This protocol is advantageous for visualizing cytoskeletal and membrane-bound proteins [1].
Reagents & Materials:
- 2% TCA in 1X PBS (freshly diluted from 20% stock)
- PBS or TBS
- Triton X-100
- Blocking solution
Procedure:
- Dissection & Collection: Identical to Protocol A.
- Fixation: Transfer embryos to 2% TCA in PBS. Fix at room temperature for 1-3 hours [1].
- Washing: Aspirate TCA and wash embryos 3x with TBST or PBST [1].
- Immunostaining: Continue with blocking, primary and secondary antibody incubations, and washes as described in Protocol A, steps 4-7. Note: A post-fixation step is typically not used for TCA-fixed embryos [1].
Advanced Technique: The CryoChem Method for Ultrastructural Preservation
For the highest quality morphological preservation, the CryoChem Method (CCM) combines cryofixation with chemical processing, making it compatible with immuno-EM and super-resolution techniques [4].
Procedure:
- Cryofixation: Rapidly immobilize cellular structures by high-pressure freezing the sample in liquid nitrogen.
- Freeze-Substitution: Place the frozen sample in a freeze-substitution cocktail (e.g., containing acetone, glutaraldehyde, uranyl acetate, methanol, and water) at low temperatures to replace ice with organic solvent while preserving structure and antigenicity.
- Rehydration: Gradually rehydrate the sample on ice through a series of acetone/water or acetone/HEPES solutions.
- Immunolabeling: Perform standard immunolabeling steps (blocking, primary/secondary antibody incubation) on the rehydrated, cryofixed sample.
- Post-staining & Embedding: Apply high-contrast en bloc staining (e.g., osmium-thiocarbohydrazide-osmium) if needed for EM, then dehydrate and embed in resin.
The Scientist's Toolkit: Essential Research Reagents
Table 3: Key Reagent Solutions for Whole Mount Immunofluorescence
| Reagent / Solution | Composition / Preparation | Primary Function in Protocol |
|---|---|---|
| 4% PFA Fixative [3] | 4g PFA powder, 10µl 10N NaOH, 100ml 0.1M phosphate buffer. Heat to dissolve, then cool and filter. | Cross-linking fixative for preserving tissue architecture and nuclear antigens. |
| 2% TCA Fixative [1] | Dilute 20% (w/v) TCA stock solution in 1X PBS to 2% concentration fresh before use. | Precipitating fixative for denaturing proteins; optimal for cytoskeletal and membrane targets. |
| Blocking Buffer [3] | 1X PBS, 1-5% normal serum (from secondary host species), 0.1-0.3% Triton X-100. | Reduces non-specific antibody binding to improve signal-to-noise ratio. |
| Permeabilization Buffer [3] | 1X PBS with 0.1-0.5% Triton X-100. Alternatively, 0.05% Tween-20 or Saponin. | Solubilizes membranes to allow antibody penetration into the cell (not needed after methanol fixation). |
| Serum Block (Alternative) [3] | 1X PBS, 1% BSA, 0.1-0.3% Triton X-300, 300mM glycine. | Alternative blocking buffer; BSA and glycine help quench autofluorescence and non-specific binding. |
| Wash Buffer (PBST) [3] | 1X PBS with 0.1% Triton X-100 (or 0.05% Tween-20). | Washes away unbound antibodies and reagents between incubation steps. |
| Codon readthrough inducer 1 | Codon readthrough inducer 1, MF:C15H11N3O5, MW:313.26 g/mol | Chemical Reagent |
| Sorbitan monooctadecanoate | Sorbitan monooctadecanoate, CAS:5093-91-4, MF:C24H46O6, MW:430.6 g/mol | Chemical Reagent |
The choice of fixative is a critical determinant of success in whole mount embryo immunofluorescence research. It directly influences the preservation of morphology, the accessibility of epitopes for antibody binding, and the retention of biomolecules for subsequent analysis. Among the plethora of available fixatives, 4% Paraformaldehyde (PFA) and methanol are two of the most commonly employed. This application note provides a comparative analysis of these two fixatives, detailing their mechanisms, optimal applications, and providing standardized protocols to guide researchers in selecting the appropriate method for their specific investigative goals within the context of embryonic development studies.
Mechanism of Action and Key Characteristics
The fundamental difference between PFA and methanol lies in their mechanism of action, which dictates their performance in preserving different cellular components.
- 4% Paraformaldehyde (PFA): This is an aldehyde-based, crosslinking fixative. It works by forming covalent methylene bridges between proteins, primarily with the side chains of basic amino acids like lysine [5] [6]. This process creates a three-dimensional molecular network that stabilizes and hardens the sample, effectively "freezing" the cellular architecture in a life-like state. A key consideration, especially for membrane proteins, is that fixation with PFA alone can sometimes be inadequate, leading to artefactual clustering of receptors during immunolabeling; this can be mitigated by combining PFA with low concentrations of glutaraldehyde for more complete immobilization [5].
- Methanol: This is an alcohol-based, coagulating fixative. It acts by dehydrating the sample and precipitating proteins in situ through denaturation [7] [6]. This process displaces water around cellular macromolecules, disrupting hydrophobic bonds and altering protein conformation. While this can damage overall cellular structure, it often exposes buried epitopes, making it advantageous for certain intracellular targets [6].
The table below summarizes the core properties of each fixative:
Table 1: Fundamental Characteristics of PFA and Methanol Fixatives
| Characteristic | 4% Paraformaldehyde (PFA) | Methanol |
|---|---|---|
| Mechanism | Crosslinking | Precipitation/Dehydration |
| Morphology Preservation | Excellent | Moderate (can cause cell contraction) [8] |
| RNA Integrity | High-quality preservation suitable for RNA-seq [9] | Good preservation, but can cause subtle transcriptomic biases [7] |
| Epitope Accessibility | May mask some epitopes via cross-linking | Can expose buried epitopes via denaturation [6] |
| Primary Applications | Morphology, immunofluorescence (IF), RNA sequencing | IF for specific intracellular targets (e.g., cytoskeleton), DNA staining |
Comparative Experimental Data and Performance
Empirical data highlights the context-dependent performance of PFA and methanol across various experimental readouts.
- Morphological and Immunohistochemical Outcomes: A study on xenograft tumor tissues demonstrated that 10% Neutral Buffered Formalin (NBF, functionally similar to PFA) provided excellent morphological quality, whereas methanol-fixed tissues exhibited significant cell contraction [8]. Furthermore, immunohistochemical results varied dramatically; methanol fixation decreased immunoreactivity for Ki-67 and VEGF-A but improved staining for cytokeratin [8].
- RNA Sequencing Compatibility: For single-cell RNA sequencing (scRNA-seq), PFA fixation followed by a cross-link reversal step has been shown to preserve RNA integrity and relative gene expression levels effectively, with methods like FD-seq detecting a higher number of genes and transcripts compared to methanol fixation [9]. While methanol fixation is generally compatible with scRNA-seq and preserves biological signals, it can introduce subtle biases, potentially due to incomplete reverse transcription of mRNAs with complex secondary structures [7].
- Membrane Protein Artifacts: Research on lymphatic endothelial cells revealed that fixation with PFA alone can be insufficient to fully immobilize membrane receptors like LYVE-1 and CD44. The residual mobility leads to artefactual clustering when secondary antibodies are applied. This artifact was prevented by using a combination of PFA and glutaraldehyde, which ensures complete immobilization [5].
Table 2: Experimental Performance Summary for Key Applications
| Application | 4% Paraformaldehyde (PFA) | Methanol |
|---|---|---|
| Whole Mount IF (General) | Recommended for superior structural preservation [10] | Use if preliminary tests show superior signal for target |
| Whole Mount IF (Membrane Proteins) | Use in combination with low-concentration glutaraldehyde to prevent artefactual clustering [5] | Not recommended due to potential for protein redistribution |
| Single-Cell RNA-seq | Compatible with specialized protocols (e.g., FD-seq); high gene detection [9] | Compatible but may yield fewer detected genes/transcripts and introduce sequence-dependent biases [7] |
| Phalloidin Staining (F-actin) | Compatible [11] | Not compatible; destroys F-actin structures [11] |
Detailed Protocols for Whole Mount Immunofluorescence
The following protocols are adapted for whole mount embryo staining, incorporating best practices from the literature.
Protocol A: Immunofluorescence Using 4% PFA Fixation
This protocol is recommended for most whole mount immunofluorescence applications, especially when preserving delicate embryonic structures.
Solutions & Reagents:
- PBS-Glycine (10X Stock): 7.5 g glycine in 100 mL 10X PBS, pH to 7.4 [10].
- IF-Wash Buffer (10X Stock): 0.5 g NaN₃, 1 g BSA, 2 mL Triton X-100, 0.5 mL Tween-20, bring to 100 mL with 10X PBS, pH to 7.4 [10]. (Caution: NaN₃ is highly toxic.)
- Blocking Buffer: 1X IF-Wash buffer supplemented with 3-5% normal serum from the secondary antibody host species.
Procedure:
- Fixation: Immerse samples in pre-warmed (37°C) 2-4% PFA in PBS. Fix for 15-30 minutes at room temperature. Avoid over-fixation to prevent epitope masking [10] [12].
- Washing: Rinse samples twice with PBS. Quench unreacted aldehydes by incubating with pre-warmed 1X PBS-Glycine for 15-30 minutes [10].
- Permeabilization & Blocking: Incubate samples in Blocking Buffer for 60 minutes to several hours at room temperature. For tougher tissues, permeabilization can be enhanced by using a higher concentration of Triton X-100 (e.g., 0.5-1.0%) or by adding a brief incubation with methanol.
- Primary Antibody Incubation: Incubate samples with primary antibody diluted in fresh Blocking Buffer overnight at 4°C.
- Washing: Wash samples 3-5 times with 1X IF-Wash buffer over 1-2 hours.
- Secondary Antibody Incubation: Incubate with fluorophore-conjugated secondary antibodies (and counterstains like DAPI if needed) diluted in Blocking Buffer for 1-2 hours at room temperature, protected from light.
- Final Washes & Mounting: Wash thoroughly 3-5 times with 1X IF-Wash buffer over 1-2 hours. Mount samples in a suitable antifade mounting medium. For whole mounts, a fructose-glycerol clearing solution can improve transparency [10].
Protocol B: Immunofluorescence Using Methanol Fixation
Use this protocol for targets known to be sensitive to aldehyde cross-linking or when PFA provides unsatisfactory results.
Procedure:
- Fixation: Aspirate culture medium and immediately cover samples with ice-cold 100% methanol. Fix for 5-15 minutes at -20°C [13] [12]. The low temperature is crucial to minimize damaging effects on cellular morphology.
- Rehydration: Rinse samples three times with 1X PBS for 5 minutes each to rehydrate and remove methanol [13].
- Blocking: Incubate samples in Blocking Buffer (e.g., 1X PBS / 5% normal serum / 0.3% Triton X-100) for 60 minutes at room temperature [13].
- Primary & Secondary Antibody Incubation: Follow steps 4-7 from Protocol A.
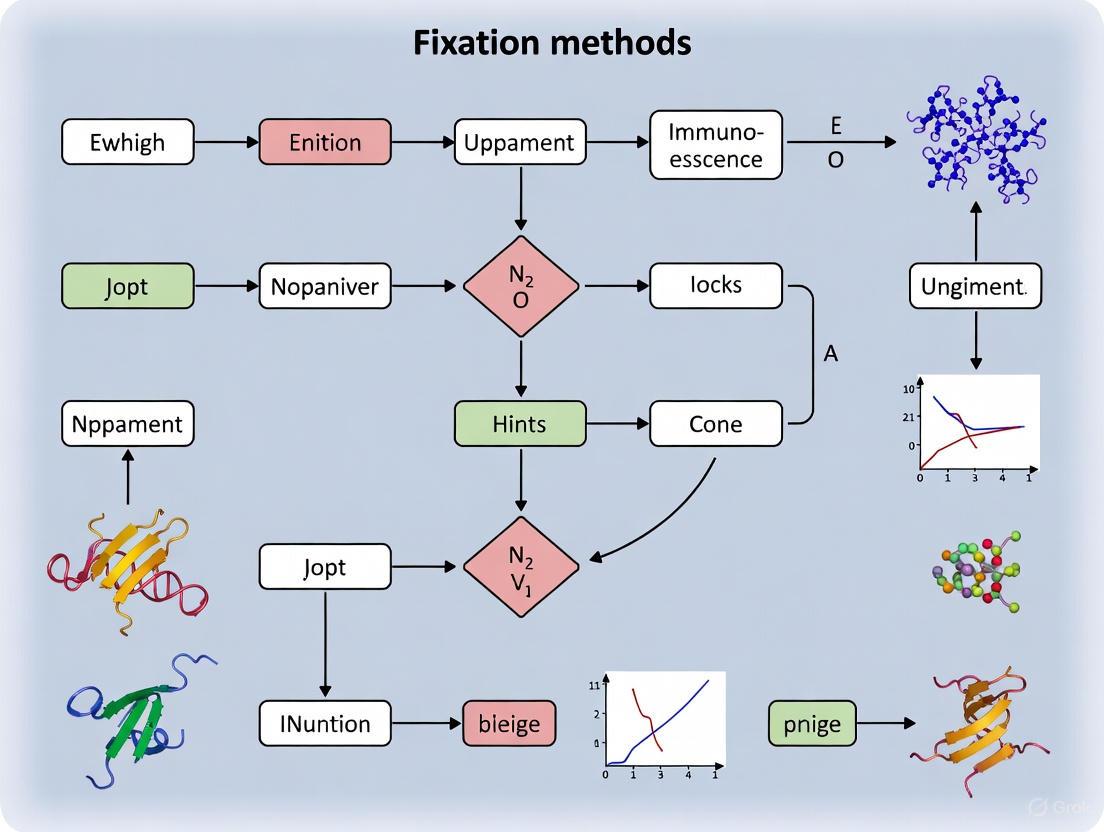
Experimental Workflow and Decision Pathway
The following diagram outlines a logical decision pathway for selecting and optimizing a fixation protocol for whole mount embryo immunofluorescence.
Diagram 1: Fixation Method Decision Pathway. This flowchart guides the selection of an appropriate fixation method based on key experimental requirements.
The Scientist's Toolkit: Essential Research Reagent Solutions
A successful immunofluorescence experiment relies on a suite of carefully selected reagents. The following table details key solutions and their functions.
Table 3: Essential Reagents for Whole Mount Immunofluorescence
| Reagent Solution | Composition Example | Primary Function |
|---|---|---|
| Paraformaldehyde (PFA) Fixative | 4% PFA in PBS | Crosslinks proteins to preserve cellular morphology and immobilize antigens. |
| Methanol Fixative | 100% Methanol, ice-cold | Precipitates and denatures proteins, can expose hidden epitopes. |
| Permeabilization Buffer | PBS with 0.1-1.0% Triton X-100 | Dissolves membrane lipids to allow antibody penetration into the cell. |
| Blocking Buffer | PBS with 1% BSA, 0.3% Triton, 5% normal serum | Reduces non-specific antibody binding to minimize background. |
| Wash Buffer | PBS with 0.05% Tween-20 and 0.1% BSA | Removes unbound antibodies and reagents while maintaining sample integrity. |
| Quenching Buffer | 50-100mM Glycine in PBS | Neutralizes unreacted aldehyde groups after PFA fixation to reduce background. |
| Mounting Medium | Antifade reagents (e.g., EverBrite) with or without DAPI | Preserves fluorescence and allows for high-resolution imaging. |
| Atrasentan Hydrochloride | Atrasentan Hydrochloride, CAS:2984284-99-1, MF:C29H39ClN2O6, MW:547.1 g/mol | Chemical Reagent |
| Oral antiplatelet agent 1 | Oral antiplatelet agent 1, MF:C23H24N4O5S, MW:468.5 g/mol | Chemical Reagent |
There is no universal "best" fixative for whole mount embryo immunofluorescence. The choice between 4% PFA and methanol is a strategic one, dictated by the biological question, the nature of the target antigen, and the required downstream analyses. PFA is generally the preferred choice for superior morphological preservation and compatibility with advanced molecular techniques like scRNA-seq. In contrast, methanol is a valuable tool for detecting specific epitopes that are masked by aldehyde cross-linking. Ultimately, empirical validation is indispensable. Researchers are encouraged to perform small-scale pilot studies, comparing both fixatives to establish the optimal protocol that delivers the highest signal-to-noise ratio and most faithful representation of their protein of interest within the complex architecture of the whole mount embryo.
In whole mount immunofluorescence research, particularly in developmental biology using model organisms like mouse, chick, and zebrafish embryos, fixation is a critical first step that preserves cellular architecture and antigenicity. The choice between protein cross-linking agents like paraformaldehyde (PFA) and protein precipitants like methanol represents a fundamental methodological decision that directly impacts experimental outcomes. These fixation methods operate through distinct biochemical mechanisms, leading to significant differences in their ability to preserve tissue structure, maintain antigen accessibility, and minimize artifacts in three-dimensional samples. This application note delineates the mechanisms, advantages, and limitations of PFA cross-linking versus methanol precipitation fixation, providing detailed protocols and analytical data to guide researchers in selecting the optimal approach for whole mount embryo studies.
Fundamental Mechanisms of Action
Protein Cross-linking with Paraformaldehyde (PFA)
Paraformaldehyde fixation operates through a cross-linking mechanism that creates covalent bonds between biomolecules, primarily proteins and nucleic acids. PFA, upon hydrolysis to formaldehyde, reacts with the side chains of amino acids—particularly lysine, arginine, and histidine—forming reactive hydroxymethyl groups that subsequently create methylene bridges between closely spaced amino groups in proteins [14] [15]. This process generates a three-dimensional network of cross-linked molecules that effectively stabilizes protein complexes and cellular ultrastructure.
The cross-linking process preserves spatial relationships within the cell by immobilizing molecules in their native locations. However, this same mechanism can potentially mask epitopes through several pathways: (1) direct chemical modification of amino acid residues within antibody-binding sites, (2) steric hindrance from the cross-linked network limiting antibody access, and (3) conformational changes in protein structure induced by cross-linking forces [16]. The extent of epitope masking is highly variable and depends on factors including the specific antigen, fixation duration, PFA concentration, and the chemical properties of the epitope region.
Protein Precipitation with Methanol
Methanol fixation functions through a fundamentally different dehydration and precipitation mechanism. As a polar organic solvent, methanol disrupts hydrophobic interactions and hydrogen bonding that maintain protein tertiary and quaternary structure. This disruption causes proteins to denature and precipitate in situ, effectively trapping them within the cellular architecture while removing water from the tissue [14].
The precipitation mechanism avoids cross-linking artifacts and generally provides better epitope accessibility for many antigens since it doesn't create covalent linkages between proteins. However, the denaturing process can alter protein conformation significantly, potentially destroying conformation-dependent epitopes that require the native protein structure for recognition. Additionally, methanol fixation may cause cellular shrinkage due to its dehydrating effect and can potentially extract some lipid components from cellular membranes [14].
Table 1: Core Mechanisms and Biochemical Effects
| Characteristic | Paraformaldehyde (PFA) | Methanol |
|---|---|---|
| Primary Mechanism | Covalent cross-linking via methylene bridges | Protein denaturation & dehydration |
| Chemical Process | Reaction with amino groups (lysine, arginine, histidine) | Disruption of hydrophobic interactions & hydrogen bonding |
| Structural Impact | Stabilizes protein complexes & native ultrastructure | Causes protein precipitation & potential shrinkage |
| Epitope Effects | May mask epitopes via cross-linking | May destroy conformation-dependent epitopes |
| Cellular Penetration | Fast penetration, slower cross-linking kinetics | Rapid penetration and action |
Comparative Performance in Whole Mount Applications
Structural Preservation and Artifacts
For whole mount embryo immunofluorescence, structural preservation is paramount. PFA excels at maintaining three-dimensional architecture and spatial relationships in complex tissues, making it particularly valuable for developmental studies where tissue context is critical. However, recent evidence reveals that PFA fixation can significantly alter the appearance of liquid-liquid phase separation (LLPS) in living cells, either enhancing or diminishing droplet-like puncta depending on the protein [15]. This finding presents a substantial caveat for interpreting subcellular organization in fixed specimens.
Methanol fixation generally provides inferior ultrastructural preservation compared to PFA, with potential extraction of cellular components and induction of shrinkage artifacts. Studies on neutrophil extracellular traps (NETs) demonstrated that 100% methanol fixation resulted in visible cellular damage and was less reliable for preserving delicate structures compared to optimized PFA protocols [14]. However, for some antigens, methanol's avoidance of cross-linking artifacts makes it preferable despite structural compromises.
Antigen Accessibility and Antibody Compatibility
The accessibility of epitopes to antibody binding differs markedly between these fixation methods. PFA cross-linking can hide epitopes, making them inaccessible to certain antibodies. Research indicates that approximately 30% of antibodies tested for whole mount applications may fail with PFA fixation due to epitope masking, necessitating methanol fixation as an alternative [16]. This limitation is particularly relevant for transcription factors and proteins with highly specific conformational epitopes.
Methanol fixation typically preserves a broader range of epitopes for antibody binding since it avoids cross-linking. However, it may destroy epitopes that depend on native protein conformation. Whole mount staining protocols note that if an antibody works on cryosections but fails on PFA-fixed whole mounts, methanol fixation often resolves the issue [16]. The penetration of antibodies through fixed tissues is also method-dependent, with methanol-fixed tissues generally allowing better reagent penetration due to enhanced permeability from dehydration effects.
Table 2: Performance Comparison for Whole Mount Embryo Staining
| Parameter | Paraformaldehyde (PFA) | Methanol |
|---|---|---|
| Tissue Architecture | Excellent preservation of 3D structure | Good to moderate, potential shrinkage |
| Subcellular Structure | May artifact LLPS and dynamic compartments [15] | Better for some intracellular targets |
| Epitope Preservation | Variable; 30% of antibodies may fail [16] | Broader accessibility for most antibodies |
| Penetration in Whole Mounts | Requires extended incubation (hours to days) | Faster penetration due to dehydration |
| Background Staining | Generally low with proper quenching | Low, but cellular damage may increase background [14] |
| Antigen Retrieval | Not feasible in whole mount embryos [16] | Not applicable |
| Recommended Embryo Age | Mouse: up to 12 days; Chick: up to 6 days [16] | Similar age limitations based on size |
Experimental Protocols for Whole Mount Embryo Fixation
PFA Cross-linking Protocol for Whole Mount Embryos
The following protocol is optimized for preserving tissue architecture while maintaining antigen accessibility in whole mount embryos:
Reagents Required:
- 4% Paraformaldehyde (PFA) in PBS (pH 7.4)
- Phosphate-Buffered Saline (PBS)
- 0.1% Triton X-100 in PBS
- Blocking solution (3% BSA, 5% normal serum, 0.1% Triton X-100 in PBS)
- Glycine quenching solution (100 mM glycine in PBS)
Procedure:
- Dissection and Initial Processing: Harvest embryos at appropriate developmental stage (mouse up to E12, chick up to E6) in cold PBS. Remove extraembryonic membranes carefully.
- Fixation: Immerse embryos in 10-20 volumes of 4% PFA in PBS. Fix for 30 minutes to 24 hours at 4°C depending on embryo size (15-30 minutes for small embryos
[16] [14]. ,> - Quenching: Remove PFA and wash embryos 3× with PBS. Incubate with glycine quenching solution (100 mM) for 1 hour to neutralize residual aldehydes.
- Permeabilization: Incubate embryos with 0.1% Triton X-100 in PBS for 1-48 hours depending on size (1-2 hours for small embryos, 24-48 hours for large embryos) with gentle agitation.
- Blocking: Transfer embryos to blocking solution and incubate for 12-48 hours at 4°C with agitation.
- Primary Antibody Incubation: Incubate with primary antibody diluted in blocking solution for 24-72 hours at 4°C with agitation.
- Washing: Wash extensively with PBS containing 0.1% Triton X-100 (8-10 changes over 24-48 hours).
- Secondary Antibody Incubation: Incubate with fluorescent-conjugated secondary antibody in blocking solution for 24-48 hours at 4°C in darkness.
- Final Washing and Imaging: Wash as in step 7. Clear and mount for imaging with confocal microscopy.
Critical Considerations:
- Fixation time must be optimized empirically for each antigen-embryo combination
- Extended fixation (>24 hours) may require harsher permeabilization (0.3-0.5% Triton X-100)
- Antigen retrieval is not feasible in whole mount embryos due to heat sensitivity [16]
Methanol Precipitation Protocol for Whole Mount Embryos
This protocol leverages methanol's epitope accessibility benefits while minimizing structural damage:
Reagents Required:
- 100% Methanol (pre-chilled to -20°C)
- Phosphate-Buffered Saline (PBS)
- Dimethyl Sulfoxide (DMSO)
- 0.1% Triton X-100 in PBS
- Blocking solution (3% BSA, 5% normal serum, 0.1% Triton X-100 in PBS)
Procedure:
- Dissection and Initial Processing: Harvest embryos as in PFA protocol. Transfer to cold PBS.
- Dehydration: Gradually dehydrate embryos through a methanol series (25%, 50%, 75% methanol in PBS, 15 minutes each) at room temperature.
- Fixation: Transfer embryos to 100% methanol pre-chilled to -20°C. Fix for 30 minutes to 2 hours at -20°C [14]. For better preservation, include 5% DMSO in methanol.
- Rehydration: Gradually rehydrate through reverse methanol series (75%, 50%, 25% methanol in PBS, 15 minutes each) to PBS.
- Permeabilization and Blocking: Permeabilize with 0.1% Triton X-100 in PBS for 1-24 hours depending on embryo size. Block with blocking solution for 6-24 hours.
- Antibody Incubation and Washing: Follow same antibody incubation and washing steps as PFA protocol.
Critical Considerations:
- Rapid cooling during methanol fixation improves structural preservation
- DMSO addition helps prevent formation of ice crystals that can damage tissue
- Methanol fixation is particularly suitable for intracellular antigens and when PFA destroys epitopes
Analytical Diagrams and Workflows
Biochemical Mechanisms and Experimental Workflow
The following diagram illustrates the fundamental biochemical mechanisms of both fixation methods and their integration into a complete experimental workflow for whole mount immunofluorescence:
The Scientist's Toolkit: Essential Research Reagents
Table 3: Key Research Reagents for Fixation Methods
| Reagent | Function | Application Notes |
|---|---|---|
| 4% Paraformaldehyde | Protein cross-linking fixative | Must be fresh or freshly prepared; Use pH 7.4 for optimal fixation [16] |
| 100% Methanol | Protein precipitating fixative | Pre-chill to -20°C; Add 5% DMSO for improved preservation [14] |
| Glycine | Quenching residual aldehydes | Neutralizes unreacted PFA to reduce background [15] |
| Triton X-100 | Detergent for permeabilization | Critical for antibody penetration in whole mounts; 0.1-0.5% typical [16] |
| Dimethyl Sulfoxide (DMSO) | Cryoprotectant & penetration enhancer | Reduces ice crystal formation in methanol fixation [17] |
| Bovine Serum Albumin (BSA) | Blocking agent | Reduces non-specific antibody binding; Use at 1-3% [14] |
| Normal Serum | Blocking agent | Matched to secondary antibody host species; Use at 5-10% |
| Sodium Demethylcantharidate | Sodium Demethylcantharidate, MF:C8H9NaO5, MW:208.14 g/mol | Chemical Reagent |
| Phytic acid potassium | Phytic acid potassium, MF:C6H16K2O24P6, MW:736.22 g/mol | Chemical Reagent |
The choice between PFA cross-linking and methanol precipitation for whole mount embryo immunofluorescence involves careful consideration of research priorities. PFA fixation is generally superior for studies requiring exceptional preservation of tissue architecture, membrane proteins, and subcellular localization where maintaining native spatial relationships is paramount. Conversely, methanol fixation provides a valuable alternative when PFA cross-linking masks critical epitopes, particularly for intracellular antigens and transcription factors.
For critical applications, empirical testing of both fixation methods with target antigens is strongly recommended. Sequential optimization using methanol when PFA fails represents a practical strategy for challenging targets. Furthermore, researchers should remain cognizant that all chemical fixation methods potentially introduce artifacts, particularly for dynamic cellular processes like liquid-liquid phase separation. Where feasible, validation of fixed sample observations through live-imaging approaches provides the most rigorous approach for interpreting subcellular organization and protein dynamics in developing embryos.
Impact of Fixative Choice on Epitope Accessibility and Masking
In whole mount embryo immunofluorescence, the choice of chemical fixative is a critical determinant of experimental success, fundamentally influencing the preservation of tissue architecture and, crucially, the accessibility of target epitopes to antibodies. Fixation stabilizes protein antigens within their cellular context; however, the chemical mechanism by which this is achieved can inadvertently mask the very epitopes researchers aim to visualize [18]. This application note examines the impact of two common fixatives—paraformaldehyde (PFA) and trichloroacetic acid (TCA)—on epitope accessibility, drawing on recent comparative studies in avian embryos [19] [20] [1]. We provide structured quantitative data, detailed protocols, and strategic guidance to empower researchers in making informed methodological decisions that enhance the accuracy and reproducibility of their protein localization studies within the broader context of developmental biology and drug discovery research.
Comparative Analysis of PFA and TCA Fixation
The efficacy of a fixative is judged by its dual capacity to preserve morphological integrity and maintain antigenicity. PFA and TCA fulfill these roles through distinct biochemical mechanisms, leading to significant differences in experimental outcomes.
Mechanisms of Action
- Paraformaldehyde (PFA): This aldehydic fixative works by creating stable methylene bridges between proteins, effectively cross-linking them and preserving the native tissue architecture. While excellent for structural preservation, this cross-linking can sterically hinder antibody access to specific epitopes, a phenomenon known as epitope masking [1] [18].
- Trichloroacetic Acid (TCA): As a precipitative fixative, TCA rapidly denatures and aggregates proteins by disrupting hydrophobic interactions and hydrogen bonding. This process can expose epitopes that are otherwise buried within the protein's tertiary structure or masked by PFA cross-linking, albeit at the potential cost of some structural detail [1].
Quantitative Comparison of Fixation Outcomes
Recent direct comparisons in chick embryos highlight how these differing mechanisms translate to observable results in a whole-mount context. The table below summarizes key findings from these studies.
Table 1: Quantitative and Qualitative Comparison of PFA and TCA Fixation in Chick Embryos
| Parameter | Paraformaldehyde (PFA) Fixation | Trichloroacetic Acid (TCA) Fixation |
|---|---|---|
| Primary Mechanism | Protein cross-linking [1] [18] | Protein precipitation & denaturation [1] |
| Impact on Nuclear Morphology | Results in smaller, less circular nuclei [20] [1] | Produces larger, more circular nuclei [20] [1] |
| Optimal Protein Targets | Nuclear transcription factors (e.g., SOX, PAX) [1] | Cytoskeletal & membrane proteins (e.g., Tubulin, Cadherin) [1] |
| Epitope Accessibility | May mask epitopes via cross-linking; superior for nuclear proteins [1] | Can reveal epitopes inaccessible with PFA; subpar for some transcription factors [1] |
| Typical Fixation Protocol | 4% PFA, 20 minutes, Room Temperature [1] | 2% TCA, 1-3 hours, Room Temperature [1] |
Subcellular Localization Dictates Fixative Choice
The most significant finding from recent research is that the optimal fixative is highly dependent on the subcellular localization of the target protein [1]:
- Nuclear Proteins (e.g., SOX9, PAX7): PFA is generally superior, providing maximal signal intensity for transcription factors.
- Cytoskeletal and Membrane Proteins (e.g., Tubulin, Cadherins): TCA often outperforms PFA, revealing sharper localization and stronger signal for proteins like tubulin and N-cadherin.
This specificity underscores the importance of validating fixation conditions for each target, as the universal use of PFA can lead to false negatives for certain classes of proteins.
Detailed Experimental Protocols
Below are standardized protocols for the fixation and immunostaining of whole-mount chick embryos, adaptable to other model systems. The process from embryo collection to imaging is summarized in the following workflow.
Diagram 1: Whole mount immunofluorescence workflow.
Embryo Collection and Fixation
Materials:
- Fertile chicken eggs incubated to desired Hamburger-Hamilton (HH) stage [1].
- Fixative A: 4% Paraformaldehyde (PFA) in 0.2M phosphate buffer, pH 7.4 [1] [16].
- Fixative B: 2% Trichloroacetic Acid (TCA) in 1X PBS [1].
- Ringer's Solution, 1X PBS, and TBST (Tris-Buffered Saline with 0.1-0.5% Triton X-100).
Protocol:
- Dissection: Dissect embryos from eggs into Ringer's solution [1].
- Fixation:
- Washing: Following fixation, wash embryos 3-5 times in TBST or PBST over 60-90 minutes to completely remove the fixative [1].
Whole-Mount Immunofluorescence
Materials:
- Blocking solution: TBST or PBST supplemented with 10% donkey serum (or other suitable serum) [1].
- Primary antibodies diluted in blocking solution (see Table 2 for examples).
- Fluorescently-labeled secondary antibodies (e.g., AlexaFluor conjugates) diluted in blocking solution.
- Optional: DAPI for nuclear counterstaining.
Table 2: Example Primary Antibodies for Chick Embryo Studies
| Target | Isotype | Expected Localization | Recommended Dilution | Fixative Performance Note |
|---|---|---|---|---|
| PAX7 [1] | Mouse IgG1 | Nucleus | 1:5 - 1:10 | Optimal with PFA |
| SOX9 [1] | Rabbit IgG | Nucleus | 1:500 | Optimal with PFA |
| SNAI2 [1] | Rabbit IgG | Nucleus | 1:200 | Optimal with PFA |
| TUBA4A [1] | Mouse IgG | Cytoskeleton | 1:250 | Superior with TCA |
| ECAD [1] | Mouse IgG2a | Membrane | 1:500 | Superior with TCA |
| NCAD [1] | Rat IgG1 | Membrane | 1:5 | Superior with TCA |
Protocol:
- Permeabilization & Blocking: Incubate fixed and washed embryos in blocking solution for 1 hour at room temperature or overnight at 4°C. For thicker tissues, permeability may be enhanced with higher Triton X-100 concentrations (e.g., 0.5-1.0%) [1] [16].
- Primary Antibody Incubation: Incubate embryos in primary antibody solution for 72 to 96 hours at 4°C with gentle agitation. This extended duration is critical for antibody penetration in whole-mount samples [1].
- Washing: Wash embryos 5-6 times with TBST/PBST over 12-24 hours to remove unbound primary antibody.
- Secondary Antibody Incubation: Incubate embryos in fluorophore-conjugated secondary antibody (e.g., 1:500 dilution) for 12-24 hours at 4°C, protected from light.
- Final Washes and Post-Fixation:
- TCA-fixed embryos: Proceed directly to final washing.
- PFA-fixed embryos: After secondary antibody washes, post-fix with 4% PFA for 1 hour at room temperature to stabilize the antibody-antigen complexes [1].
- Mounting and Imaging: Mount embryos in glycerol or a commercial mounting medium. For 3D analysis, image using a confocal microscope. Embryos can be cleared using protocols like BABB for deeper imaging [21].
The Scientist's Toolkit: Essential Research Reagents
Successful whole-mount immunofluorescence relies on a core set of reagents and tools. The following table details key components for the protocols described in this note.
Table 3: Essential Reagents and Materials for Whole-Mount Embryo Immunofluorescence
| Item | Function/Description | Example/Note |
|---|---|---|
| Paraformaldehyde (PFA) [1] [18] | Cross-linking fixative; preserves structure. | Typically used at 4% in buffer. |
| Trichloroacetic Acid (TCA) [1] | Precipitative fixative; can unveil hidden epitopes. | Typically used at 2% in PBS. |
| Triton X-100 [1] [16] | Detergent for permeabilizing cell membranes. | Critical for antibody penetration. |
| Donkey Serum [1] | Component of blocking buffer to reduce nonspecific binding. | Can be substituted with BSA or other sera. |
| Fluorophore-Conjugated Secondary Antibodies [1] | Detect bound primary antibodies for visualization. | AlexaFluor dyes are common choices. |
| Confocal Microscope [21] | Imaging system for capturing high-resolution 3D data from thick samples. | Essential for whole-mount analysis. |
| Silicone Isolators [21] | Used for mounting embryos for imaging under a coverslip. | Creates wells for multiple samples. |
| Isobutyl-deoxynyboquinone | Isobutyl-deoxynyboquinone (IB-DNQ) | NQO1 Substrate | Isobutyl-deoxynyboquinone is a selective NQO1 bioactivatable substrate that induces ROS-mediated cancer cell death. For Research Use Only. Not for human use. |
| 6',7'-epoxy Cannabigerol | 6',7'-Epoxy Cannabigerol|Cannabinoid Metabolite | 6',7'-Epoxy Cannabigerol is a cytochrome P450 metabolite of CBG for anti-inflammatory research. This product is For Research Use Only. Not for human or veterinary diagnostic or therapeutic use. |
The empirical evidence clearly demonstrates that fixative choice is not a one-size-fits-all parameter but a strategic variable that directly governs epitope accessibility. The cross-linking nature of PFA makes it the gold standard for nuclear targets, while the precipitative action of TCA can be indispensable for visualizing many cytoskeletal and membrane-associated proteins. Therefore, a critical step in experimental design should be the systematic validation of fixation methods for each novel target. By adopting a tailored approach to fixation, as outlined in the protocols and data herein, researchers can minimize epitope masking artifacts, thereby enhancing the reliability and biological relevance of their findings in developmental biology and beyond.
Guidelines for Fixation Duration and Temperature for Different Embryo Sizes
Within the context of a broader thesis on fixation methods for whole mount embryo immunofluorescence research, this document establishes standardized protocols for a critical yet often overlooked variable: the combination of fixation duration and temperature tailored to specific embryo sizes. Effective fixation preserves tissue architecture and antigenicity, forming the foundation for reliable immunofluorescence data. The small size and delicate nature of embryos, particularly for whole mount techniques, make them susceptible to artifacts from under-fixation (poor preservation) or over-fixation (epitope masking). This guide provides evidence-based, step-by-step protocols to ensure optimal morphological preservation and antigen integrity for embryos of varying stages and model organisms, thereby enhancing the reproducibility and accuracy of developmental biology and drug discovery research.
Quantitative Fixation Guidelines
The following tables consolidate empirical data on optimal fixation conditions for different embryo sizes and model organisms, balancing preservation quality with biomolecular integrity.
Table 1: Fixation Guidelines by Embryo Size and Organism
| Embryo Size / Model Organism | Recommended Fixative | Optimal Temperature | Optimal Duration | Key Considerations / Rationale |
|---|---|---|---|---|
| Small Embryos (e.g., Zebrafish Larvae) | 10% Neutral Buffered Formalin (NBF) [22] | 21°C [22] | 24 hours [22] | Provides excellent tissue morphology for histology. Gentle stirring showed no detectable effect [22]. |
| Mouse Embryos (e.g., E9.5) | 4% Paraformaldehyde (PFA) [23] | Room Temperature (implied) [23] | 45 minutes [23] | Preserves delicate structures like cytonemes; agitation must be gentle (max 20 RPM) to avoid damage [23]. |
| Chick Embryos (Whole-Mount) | 4% PFA or Trichloroacetic Acid (TCA) [20] [19] | Not Specified | Not Specified | Fixative choice significantly alters subcellular appearance; TCA can reveal protein domains inaccessible with PFA [20]. |
| Larger Embryos / Tissues | 4% PFA [16] | 4°C (for overnight) [16] | 30 minutes - Overnight [16] | For whole-mount, penetration time must be increased. Methanol is an alternative if PFA causes epitope masking [16]. |
Table 2: Impact of Fixation on Downstream Biomolecular Analysis
| Fixative Type | Effect on RNA Quality / Quantity | Effect on Protein/Epitope Integrity | Best Suited For | | :--- | :--- | :--- | ::--- | | Methacarn | High concentration and purity, comparable to unfrozen tissue (UFT) [24] | Good for immunohistology; comparable to formalin-fixed samples [24] | Combined histological, immuno-histological, and biomolecular analysis from the same sample [24]. | | Formalin (NBF) | Statistically significant lower RNA quality and quantity [24]; Formaldehyde causes cross-linking [8] | Excellent morphology; may mask some epitopes due to cross-linking [16] [8] | Primarily histological analysis when high-quality RNA is not required. | | Paraformaldehyde (PFA) | High-quality RNA, though fragmentation can occur [8] | Good preservation; may require optimization for specific antibodies [23] [20] | General immunofluorescence and immunohistochemistry; a standard for many protocols. | | Ethanol (99%) | Degradation of RNA [8] | Causes cell contraction; variable immunoreactivity (decreased for Ki-67, improved for cytokeratin) [8] | Specific targets where it enhances immunoreactivity; not recommended for RNA work. |
Experimental Protocols
Protocol 1: Fixation of Small, Delicate Embryos for Cytoneme Preservation
This protocol, optimized for mouse embryos but applicable to other small embryos, is designed for preserving fragile cellular structures like cytonemes (≤200 nm in diameter) [23].
Materials:
- Fixative: 4% Paraformaldehyde (PFA) in Hank's Balanced Salt Solution (HBSS). Prepare under a fume hood [23].
- Wash Buffer: Phosphate-Buffered Saline (PBS) with Ca2+ and Mg2+ with 0.1% Triton [23].
- Blocking Solution: PBS with Ca2+ and Mg2+, 0.1% Triton, and 5% goat serum [23].
- Equipment: 24-well plate, rocker or circular shaker (capable of gentle ~20 RPM agitation) [23].
Method:
- Euthanasia and Dissection: Euthanize the pregnant dam following approved institutional guidelines. Excise the uterus and dissect embryos in complete growth medium, removing the yolk sac and surrounding membranes. Rinse isolated embryos in HBSS [23].
- Fixation: Place each embryo in a well of a 24-well plate containing 1 mL of 4% PFA. Incubate for 45 minutes with gentle agitation on a rocker [23].
- Critical: Abrupt handling or movement will destroy delicate structures. Use a pipette to gently change solutions.
- Post-Fixation Wash: Remove the fixative and wash the embryos 3 times for 30 minutes each in Wash Buffer with gentle agitation [23].
- Blocking: Incubate embryos in Blocking Solution for 2 periods of 1 hour each with gentle agitation. After the second block, perform one quick rinse with fresh Blocking Solution [23].
- Immunostaining (Outline): Proceed with primary and secondary antibody incubations, which may extend over several days, followed by further washing and mounting [23].
Protocol 2: Fixation and Preparation of Zebrafish Embryos for Whole-Mount Imaging
This protocol addresses the unique challenges of working with zebrafish embryos, focusing on penetration barriers and morphology.
Materials:
- Fixative: 4% Paraformaldehyde (PFA) or 10% Neutral Buffered Formalin (NBF) [22] [16].
- Permeabilization Agents: Pronase solution (1-2 mg/mL) for enzymatic dechorionation, or fine forceps for manual dechorionation [16].
- Equipment: Dissecting microscope, fine forceps, glass vials (for straight fixation) [22] [16].
Method:
- Euthanasia and Selection: Euthanize zebrafish embryos with an approved method like Tricaine-S or hypothermal shock. Gently handle embryos using flame-rounded Pasteur pipettes to prevent damage [22].
- Dechorionation: Remove the chorion (egg membrane) to permit fixative and antibody penetration. This can be done manually under a microscope using fine forceps or enzymatically by incubating in pronase solution for 5-10 minutes at room temperature, followed by thorough rinsing [16].
- Fixation:
- For larvae and adults intended for high-quality sectioning, fixation in 10% NBF at 21°C for 24 hours is recommended. Incubate in at least 20x the fish volume of fixative. Use flat-bottom glass vials to keep the fish straight and prevent bending [22].
- For whole-mount immunofluorescence of younger embryos, 4% PFA is commonly used. Incubation times can range from 30 minutes at room temperature to overnight at 4°C, depending on size and antibody penetration requirements [16].
- Post-Fixation Handling: After fixation, wash embryos thoroughly in PBS. Fixed samples can be stored at 4°C or -20°C in a tube with an appropriate buffer to prevent drying until further processing [16].
Workflow and Pathway Diagrams
The following diagram illustrates the critical decision pathway for selecting the appropriate fixation protocol based on embryo size and research objectives.
Decision Workflow for Embryo Fixation
The Scientist's Toolkit: Essential Research Reagents
Table 3: Essential Reagents for Embryo Fixation and Processing
| Reagent | Function | Key Considerations |
|---|---|---|
| Paraformaldehyde (PFA) | Cross-linking fixative. Preserves tissue structure by creating covalent bonds between proteins. | The 4% solution is standard. It may mask some epitopes; antigen retrieval is not feasible in whole-mount embryos [23] [16]. |
| Neutral Buffered Formalin (NBF) | Standard cross-linking fixative (~4% formaldehyde in buffer). | The gold standard for histology; provides excellent morphology. Degrades RNA quality, impacting downstream biomolecular analysis [22] [24]. |
| Trichloroacetic Acid (TCA) | Coagulant fixative. Precipitates proteins. | Can alter nuclear morphology and reveal protein localization domains inaccessible to PFA. Requires validation for each target [20]. |
| Methacarn | Coagulant fixative (methanol-chloroform-acetic acid). | Excellent for combined histology and RNA analysis from the same sample. Yields high-quality RNA comparable to fresh-frozen tissue [24]. |
| EDTA | Chelating agent for decalcification. | Essential for sectioning juvenile and adult zebrafish (≥21 dpf) or bone samples. A 0.35 M solution is effective [22] [24]. |
| Low-Melting Point (LMP) Agarose | Embedding medium for sectioning. | Used to orient and support delicate embryos for sectioning post-fixation and immunostaining. A 4% solution is typical [23]. |
| Triton X-100 / Tween-20 | Detergents for permeabilization. | Added to wash and antibody buffers to allow antibody penetration into the tissue by dissolving membranes [23]. |
| Goat Serum | Blocking agent. | Used in blocking and antibody buffers to reduce non-specific background staining by occupying hydrophobic sites [23]. |
| Tazemetostat de(methyl morpholine)-COOH | Tazemetostat de(methyl morpholine)-COOH | Tazemetostat de(methyl morpholine)-COOH is a ligand for synthesizing PROTAC EZH2 degraders for lymphoma research. For Research Use Only. Not for human use. |
| Cannabidivarin diacetate | Cannabidivarin diacetate, MF:C23H30O4, MW:370.5 g/mol | Chemical Reagent |
Step-by-Step Protocols: Optimized Fixation and Staining for Mouse, Zebrafish, and Other Model Organisms
Standardized Protocol for Fixing Mouse Embryos (Pre- to Post-implantation)
This application note provides a standardized protocol for the fixation of mouse embryos from pre- to post-implantation stages, specifically optimized for whole mount immunofluorescence research. Proper fixation is critical for preserving embryonic morphology and antigen integrity during dynamic developmental processes. The protocols outlined herein establish reproducible methods for capturing structural and molecular information across key developmental timepoints, enabling high-resolution imaging and quantitative analysis of embryonic morphogenesis.
Quantitative Comparison of Fixation Parameters Across Developmental Stages
Table 1: Developmental Staging and Fixation Parameters for Mouse Embryos
| Developmental Stage | Days Post Coitum (dpc) | Key Morphological Features | Primary Fixative | Fixation Duration | Permeabilization Method |
|---|---|---|---|---|---|
| Pre-implantation (4-cell) | 1.75 dpc | 4 blastomeres | 4% PFA | 30-60 minutes | 0.25% Triton X-100 |
| Pre-implantation (8-cell) | 2.25 dpc | 8 blastomeres | 4% PFA | 30-60 minutes | 0.25% Triton X-100 |
| Pre-implantation (Morula) | 2.75 dpc | 16-32 cells, compaction | 4% PFA | 30-60 minutes | 0.25% Triton X-100 |
| Pre-implantation (Blastocyst) | 3.5 dpc | Trophoectoderm, ICM | 4% PFA | 30-60 minutes | 0.25% Triton X-100 |
| Early Post-implantation | 5.5-7.5 dpc | Egg cylinder, gastrulation | 4% PFA | 1-2 hours | Proteinase K (titrated) |
| Mid Post-implantation | 8.5-9.5 dpc | Organogenesis, turning | 4% PFA | 2-4 hours | Proteinase K (titrated) |
Table 2: Embryo Culture Media Composition for Post-implantation Stages
| Embryo Stage | Base Medium | Serum Supplement | Antibiotics | Culture Volume per Embryo |
|---|---|---|---|---|
| 5.5-7.5 dpc | DMEM | 50% heat-inactivated rat serum | Optional | 0.5-1 mL |
| 7.5+ dpc | DMEM/F-12 | 50% heat-inactivated rat serum | 10 mM penicillin-streptomycin | 0.5-1 mL |
Experimental Workflow for Embryo Processing
Diagram 1: Complete workflow for mouse embryo processing from isolation to imaging.
Detailed Methodologies
Pre-implantation Embryo Isolation and Fixation Protocol
Materials:
- C57BL/6J mice (females: 6 weeks-6 months; males: 2-12 months) [25]
- 4% Paraformaldehyde (PFA) in PBS
- 10× PBS (1.37 M NaCl, 26.8 mM KCl, 97.75 mM Na₂HPO₄·2H₂O, 17.6 mM KH₂PO₄, pH 7.4) [25]
- Permeabilization buffer (0.25% Triton X-100 in PBS)
- Blocking solution (10% goat serum, 0.1% Triton X-100 in PBS) [25]
Protocol Steps:
Timed Mating Setup:
Embryo Collection:
Fixation Procedure:
Permeabilization and Blocking:
Post-implantation Embryo Dissection and Processing
Materials:
- Mammalian embryo dissection medium (DMEM/F-12, 10% FBS, 10 mM penicillin-streptomycin) [26]
- Mammalian embryo culture medium (DMEM/F-12 with 50% heat-inactivated rat serum) [26]
- 4% PFA in PBS
- Proteinase K (concentration titrated by stage: 10 µg/mL for initial testing) [28]
Protocol Steps:
Embryo Dissection:
- Euthanize pregnant mouse according to institutional guidelines
- Make V-shaped incision into abdominal cavity
- Remove uterine horns and place in warmed mammalian embryo dissection medium [26]
- Separate uterus into individual embryo segments using small scissors [26]
- Gently peel away uterine muscle and remove embryos surrounded by decidua [26]
- Remove Reichert's membrane and trophoblast layer using Dumont #5 watchmaker's forceps [26]
- Leave extraembryonic tissues intact until 9.5 dpc; ectoplacental cone typically remains attached [26]
Embryo Immobilization for Imaging:
- Use one of the following techniques to prevent drift during imaging:
- Orient embryos using suction-holding pipette attached to micromanipulator
- Tie human hair or platinum wire around ectoplacental cone to "prop" embryo
- Use wire hook anchored in wax or agarose around ectoplacental cone
- Allow small decidua piece to remain attached to weigh down embryo [26]
- CRITICAL: For yolk sac studies (8.5-9.5 dpc), keep yolk sac intact with ectoplacental cone attached [26]
- Use one of the following techniques to prevent drift during imaging:
Fixation and Permeabilization:
- Fix in 4% PFA for 1-4 hours depending on embryo size (see Table 1)
- For post-implantation embryos, use Proteinase K treatment (10 µg/mL in PBS-T) to enhance permeability [28]
- Proteinase K treatment must be optimized for each embryonic stage and tissue type [28]
- Re-fix in 4% PFA for 10 minutes after Proteinase K treatment [28]
The Scientist's Toolkit: Essential Research Reagents
Table 3: Key Research Reagent Solutions for Embryo Fixation and Processing
| Reagent/Category | Specific Examples | Function | Application Notes |
|---|---|---|---|
| Fixatives | 4% Paraformaldehyde (PFA) | Protein cross-linking, structural preservation | Freshly prepared or freshly thawed; prevents antigen masking |
| Permeabilization Agents | 0.25% Triton X-100, Proteinase K | Membrane permeabilization for antibody access | Triton X-100 for pre-implantation; Proteinase K for post-implantation |
| Blocking Solutions | 10% Goat Serum, 1% BSA | Reduce non-specific antibody binding | Prepare in PBS with 0.1% Triton X-100 |
| Culture Media | DMEM/F-12 with rat serum | Ex vivo embryo development and maintenance | 50% rat serum for 5.5-7.5 dpc embryos [26] |
| Detection Systems | Alexa Fluor-conjugated secondaries | Signal amplification and detection | Use cross-adsorbed secondary antibodies for multiplexing [25] |
| Mounting Media | ProLong Gold Antifade with DAPI | Preservation of fluorescence, nuclear counterstaining | Includes DAPI for nuclear visualization [25] |
| Hexaethylene glycol phosphoramidite | Hexaethylene glycol phosphoramidite, MF:C42H61N2O10P, MW:784.9 g/mol | Chemical Reagent | Bench Chemicals |
| Smcy HY Peptide (738-746) | Smcy HY Peptide (738-746), MF:C48H82N18O14S, MW:1167.3 g/mol | Chemical Reagent | Bench Chemicals |
Immunofluorescence and Imaging
Diagram 2: Immunofluorescence staining workflow with critical optimization points.
Imaging Considerations:
- For pre-implantation embryos: Use confocal microscopy with high-NA objectives [25]
- For post-implantation embryos: May require light sheet microscopy or ultrasound for deeper structures [29]
- Embryo immobilization is critical for high-resolution time-lapse imaging [26]
- Maximum penetration depth for confocal microscopy in embryonic specimens is approximately 200 µm [29]
Troubleshooting and Quality Control
Common Issues and Solutions:
Poor Antibody Penetration:
High Background Staining:
- Increase blocking serum concentration to 10%
- Include 1% BSA in blocking solution [27]
- Increase wash stringency (more changes, longer duration)
Developmental Arrest in Culture:
This standardized protocol provides a foundation for reproducible fixation and processing of mouse embryos across pre- to post-implantation stages, enabling high-quality whole mount immunofluorescence studies essential for developmental biology research and drug discovery applications.
Within the framework of fixation methods for whole-mount embryo immunofluorescence research, the initial preparation of zebrafish embryos is a critical determinant of success. The embryo's natural barriers—the chorion and the limited permeability of the embryonic tissue itself—can significantly impede the uniform penetration of fixatives, antibodies, and other reagents, leading to high background staining, non-specific signal, and ultimately, unreliable data. This application note details standardized protocols for dechorionation and permeabilization, two essential preparatory steps that ensure high-quality, reproducible staining for confocal microscopy and other high-resolution imaging techniques [30] [31]. Optimizing these steps is particularly crucial for visualizing intricate internal structures, such as the vascular network or the nervous system, and for ensuring the accurate assessment of nanomaterial toxicity [30] [31].
The Imperative for Dechorionation
The chorion is an acellular envelope, approximately 1.5–2.5 µm thick, that surrounds the zebrafish embryo. It is perforated by pore canals with diameters of 0.5–0.7 µm, which function as a selective size-exclusion barrier [31]. While protective, the chorion can confound research in two primary ways:
- Barrier to Macromolecules and Nanomaterials: The chorion can adsorb or physically block the passage of immunostaining reagents, including large antibodies, and particularly nanomaterials (NMs), leading to false negatives in toxicity assays and inconsistent staining [31].
- Inhibition of Hatching: Certain chemicals can inhibit the hatching process, causing secondary phenotypic malformations that are not a direct toxic response but an artifact of confinement within the chorion [32].
The International Specification Organization has acknowledged these limitations by publishing a standardized test method (ISO/TS 22082:2020) specifically for evaluating nanotoxicity using dechorionated zebrafish embryos, underscoring the importance of this procedure for reproducible science [31].
Quantitative Impact of Dechorionation
The table below summarizes key experimental findings that highlight the physiological and toxicological impact of the dechorionation process.
Table 1: Physiological and Toxicological Impact of Dechorionation
| Assessment Parameter | Findings in Dechorionated Embryos | Significance/Implication |
|---|---|---|
| Mortality Rate (by 24 hpf) | ~2% mortality from automated pronase treatment [32] | Demonstrates that dechorionation can be performed with high survival rates. |
| Malformation Rate (by 120 hpf) | ~2% malformation from automated pronase treatment [32] | Confirms long-term viability post-dechorionation. |
| Nanomaterial Toxicity | LCâ‚…â‚€ values for several NMs (e.g., Ag, ZnO) were lower in dechorionated embryos [31] | Reveals greater sensitivity and eliminates the chorion as a confounding variable in toxicology. |
| Nanoparticle Permeability | Si content (from SiOâ‚‚NPs) was higher in the chorion than in the embryonic body [31] | Directly evidences the chorion as a significant barrier to NM uptake. |
Established Protocols for Dechorionation
Manual Dechorionation with Pronase
This method is ideal for processing a moderate number of embryos and is widely used for immunofluorescence preparations [30] [33].
Materials and Reagents:
- Pronase from Streptomyces griseus, prepared as a 2.5 - 50 mg/mL solution in E3 embryo medium [33] [32].
- Agarose-coated Petri dishes (to prevent embryo adhesion).
- E3 embryo medium.
- 0.05% bleach solution in E3 for decontamination.
Procedure:
- Decontaminate: Collect embryos at the desired stage (e.g., ~3.3 hours post-fertilization, hpf) and incubate in 0.05% bleach solution for 2 minutes. Wash three times with E3 medium [33].
- Digest Chorion: Transfer embryos to an agarose-coated dish and incubate in pronase solution (2.5 mg/mL) at 28.5°C for 5-6.5 minutes [33] [32].
- Rinse and Release: Gently flush away the pronase with fresh E3 medium. Agitation or gentle pipetting can help dislodge the partially digested chorions.
- Incubate and Verify: Incubate embryos for 20 minutes at 28°C, followed by a final agitation and rinse to remove any remaining chorions. Confirm dechorionation under a dissecting microscope [32].
Automated High-Throughput Dechorionation
For large-scale chemical screens or toxicological assessments, automated systems offer unparalleled efficiency and consistency [32].
Key Components:
- Custom Dechorionator: A modified shaker system (e.g., Belly Dancer) with a plate holding multiple glass Petri dishes, integrated water delivery nozzles, and a drain port [32].
- Machine Vision-Guided Robotics: For subsequent selection and placement of dechorionated embryos into multi-well plates.
Automated Workflow:
- Load: Distribute approximately 400-500 embryos into each glass dish containing pronase solution.
- Digest and Agitate: The platform agitates the embryos in pronase for 6.5 minutes to hydrolyze the chorion.
- Rinse: A pump gently overflows the dishes with fish water for 10 minutes, with programmed agitation cycles to dislodge chorions.
- Final Incubation and Allocation: After a 20-minute incubation, a final agitation and rinse clears the chorions. Embryos are then robotically allocated to well plates [32].
Permeabilization Strategies for Fixed Embryos
Following fixation and dechorionation, permeabilization is essential for enabling antibody penetration into the embryonic tissue.
Proteinase K Treatment for Fixed Embryos
This step is critical for whole-mount immunofluorescence and in situ hybridization protocols to allow macromolecular probes access to internal epitopes and mRNA.
Materials and Reagents:
- Proteinase K (e.g., 10 µg/mL in PBST)
- Phosphate-Buffered Saline with Tween (PBST)
- 4% Paraformaldehyde (PFA) in PBS for post-fixation
Procedure:
- Fix and Rehydrate: Fix embryos overnight in 4% PFA at 4°C. After washing in PBST, dehydrate through a methanol series (25%, 50%, 100%) and store at -20°C for at least 30 minutes. Rehydrate through a descending methanol series back to PBST [34].
- Digest: Incubate embryos in Proteinase K solution (10 µg/mL in PBST) at room temperature. The duration is stage-dependent and must be optimized:
- Post-Fix: Terminate digestion by rinsing in PBST and re-fix in 4% PFA for 20 minutes to maintain tissue integrity [34].
- Wash: Rinse twice in PBST before proceeding with immunofluorescence staining.
The Scientist's Toolkit: Essential Research Reagents
Table 2: Key Reagents for Zebrafish Embryo Dechorionation and Permeabilization
| Reagent / Solution | Function / Purpose | Key Considerations |
|---|---|---|
| Pronase | Proteolytic enzyme for enzymatic degradation and removal of the chorion. | Concentration and incubation time must be optimized to minimize embryo mortality [31] [32]. |
| Proteinase K | Serine protease for permeabilizing the fixed embryonic tissue after dechorionation. | Digestion time is critically dependent on embryo stage; over-digestion can damage tissue morphology [34]. |
| Paraformaldehyde (PFA) | Cross-linking fixative for preserving tissue architecture and antigenicity prior to permeabilization and staining. | Standard concentration is 4% in PBS; fixation time varies with embryo size [34]. |
| Methanol | Organic solvent used for dehydration, long-term storage, and permeabilization of embryonic membranes. | A step-wise series (e.g., 25%, 50%, 100%) prevents shocking the embryos. Storage at -20°C enhances permeability [34]. |
| Leibowitz's L-15 Medium | Base component for zebrafish embryonic stem cell (zESC) medium, used in blastomere culture post-dechorionation. | Often supplemented with other media and factors (e.g., B27, N2) to maintain pluripotency or direct differentiation [33]. |
| (R,S,S,R,S)-Boc-Dap-NE | (R,S,S,R,S)-Boc-Dap-NE, MF:C23H36N2O5, MW:420.5 g/mol | Chemical Reagent |
| PROTAC BCR-ABL Degrader-1 | PROTAC BCR-ABL Degrader-1|Bcr-Abl Degrader (RUO) | PROTAC BCR-ABL Degrader-1 induces ubiquitin-proteasome-dependent Bcr-Abl degradation. For research use only. Not for human use. |
Visualizing the Workflow
The following diagram illustrates the integrated experimental workflow for preparing zebrafish embryos for whole-mount immunofluorescence, from dechorionation to imaging.
Diagram 1: Embryo preparation workflow for immunofluorescence.
Meticulous dechorionation and permeabilization are not merely preliminary steps but are foundational to the integrity of whole-mount immunofluorescence research in zebrafish. The protocols outlined here, supported by quantitative data and standardized methods, provide researchers with a clear pathway to overcome the technical challenges posed by the embryo's natural barriers. By adopting these refined preparatory techniques, scientists can ensure superior reagent penetration, minimize artifacts, and achieve the level of reproducibility required for robust scientific discovery in developmental biology, toxicology, and drug development.
Integrating Fixation with Permeabilization and Blocking Steps
In whole mount embryo immunofluorescence research, the integration of fixation, permeabilization, and blocking represents a critical methodological sequence that fundamentally determines experimental success. These steps work in concert to preserve delicate embryonic structures in their three-dimensional context while enabling specific antibody access to intracellular targets. Unlike section-based techniques, whole mount immunofluorescence presents unique challenges for reagent penetration throughout intact tissues, making the optimization and seamless integration of these preliminary steps paramount for achieving high-quality, reproducible spatial data of protein localization during development.
Quantitative Comparison of Fixation Methods
The choice of fixation method significantly impacts tissue morphology, epitope preservation, and ultimate antibody performance in embryonic samples. The following table summarizes key characteristics of common fixatives used in whole mount protocols.
Table 1: Comparison of Fixation Methods for Whole Mount Embryo Immunofluorescence
| Fixative | Concentration | Incubation Time | Mechanism of Action | Best For | Limitations |
|---|---|---|---|---|---|
| Paraformaldehyde (PFA) | 4% in PBS | 15 min at RT to overnight at 4°C [35] [36] [16] | Protein cross-linking | Most targets; preserves ultrastructure [6] | May mask some epitopes; requires permeabilization [20] [16] |
| Methanol | 95-100% (chilled) | 5-10 min at -20°C [36] | Protein precipitation/dehydration | Some cytoskeletal proteins, transcription factors [6] | Poor for soluble targets; may disrupt membrane integrity [6] |
| Trichloroacetic Acid (TCA) | Not specified | Not specified | Protein precipitation | Revealing inaccessible protein domains [20] | Alters nuclear morphology; less common [20] |
Recent comparative studies in chick embryos demonstrate that TCA fixation resulted in larger and more circular nuclei compared to PFA fixation, while also altering the appearance of subcellular localization and fluorescence intensity of various proteins, including transcription factors and cytoskeletal proteins [20]. Notably, TCA fixation can reveal protein localization domains that may be inaccessible with PFA fixation alone [20].
Integrated Protocol for Whole Mount Embryo Processing
Stage 1: Sample Preparation and Fixation
Materials Required:
- Live embryos (chicken up to 6 days; mouse up to 12 days recommended) [16]
- Phosphate-buffered saline (PBS)
- 4% Paraformaldehyde (PFA) in PBS [35] [16]
- Alternatively: 95-100% methanol chilled to -20°C [36]
Procedure:
- For zebrafish embryos: Perform dechorionation manually using fine forceps or enzymatically using pronase (1-2 mg/mL for 5-10 minutes at room temperature) [16].
- Fixation with PFA: Incubate embryos in 4% PFA for 30 minutes at room temperature or overnight at 4°C for optimal preservation [16]. The extended time is crucial for whole mount samples to allow fixative penetration to the center of the tissue.
- Fixation with Methanol: As an alternative, incubate embryos in chilled methanol for 5-10 minutes at -20°C [36]. This approach simultaneously fixes and permeabilizes samples.
- Washing: Remove fixative and wash 3 times with PBS, using volumes sufficient to cover the embryos [35]. For large embryos, extend washing times to ensure complete fixative removal.
- Storage: Fixed samples can be stored in PBS at 4°C for several days or in methanol at -20°C for longer periods [35] [36].
Stage 2: Permeabilization
Materials Required:
Procedure:
- Solution Preparation: Prepare permeabilization solution with 0.1-0.5% Triton X-100 in PBS [35] [36]. For delicate membrane antigens, consider milder detergents like saponin (0.2-0.5%) [36].
- Incubation: Immerse fixed embryos in permeabilization solution for 15 minutes to several hours at room temperature [35]. Larger or denser embryos require extended incubation times.
- Washing: Remove permeabilization solution and wash 3 times with PBS [35].
- Note: Methanol-fixed samples typically do not require additional permeabilization [36].
Stage 3: Blocking
Materials Required:
- Bovine Serum Albumin (BSA) [35] [37]
- Normal serum from secondary antibody host species [36]
- PBS
- Optional: Glycine [36]
Procedure:
- Solution Preparation: Prepare blocking buffer with 3% BSA in PBS [35]. Alternatively, use 2-10% normal serum from the species in which the secondary antibody was raised [36].
- Optional: Include 0.1 M glycine to quench autofluorescence from residual aldehydes [36].
- Blocking: Incubate embryos in blocking buffer for at least 60 minutes at room temperature, or up to overnight for better penetration [35].
- Proceed directly to antibody incubation without additional washing [36].
Experimental Workflow Integration
The following diagram illustrates the integrated workflow for processing whole mount embryos, highlighting critical decision points:
Method Selection Decision Pathway
The appropriate integration of fixation with permeabilization depends on multiple experimental factors, as outlined in the following decision pathway:
Research Reagent Solutions
Table 2: Essential Reagents for Integrated Fixation-Permeabilization-Blocking Protocols
| Reagent | Function | Recommended Concentration | Key Considerations |
|---|---|---|---|
| Paraformaldehyde (PFA) | Crosslinking fixative; preserves cellular structure | 4% in PBS [35] [16] | Standard for most targets; requires permeabilization |
| Methanol | Precipitating fixative; simultaneously fixes and permeabilizes | 95-100% chilled [36] | Ideal for alcohol-resistant epitopes |
| Triton X-100 | Detergent for permeabilization after crosslinking fixation | 0.1-0.5% in PBS [35] [36] | Creates pores in membranes; may extract some proteins |
| Saponin | Mild detergent for membrane cholesterol extraction | 0.2-0.5% in PBS [36] | Better for membrane-associated antigens; reversible |
| Bovine Serum Albumin (BSA) | Blocking agent; reduces nonspecific binding | 3% in PBS [35] [37] | General purpose; compatible with most antibodies |
| Normal Serum | Species-specific blocking agent | 2-10% in PBS [36] | Use serum from secondary antibody host species |
| Glycine | Quenching agent for aldehyde groups | 0.1 M in PBS [36] | Reduces background from residual fixative |
Advanced Integration Strategies for Multiplexed Experiments
When designing multiplexed immunofluorescence experiments targeting multiple antigens with different optimal processing conditions, researchers must implement strategic integration approaches:
Protocol Prioritization: When antibodies require different fixation methods, prioritize conditions for the most critical target or the antibody with the most restrictive requirements [6].
Sequential Staining: For challenging combinations, consider sequential staining with intermediate fixation steps to preserve antibody-antigen complexes while applying different processing conditions.
Validation Imperative: Always perform small-scale test runs comparing different protocol combinations before scaling up experiments [6]. Document optimal conditions for each antibody-epitope combination systematically.
Epitope Accessibility Mapping: For complex whole mount samples, create epitope accessibility profiles documenting optimal fixation-permeabilization combinations for each target of interest, noting that TCA fixation may reveal protein domains inaccessible with PFA fixation [20].
Troubleshooting Integrated Protocols
Successful integration of fixation with permeabilization and blocking requires attention to these common challenges:
- Poor Antibody Penetration: Increase permeabilization time or detergent concentration; consider combining detergents or using methanol fixation.
- High Background: Extend blocking time; include glycine quenching; optimize serum concentration; ensure proper washing between steps.
- Weak Specific Signal: Try alternative fixation methods; avoid over-fixation that may mask epitopes [36].
- Morphological Artifacts: Compare PFA versus TCA fixation effects on tissue structure [20]; optimize fixation time for specific embryonic stage.
The integrated approach to fixation, permeabilization, and blocking outlined in these application notes provides a structured methodology for optimizing whole mount embryo immunofluorescence. By understanding the quantitative relationships between these steps and their impact on epitope accessibility, researchers can systematically overcome the unique challenges of three-dimensional tissue imaging and generate reliable, high-quality data for developmental biology research.
Within the field of developmental biology, understanding the precise spatial relationship between gene expression and protein localization is fundamental to deciphering the complex processes of embryogenesis. For researchers employing whole mount embryo models, this often necessitates techniques that can visualize both nucleic acids and proteins within their native spatial context. Sequential staining, which combines RNA in situ hybridization (RNA-ISH) with immunofluorescence (IF), provides a powerful solution for the simultaneous detection of RNA transcripts and protein antigens in a single specimen. The integrity of this multi-omics approach is critically dependent on the initial fixation method, which must preserve tissue morphology while maintaining the antigenicity of proteins and the detectability of RNA sequences. This application note details optimized protocols for sequential RNA-ISH and IF, framed within the broader context of fixation methods for whole mount embryo research, to enable robust and reproducible spatial profiling for scientists and drug development professionals.
The Impact of Fixation on Multi-Omic Assays
The choice of fixation protocol is a critical first step that profoundly influences the outcome of any subsequent in situ analysis. An ideal fixative preserves the native architecture of the embryo and stabilizes the molecular targets—both RNA and protein—without introducing masking or degradation that would compromise detection.
Comparative Analysis of Common Fixatives
The table below summarizes the effects of two common fixatives on key experimental parameters, based on recent findings in chick embryos [20].
Table 1: Impact of Fixation Methods on Whole Mount Embryo Samples
| Parameter | Paraformaldehyde (PFA) | Trichloroacetic Acid (TCA) |
|---|---|---|
| Nuclear Morphology | Standard morphology | Larger, more circular nuclei |
| Protein Localization | Standard visualization | Can reveal otherwise inaccessible protein domains |
| Fluorescence Intensity | Standard intensity | Altered (can be enhanced for specific targets) |
| Impact on RNA | Good preservation with optimized protocols [38] | Requires empirical validation |
| Primary Consideration | Widely adopted benchmark | Epitope-dependent; requires validation |
Key Takeaways for Experimental Design
- PFA Fixation: Remains the most common and reliable method for a wide range of targets. It provides consistent results for both IF and RNA-ISH when paired with appropriate antigen retrieval methods [38].
- TCA Fixation: Serves as a powerful alternative for challenging epitopes. Its ability to alter the appearance of subcellular localization and reveal novel protein domains makes it invaluable for specific research questions, particularly when standard PFA fixation fails [20].
- Validation is Essential: The choice of fixative must be empirically validated for each target RNA and protein pair. The fixation method should be optimized based on the specific model system and the primary molecular targets of interest [20].
Integrated Sequential Staining Protocol: RNA-ISH with Sequential Immunofluorescence
This protocol describes a sequential approach, performing RNA-ISH first followed by a multi-round sequential IF (seqIF) for protein detection. This order helps prevent potential degradation of RNA targets during the often-harsh antibody elution steps. The workflow is adapted from automated platforms for manual use in whole mount embryos [39].
The diagram below illustrates the complete sequential staining process.
Detailed Protocol Steps
Part A: Tissue Preparation and Fixation
- Dissection and Fixation: Harvest chick or mouse embryos following institutional ethical guidelines. Immediately immerse embryos in a sufficient volume of ice-cold 4% PFA in PBS (for standard fixation) or an appropriate TCA solution (e.g., for transcription factor targets) [20]. Fixate for the duration empirically determined for the embryo size (e.g., 4-24 hours at 4°C).
- Dehydration and Storage: Following fixation, wash embryos thoroughly in PBS. Dehydrate through a graded series of methanol (e.g., 25%, 50%, 75% in PBS, then 100% methanol) and store at -20°C in 100% methanol for long-term preservation.
Part B: RNAIn SituHybridization
This phase involves hybridizing labeled oligonucleotide probes to the target RNA sequence [38].
- Rehydration and Permeabilization: Rehydrate embryos through a descending methanol series to PBS. Treat with Proteinase K (e.g., 10 µg/mL for 5-20 minutes) to permeabilize tissues and expose target RNAs. The concentration and time must be optimized for embryo stage and size.
- Pre-hybridization and Hybridization: Pre-incubate embryos in prehybridization buffer (containing 4x SSC and 3% BSA) for 1 hour at the hybridization temperature. Replace with hybridization buffer (containing 4x SSC, 10% dextran sulfate, 10% deionized formamide) with 250 nM of each target-specific, fluorescently-labeled probe (e.g., Alexa Fluor 633-conjugated). Incubate overnight in a humidified chamber.
- Post-Hybridization Washes: The next day, perform stringent washes to remove non-specifically bound probe. Washes typically include 4x SSC, 2x SSC, 1x SSC, and 0.1x SSC, sometimes with formamide, at or above the hybridization temperature.
Table 2: Hybridization Buffer Components and Functions [38]
| Component | Final Concentration | Function |
|---|---|---|
| Saline-Sodium Citrate (SSC) | 4X | Provides ionic strength and pH for specific hybridization |
| Dextran Sulfate | 10% | Crowding agent that increases effective probe concentration |
| Deionized Formamide | 10% | Denaturing agent that lowers melting temperature, allowing hybridization at lower temperatures to preserve morphology |
| Fluorescently-Labeled Probe | 250 nM | Target-specific oligonucleotide for RNA detection |
Part C: Sequential Immunofluorescence (SeqIF)
After RNA-ISH, the sample undergoes multiple rounds of staining for protein detection [40] [39].
- Blocking: Incubate embryos in a blocking buffer (e.g., 1% BSA and 0.1% Tween-20 in 1x PBS) for 2-4 hours to minimize non-specific antibody binding.
- Staining Cycles: For each protein target, perform the following cycle:
- Primary Antibody Incubation: Incubate with the primary antibody diluted in blocking buffer. This can be done overnight at 4°C or for 2-4 hours at room temperature.
- Imaging: For whole mount embryos, acquire images using a confocal or light-sheet microscope at this stage if the platform allows in-situ imaging. Otherwise, proceed to the next step.
- Antibody Elution: Gently strip off the primary and secondary antibodies using an elution buffer. Effective elution methods include a low-pH glycine buffer, a chaotropic salt solution (e.g., 6M guanidine hydrochloride), or a solution containing a reducing agent and detergent (e.g., 2-mercaptoethanol/SDS) [41]. This step is critical for removing antibodies without damaging the tissue or the fluorescent RNA signal.
- Final Imaging and Analysis: After the final staining cycle, perform a final comprehensive image acquisition. Use image analysis software to register and align all images from the different cycles, creating a single, multi-channel file for co-localization analysis.
The Scientist's Toolkit: Essential Reagents and Materials
Successful implementation of this integrated protocol requires careful preparation of key reagents.
Table 3: Essential Research Reagent Solutions
| Item | Specification / Example | Critical Function |
|---|---|---|
| Fixative | 4% Paraformaldehyde (PFA) in PBS; or Trichloroacetic Acid (TCA) | Preserves tissue morphology and immobilizes target molecules |
| Riboprobes | Alexa Fluor 633-labeled DNA oligonucleotides, 250 nM working solution [38] | Hybridizes to target RNA sequences for detection |
| Primary Antibodies | Anti-NeuN (neurons), Anti-Iba1 (microglia), Anti-GFAP (astrocytes) [38] | Binds specifically to target protein epitopes |
| Secondary Antibodies | Alexa Fluor 488-conjugated, highly cross-adsorbed [39] | Binds to primary antibody, carries fluorophore for detection |
| Hybridization Buffer | 4x SSC, 10% dextran sulfate, 10% deionized formamide [38] | Creates optimal chemical environment for specific RNA-probe binding |
| Antibody Elution Buffer | Low-pH glycine or chaotropic salt solution [41] [40] | Removes antibody complexes between staining rounds for multiplexing |
| Mounting Medium | Medium with DAPI | Preserves sample and provides nuclear counterstain |
| Ingenol-5,20-acetonide-3-O-angelate | Ingenol-5,20-acetonide-3-O-angelate, MF:C28H38O6, MW:470.6 g/mol | Chemical Reagent |
| Dimethylamino-PEG2-C2-NH2 | Dimethylamino-PEG2-C2-NH2, MF:C8H20N2O2, MW:176.26 g/mol | Chemical Reagent |
Troubleshooting and Critical Steps for Success
- RNase Contamination: This is the primary concern for RNA-ISH. Always wear gloves, use RNase-free reagents and consumables, and clean surfaces with RNase decontamination solutions [39].
- Fixation and Antigen Retrieval Balance: Over-fixation can mask epitopes and RNA targets, while under-fixation leads to poor morphology. If signal is weak, optimize the antigen retrieval step (e.g., by testing heat-induced retrieval with sodium citrate buffer or adjusting Proteinase K concentration) [38].
- Antibody Elution Efficiency: Incomplete elution leads to crosstalk and false-positive signals in subsequent cycles. After elution, perform a control imaging step to confirm the fluorescent signal has been removed before applying the next antibody [40].
- Image Registration: Accurate alignment of images from multiple cycles is paramount. Using an automated platform with integrated imaging simplifies this. For manual processes, include fiducial markers or use software with advanced registration algorithms to align images perfectly [40] [39].
Understanding complex three-dimensional (3D) relationships in biological tissues is crucial for elucidating how tissues are organized and interact within a broader biological system. A method that images the 3D volume without physical sectioning of the tissue can avoid technical challenges and preserve the tissue for multiple imaging sessions. To achieve this, it is essential to address the nascent opacity of biological tissues, which is due to lipids and proteins that scatter light, limiting imaging depth. Optical clearing is a tissue processing technique that enables high-resolution imaging deep in thick tissue by reducing scattering. This application note details optimized workflows correlating fixation with tissue clearing and light-sheet imaging for whole-mount embryo immunofluorescence research, providing a definitive guide for researchers aiming to achieve high-quality, quantifiable 3D data at single-cell resolution.
The Critical Role of Fixation in Whole-Mount 3D Imaging
The choice of fixative is a critical first step that profoundly impacts the success of subsequent clearing, staining, and imaging procedures. Fixation preserves tissue architecture and prevents degradation, but the chemical agent used can significantly alter the detectability of specific antigen epitopes.
Comparative Analysis of Fixative Solutions
Research directly comparing fixative solutions for whole-tissue immunofluorescence demonstrates that the choice of fixative is antigen-dependent. As shown in Table 1, while 4% Paraformaldehyde (PFA) is a common general-purpose fixative, it can yield suboptimal results for certain targets, such as phosphorylated proteins [42].
Table 1: Impact of Fixative Choice on Immunofluorescence Signal Quality
| Fixative Solution | Concentration | Best For | Limitations | Example: pMLC Immunofluorescence |
|---|---|---|---|---|
| Paraformaldehyde (PFA) | 4% | General structural proteins (e.g., F-actin, E-cadherin) [42]. | Can cross-link and mask some epitopes; may result in blurred signals for specific targets [42]. | Blurred images with poor subcellular resolution [42]. |
| Trichloroacetic Acid (TCA) | 2% | Acid-labile epitopes (e.g., phosphorylated Myosin Light Chain) [42]. | May not be suitable for all tissue types or antigens; requires optimization [42]. | Detailed spatial information at single-cell resolution; clear apical junction localization [42]. |
Protocol: Tissue Fixation for Whole-Mount 3D Imaging
The following protocol is optimized for murine tissues but can be adapted for other model organisms [43].
Dissection and Initial Handling:
- Euthanize the animal according to institutional animal care guidelines.
- Dissect the desired tissue or organ (e.g., ovary, embryo) in a semi-sterile environment using fine forceps and micro-dissection scissors. Minimize tissue stress and processing time.
- Immediately place the dissected tissue into a culture medium or a physiological buffer like 1x Phosphate-Buffered Saline (PBS) on ice.
Fixation:
- Transfer the tissue to a freshly prepared fixative solution.
- For 4% PFA: Fix the tissue by covering it with the solution. Seal the container to prevent evaporation and place it at 4°C overnight [43].
- For 2% TCA: Immerse the tissue in TCA solution. The optimal fixation time and temperature should be determined empirically for each tissue type and target antigen [42].
- Note on Over-fixation: Over-fixation with PFA can reduce fluorescence in situ hybridization (FISH) signals. Researchers can either reduce the fixation time or apply a protease treatment to free up cross-linked molecules [44].
Post-Fixation Rinsing and Storage:
- After fixation, rinse the tissue 3 times with 1x PBS or 70% ethanol.
- Tissues can be stored short-term in 70% ethanol or PBS with 0.2% sodium azide (NaN3) at 4°C. Note that 70% ethanol may reduce the signal of endogenously expressed fluorescent proteins [43].
Matching Clearing Methods to Research Objectives
Optical clearing techniques enhance tissue transparency by reducing light scattering, enabling deep-tissue imaging. These methods can be broadly categorized by their mechanism and compatibility with biomolecules.
Classification and Selection of Clearing Methods
Table 2: Comparison of Hydrophilic and Hydrophobic Tissue Clearing Methods
| Characteristic | Hydrophilic (Aqueous) Methods | Hydrophobic (Organic Solvent) Methods |
|---|---|---|
| Mechanism | Refractive Index (RI) matching with aqueous solutions [44]. | RI matching with organic solvents; often involves lipid removal [44]. |
| Representative Protocols | LIMPID [44], ScaleS [43]. | iDISCO/3DISCO [45], BABB [42]. |
| Tissue Integrity | Preserves most lipids; minimal tissue swelling/shrinking [44]. | Can cause tissue shrinkage [44]; may quench endogenous fluorescent proteins [42]. |
| Compatibility | Compatible with antibodies, FISH probes, and lipophilic dyes [44]. | Not compatible with some antibodies; removes lipids, making it incompatible with lipophilic dyes [44]. |
| Speed & Toxicity | Mild, less toxic chemicals; can be slower [44]. | Often faster; solutions can be toxic, posing handling challenges [44]. |
Protocol: Single-Step Optical Clearing with LIMPID
The LIMPID (Lipid-preserving refractive index matching for prolonged imaging depth) method is a simple aqueous protocol that can quickly clear large tissue in a single step [44].
- Preparation: Ensure the tissue is fixed and thoroughly rinsed of any previous buffers or stains.
- Clearing Solution: Prepare the LIMPID solution, which consists of saline-sodium citrate, urea, and iohexol. The refractive index of the solution can be fine-tuned by adjusting the percentage of iohexol to match that of your objective lens (e.g., 1.515 for a high-NA oil immersion lens) [44].
- Clearing Process: Immerse the tissue in the LIMPID solution. The clearing relies on passive diffusion into the tissue.
- Mounting: Once the tissue is transparent, mount it in the same LIMPID solution for imaging. For prolonged storage, seal the sample to prevent evaporation and store at 4°C. It is recommended to image the stained tissue within a week of amplification to preserve signal integrity [44].
Integrated Workflow from Fixation to 3D Quantification
A successful 3D imaging experiment integrates fixation, staining, clearing, and imaging into a seamless workflow. The following diagram and protocol outline this integrated process.
Diagram 1: Integrated workflow for whole-tissue 3D visualization and analysis.
Whole-Mount Staining and Imaging Protocol
Permeabilization and Blocking:
- After fixation and rinsing, place the fixed tissue in 1x PBS at room temperature for a minimum of 4 hours.
- Prepare a permeabilization and blocking solution (e.g., containing a detergent like Triton X-100 and a protein like Bovine Serum Albumin).
- Incubate the tissue in this solution for a duration optimized for the tissue size to allow for antibody penetration and reduce non-specific binding [43].
Immunostaining and FISH:
- Incubate the tissue with primary antibodies diluted in an appropriate buffer.
- Follow with extensive washing and incubation with fluorescently conjugated secondary antibodies.
- For multiplexed RNA and protein imaging, combine with Fluorescence In Situ Hybridization (FISH). Custom FISH probes, such as those for Hybridization Chain Reaction (HCR), can be designed for less common animal models. HCR's linear amplification scheme allows for quantifiable RNA data [44].
Optical Clearing: Proceed with the chosen clearing protocol (e.g., LIMPID as described in Section 2.2).
3D Imaging and Quantification:
- Image the cleared sample using light-sheet, confocal, or even conventional fluorescence microscopy. For high-resolution subcellular imaging, match the refractive index of the clearing solution to that of the objective lens [44].
- Acquire z-stacks throughout the entire tissue volume.
- Use 3D digital image processing software (e.g., FIJI-ImageJ) for quantification. This enables objective quantitative data for whole-tissue analysis, such as counting mitotic cells or quantifying fluorescence intensity distribution in 3D space [42].
The Scientist's Toolkit: Essential Reagents and Materials
Table 3: Key Research Reagent Solutions for 3D Whole-Mount Imaging
| Reagent/Material | Function | Example Use Case |
|---|---|---|
| Iohexol | A key component in aqueous clearing solutions (e.g., LIMPID) to adjust the refractive index for optimal transparency and minimal optical aberration [44]. | Tuning the RI of the LIMPID solution to 1.515 to match a high-NA oil immersion objective [44]. |
| Hybridization Chain Reaction (HCR) FISH Probes | Fluorescent oligonucleotide probes for sensitive, specific, and quantifiable RNA detection in thick tissues. Enable single-molecule RNA imaging [44]. | Mapping the subcellular distribution of individual mRNA molecules in a 250 μm thick adult mouse brain slice [44]. |
| Urea-Sorbitol Solution | A hydrophilic clearing agent used in protocols like ScaleS, compatible with immunostaining and relatively fast-acting [43]. | Clearing cultured mouse ovaries for whole-mount follicle quantification via confocal microscopy [43]. |
| Paraformaldehyde (PFA) | A cross-linking fixative that stabilizes protein structure and tissue architecture. The most common fixative for immunofluorescence studies [43] [42]. | General preservation of tissue morphology and antigen structure for whole-mount staining of embryonic murine organs [42]. |
| Cell Culture Inserts | A physical support for culturing and processing delicate whole-mount tissues, preventing damage or loss during fluid changes and extended protocols [43]. | Maintaining the structural integrity of cultured mouse ovaries during fixation, staining, and clearing steps without displacing the organ [43]. |
The correlation between fixation, clearing, and imaging is the cornerstone of robust and reproducible 3D whole-tissue analysis. As demonstrated, the fixation method must be carefully selected based on the target biomolecule, as it directly impacts epitope preservation. The clearing technique should then be matched to the research question, weighing the need for lipid preservation, speed, and compatibility with specific labels like antibodies and FISH probes. By following the detailed protocols and workflows outlined in this application note, researchers can systematically overcome the technical bottlenecks associated with 3D imaging, thereby accelerating the understanding of morphogenesis and gene expression patterns at single-cell resolution within an intact tissue context.
Solving Common Fixation Problems: A Troubleshooting Guide for Artifacts and Poor Signal
In whole mount embryo immunofluorescence (IF) research, the integrity of the final visual data is fundamentally dependent on the initial sample preparation. Inadequate fixation and permeabilization represent two of the most critical points of failure, often leading to weak or absent signal, high background, or poor preservation of cellular architecture. Within the broader context of fixation methodologies, these failures can compromise the detection of key developmental regulators, such as the phosphorylated SMAD proteins essential for investigating TGF-β signaling activity in pre-implantation mammalian embryos [46]. This application note provides a detailed diagnostic and remedial framework to address these common challenges, ensuring reliable and reproducible results in demanding whole mount specimens.
Quantitative Assessment of Fixation Quality
Objective assessment of fixation stability is crucial for protocol standardization. Eye-tracking technology can quantify fixation stability using metrics like the Bivariate Contour Ellipse Area (BCEA), with lower BCEA values indicating superior, more stable fixation [47]. The following table summarizes quantitative benchmarks for assessing embryo fixation quality.
Table 1: Quantitative Metrics for Assessing Fixation and Permeabilization Quality
| Assessment Method | Optimal Outcome / Target Value | Indicator of Poor Processing |
|---|---|---|
| Fixation Stability (BCEA) [47] | Lower BCEA value (deg²) | High variance in nuclear position; unstable fixation |
| Nuclear Morphology Integrity | Sharp, distinct nuclear boundaries; uniform staining | Smearing, "ghost" nuclei, or fragmented structures |
| Cytoskeletal Preservation [48] | Continuous, filamentous actin and microtubule structures | Disrupted, punctate, or absent cytoskeletal filaments |
| Signal-to-Noise Ratio | High specific signal; low non-specific background | Diffuse, high background with weak or no specific signal |
| Antigen Retention | Strong, localized signal at target site | Loss of antigenicity; signal fade despite target presence [49] |
Comparative Analysis of Fixation and Permeabilization Methods
Selecting the appropriate reagents and protocols is a balancing act between antigen preservation and antibody accessibility. The table below provides a structured comparison of common methods used in whole mount embryo processing.
Table 2: Comparative Analysis of Fixation and Permeabilization Methods for Whole Mount Embryos
| Method / Reagent | Concentration / Duration | Mechanism of Action | Best For | Potential Pitfalls |
|---|---|---|---|---|
| Formaldehyde (Paraformaldehyde, PFA) | 4%, 20-30 min at RT [49] [48] | Protein cross-linking | Preserving cellular structure; phosphorylated proteins (e.g., pSMAD) [46] [49] | Masking of epitopes; requires antigen retrieval |
| Methanol | 100%, -20°C, 10-15 min | Protein precipitation & dehydration | Cytosolic antigens; ceasing phosphatase activity | Disruption of membrane integrity and cytoskeleton |
| Combined PFA/MeOH | 4% PFA followed by 100% MeOH | Cross-linking followed by precipitation | Difficult-to-fix antigens; enhances permeability | Can be overly harsh for some delicate structures |
| Triton X-100 | 0.1-0.5%, post-fixation | Solubilizes lipid membranes | General purpose permeabilization | Can not be sufficient for dense structures like blastocysts |
| Digitonin | 0.001-0.01% | Binds cholesterol; selectively permeabilizes plasma membrane | Preserving organelle integrity | Less effective for intracellular membranes |
| Tween-20 | 0.1-0.5% | Mild detergent for washing | Reducing background in washing buffers [49] | Inadequate for permeabilization alone in whole mounts |
Detailed Experimental Protocols for Remediation
Protocol 1: Standardized Fixation for Cytoskeletal and Nuclear Antigens in Embryos
This protocol, adapted from current methodologies for Drosophila and human embryos, is designed to optimally preserve cytoskeletal structures and nuclear antigens [48] [46].
- Sample Collection: Manually collect embryos in a physiological buffer.
- Fixation: Immediately transfer embryos to a freshly prepared solution of 4% formaldehyde in a suitable buffer (e.g., PEM, PBS). Incubate for 20-30 minutes at room temperature. Note: Using fresh formaldehyde is critical, as old stocks can autofluoresce and increase background [49].
- Permeabilization: For cytoskeletal antigens like actin and microtubules, subsequent permeabilization with 0.1-0.5% Triton X-100 for 20-30 minutes is often necessary after fixation [48].
- Washing: Rinse embryos thoroughly 3-5 times with a wash buffer containing 0.1% Tween-20 to remove all traces of fixative and prevent high background [49].
- Blocking: Incubate embryos for 1-2 hours at room temperature in a blocking solution, such as normal serum from the secondary antibody host species or a charge-based blocker like Image-iT FX Signal Enhancer, to minimize non-specific antibody binding [49].
- Antibody Incubation: Incubate with the primary antibody diluted in blocking solution. For many antibodies, particularly phospho-specific ones, incubation at 4°C overnight yields optimal results [49]. This should be followed by extensive washing and incubation with fluorophore-conjugated secondary antibodies.
- Mounting and Imaging: Mount samples in an anti-fade mounting medium (e.g., ProLong Gold Antifade Reagent) to prevent signal fading. Image immediately for best results [49].
Protocol 2: Coupling Immunofluorescence with mRNA Detection
This advanced protocol combines cytoskeleton visualization with single-molecule fluorescent in situ hybridization (smFISH), enabling correlative analysis of protein localization and gene expression [48].
- Fixation for RNA & Protein: Begin with the standard fixation protocol (4% formaldehyde, 20-30 min) to cross-link both proteins and nucleic acids.
- Simultaneous Permeabilization and Post-fixation: Treat embryos with a solution that permeabilizes the sample while also ensuring RNA retention. This often involves a brief treatment with detergent followed by a second, mild fixation step.
- Hybridization: Perform smFISH using labeled probes targeting the mRNA of interest.
- Immunofluorescence: After smFISH is complete, proceed with the standard IF protocol for cytoskeletal or other proteins, starting from the blocking step.
The Scientist's Toolkit: Essential Research Reagents
Table 3: Key Reagent Solutions for Fixation and Permeabilization
| Reagent / Kit | Function / Application | Example Product / Composition |
|---|---|---|
| High-Purity Formaldehyde | Cross-linking fixative for structural preservation | EM-grade, freshly prepared 4% solution from ampules [49] |
| Methanol | Precipitating fixative and permeabilizing agent | 100% Methanol, ice-cold |
| Triton X-100 | Non-ionic detergent for permeabilization of lipid bilayers | 0.1-0.5% solution in buffer |
| Digitonin | Cholesterol-binding detergent for selective plasma membrane permeabilization | 0.001-0.01% solution |
| Anti-fade Mountant | Reduces photobleaching of fluorophores during imaging | ProLong Gold Antifade Reagent [49] |
| Signal Enhancer | Charge-based blocker to reduce non-specific background | Image-iT FX Signal Enhancer [49] |
Visual Workflows for Diagnostic and Experimental Logic
Below are diagrams outlining the logical workflow for diagnosing signal issues and the experimental pipeline for successful sample preparation.
Diagram 1: Diagnostic logic for weak signal issues.
Diagram 2: Standardized experimental workflow for embryo IF.
In whole mount immunofluorescence, the integrity of the experimental data is heavily dependent on the specific interaction between an antibody and its target epitope. Non-specific antibody binding and insufficient blocking present major obstacles, generating high background signals that obscure true biological findings and compromise data interpretation. Historically, pedagogical models like "lock-and-key" have been used to explain antibody-antigen interactions, but these simplistic frameworks fail to account for the dynamic reality of molecular recognition, where conformational flexibility and energetic landscapes govern binding events [50].
The "induced-fit" model advanced our understanding by acknowledging structural adjustments upon binding, yet it still operates within a binary framework that categorizes interactions as either specific or non-specific [50]. This binary thinking creates a conceptual divide that fails to explain established immunological phenomena such as cross-reactivity and polyreactivity, particularly observed in natural antibodies like IgM [50]. Within this traditional framework, non-specific binding is often dismissed as meaningless noise, neglecting its physiological significance in immune surveillance and signaling fine-tuning [50].
Modern energy landscape theory provides a more nuanced physical framework that reconciles these apparent contradictions. This theory conceptualizes antibody binding as energy transitions on a topological map, where molecular conformations follow pathways toward thermodynamically favorable states [50]. High-affinity specific interactions correspond to deep, sharply defined energy wells with substantial negative Gibbs free energy change (ΔG ≈ -7 to -14 kcal/mol), while lower-affinity "non-specific" binding occupies broad, shallow energy basins on the same continuous spectrum [50]. This probabilistic model explains why a single antibody can engage transiently with multiple structurally diverse antigens—a phenomenon particularly problematic in immunofluorescence applications where non-specific binding creates confounding background signals.
Experimental Design and Workflows
Experimental Workflow for Reducing Non-Specific Binding
The following diagram outlines a comprehensive experimental workflow for minimizing non-specific binding in whole mount immunofluorescence, integrating optimized fixation, blocking, and detection steps:
Mechanisms of Non-Specific Binding and Intervention Strategies
The diagram below illustrates the primary mechanisms of non-specific binding in antibody-oligo conjugates and the corresponding intervention strategies to mitigate this background:
Optimized Protocol for Reducing Non-Specific Background
Buffer Formulations and Preparation
Table 1: Blocking Buffer Composition for Reducing Non-Specific Binding
| Component | Final Concentration | Purpose | Notes |
|---|---|---|---|
| BSA | 1-3% | Blocks hydrophobic sites | Use high-quality, protease-free |
| Normal IgG | 0.1 mg/mL | Competes for Fc receptor binding | Source should match host species |
| Triton X-100 | 0.1% | Permeabilization | Prepare fresh on day of use |
| Dextran Sulfate | 0.02-0.1% | Competes for electrostatic interactions | Higher concentrations may reduce antibody affinity |
| NaCl | 150 mM | Shields electrostatic forces | Optimized concentration for ionic shielding |
| Complementary DNA | 1-10 nM | Pre-hybridizes conjugated ssDNA | Sequence-specific to antibody oligo |
| Optional: Salmon Sperm DNA | 0.2 mg/mL | Non-specific DNA competitor | Less effective than complementary DNA |
| Optional: poly(TTG) | 1 μM | Non-specific oligonucleotide competitor | Alternative to salmon sperm DNA |
Table 2: Fixation Method Comparison for Whole Mount Specimens
| Parameter | Paraformaldehyde (PFA) | Trichloroacetic Acid (TCA) |
|---|---|---|
| Tissue Morphology | Preserves native structure | Alters morphology; produces larger, more circular nuclei |
| mRNA Detection | Superior for HCR and FISH | Ineffective for mRNA visualization |
| Protein Epitopes | Suitable for most antigens | May reveal signals inaccessible with PFA |
| Nuclear Structure | Standard preservation | Altered neural tube morphology |
| Recommended Applications | General immunofluorescence, mRNA detection | Specific protein targets when PFA fails |
Step-by-Step Protocol
Sample Preparation and Fixation
Dissection and Preparation: For whole mount zebrafish spinal cords, perform careful dissection in cold PBS. Use fine forceps and microdissection tools to preserve tissue integrity [30].
Fixation Method Selection:
- For most applications, use 4% PFA in PBS with Ca²⺠and Mg²âº, prepared fresh (not older than 7 days) and stored at 4°C [51].
- Fix for 2-4 hours at 4°C with gentle agitation.
- For challenging epitopes, consider TCA fixation, but note it alters morphology and is ineffective for mRNA detection [19].
Permeabilization:
- Prepare 0.1% Triton X-100 in PBS without Ca²⺠and Mg²⺠fresh on the day of use [51].
- Permeabilize for 30-60 minutes at room temperature with rocking.
Blocking and Antibody Incubation
Blocking:
- Prepare blocking buffer according to Table 1.
- Incubate samples for 2-4 hours at room temperature or overnight at 4°C with gentle agitation.
- For antibody-oligo conjugates, include pre-hybridization step with complementary DNA.
Primary Antibody Incubation:
- Dilute primary antibody in optimized antibody incubation buffer (Table 1).
- For phosphorylated SMAD proteins, use 1:50 dilution in buffer containing dextran sulfate and complementary DNA [51].
- Incubate for 2 hours at room temperature or overnight at 4°C with gentle agitation.
Washing:
- Perform 3× 15-minute washes with PBS containing 0.1% Tween-20.
- For electrostatic-sensitive applications, include 150 mM NaCl in wash buffers.
Detection and Imaging
Signal Detection:
Clearing and Mounting:
- For whole mount zebrafish spinal cords, use Scale-based clearing solutions [30].
- Mount in appropriate anti-fade mounting medium with DAPI for nuclear counterstaining.
Imaging:
- Acquire images using confocal or light-sheet microscopy with appropriate laser settings and filter sets.
- For whole mount embryos, use multi-view light sheet microscopy to generate isotropic resolution data [53].
The Scientist's Toolkit: Essential Research Reagents
Table 3: Essential Research Reagents for Reducing Non-Specific Binding
| Reagent/Category | Specific Examples | Function/Purpose |
|---|---|---|
| Fixatives | 4% Paraformaldehyde (PFA) | Preserves protein epitopes and tissue morphology; superior for mRNA detection [19] [51] |
| Permeabilization Agents | Triton X-100 (0.1%) | Disrupts membranes for antibody penetration; must be prepared fresh [51] |
| Blocking Proteins | BSA (1-3%), Normal Donor IgG | Blocks hydrophobic sites and Fc receptors to prevent non-specific binding [52] |
| Electrostatic Blockers | Dextran Sulfate (0.02-0.1%) | Polyanion that competes with conjugated DNA for electrostatic binding [52] |
| Ionic Strength Modulators | NaCl (150 mM) | Shields electrostatic forces through ionic strength optimization [52] |
| DNA Competitors | Complementary DNA, Salmon Sperm DNA | Pre-hybridizes conjugated ssDNA to prevent hybridization to cellular nucleic acids [52] |
| Detection Systems | HCR Hairpins, Fluorophore-conjugated Secondaries | Signal amplification and detection with minimal background [52] |
| Mounting Media | DAPI-containing Vectashield | Nuclear counterstaining and preservation of fluorescence during imaging [51] |
Discussion and Technical Notes
The energy landscape theory provides a robust conceptual framework for understanding why the optimized protocol components effectively reduce non-specific binding. The addition of dextran sulfate and increased ionic strength work by elevating the energy barrier for non-specific interactions, effectively flattening the shallow energy basins that permit transient binding to non-target structures [50]. Similarly, pre-hybridization with complementary DNA eliminates the availability of ssDNA for non-specific hybridization, effectively removing an entire category of non-specific interaction pathways.
Fixation method selection critically impacts background signal. PFA remains the gold standard for most applications, preserving both morphology and mRNA detectability [19] [51]. However, TCA fixation may reveal certain protein epitopes that remain inaccessible with PFA fixation, despite its detrimental effects on morphology and unsuitability for mRNA detection [19]. This highlights the importance of matching fixation methods to specific experimental goals.
For researchers working with whole mount specimens, the complete protocol—from dissection through clearing and imaging—must be optimized as an integrated system. The nuclear segmentation and quantitative analysis frameworks like nuQLOUD enable rigorous quantification of organizational features in whole embryos, providing standardized methods for comparing architectural diversity across samples and conditions [53]. These computational approaches complement the experimental optimizations described here, together providing a comprehensive solution for reducing background and enhancing signal specificity in complex whole mount specimens.
The principles outlined in this protocol—strategic buffer formulation, appropriate fixation selection, and systematic blocking of non-specific interaction mechanisms—provide a robust foundation for achieving clean, interpretable results in whole mount immunofluorescence. While specific optimizations may be required for particular tissue types or antibody combinations, these core strategies consistently deliver significant improvements in signal-to-noise ratio across diverse experimental systems.
Addressing Uneven Staining and Poor Antibody Penetration in Thick Samples
In whole mount embryo immunofluorescence research, achieving uniform staining and sufficient antibody penetration represents a significant technical hurdle. The three-dimensional complexity of thick specimens often impedes reagent access to internal antigens, leading to uneven signal distribution and compromised data integrity. This challenge stems from a fundamental need to balance several competing factors: optimal tissue fixation for structural preservation, sufficient permeabilization for antibody penetration, and robust antigenicity for specific labeling. The fixation method serves as the cornerstone of this process, critically influencing epitope availability and reagent accessibility. Researchers must navigate these complexities to generate reliable, reproducible data that accurately reflects protein localization and expression within the native tissue architecture. This application note systematically addresses these challenges through comparative fixation analysis and optimized methodological frameworks.
Comparative Analysis of Fixation Methods
The choice of fixation method profoundly impacts antibody penetration and staining quality in thick samples by differentially affecting tissue architecture, antigen preservation, and permeability. The table below summarizes key characteristics of common fixatives used in whole-mount immunofluorescence:
Table 1: Comparative Analysis of Fixation Methods for Whole-Mount Immunofluorescence
| Fixative | Mechanism of Action | Tissue Preservation | Antigenicity Impact | Optimal Applications | Limitations |
|---|---|---|---|---|---|
| Paraformaldehyde (PFA) | Protein cross-linking via amino acid bridges [1] | Excellent structural preservation [1] | Potential epitope masking; good for structural proteins [1] [16] | Nuclear transcription factors; general protein localization [1] | Reduced antibody penetration for intracellular epitopes [1] |
| Trichloroacetic Acid (TCA) | Protein denaturation and precipitation through acid-induced coagulation [1] | Altered nuclear morphology (larger, more circular nuclei) [1] | Enhanced detection for some cytoplasmic and membrane proteins [1] | Cytoskeletal components (tubulin); membrane-bound cadherins [1] | Suboptimal for nuclear transcription factors [1] |
| Methanol | Protein precipitation and dehydration [16] | Moderate preservation with potential tissue shrinkage | Can unmask epitopes sensitive to PFA cross-linking [16] | Alternative when PFA causes epitope masking [16] | May not preserve delicate structures as effectively as aldehydes |
Quantitative assessments reveal that TCA fixation significantly alters cellular morphology compared to PFA, resulting in larger and more circular nuclei across various embryonic stages [1]. Furthermore, fluorescence intensity measurements demonstrate that TCA fixation enhances signal detection for specific protein classes, particularly cytoskeletal components like tubulin and membrane-bound cadherins, while PFA proves superior for nuclear transcription factors such as PAX7 and SOX9 [1]. This differential performance underscores the importance of matching fixation strategies to specific target antigens and research objectives.
Optimized Protocols for Enhanced Penetration and Staining
Standard Whole-Mount Immunofluorescence Protocol
The following protocol provides a robust foundation for whole-mount immunofluorescence, with specific considerations for addressing penetration challenges in thick embryonic samples:
Sample Preparation and Fixation
Permeabilization and Blocking
Antibody Incubation
- Incubate with primary antibody diluted in blocking solution for 72-96 hours at 4°C [1]
- Wash extensively with PBST (6-8 changes over 12-24 hours) [16]
- Incubate with fluorophore-conjugated secondary antibodies diluted in blocking solution overnight (12-24 hours) at 4°C [1]
- Perform final washes with PBST (6-8 changes over 12-24 hours) [1]
Mounting and Imaging
Advanced Protocol: NAFA Fixation for Delicate Tissues
For particularly delicate tissues or when combining immunofluorescence with RNA in situ hybridization, the NAFA (Nitric Acid/Formic Acid) protocol offers superior tissue preservation:
Fixation Solution Preparation
Sample Processing
Compatibility Assessment
- This protocol demonstrates excellent compatibility with both immunofluorescence and in situ hybridization while preserving delicate epidermal structures and regeneration blastemas [55]
Workflow Optimization Strategy
The following diagram illustrates a systematic approach to addressing staining and penetration challenges in thick samples:
Essential Research Reagent Solutions
Successful whole-mount immunofluorescence requires carefully selected reagents optimized for thick sample processing:
Table 2: Essential Research Reagents for Whole-Mount Immunofluorescence
| Reagent Category | Specific Examples | Function & Application Notes |
|---|---|---|
| Fixatives | 4% PFA, 2% TCA, Methanol, NAFA solution | Preserve tissue architecture and antigenicity; selection depends on target epitope [1] [55] |
| Permeabilization Agents | Triton X-100, Tween-20, Saponin, Digitonin | Enable antibody penetration by disrupting membranes; concentration and duration require optimization [1] [16] |
| Blocking Reagents | Donkey serum, BSA, Fish skin gelatin | Reduce non-specific antibody binding; serum should match secondary antibody host species [1] |
| Mounting Media | 80% Glycerol, ProLong Gold, RIMS, Optiprep | Refractive index matching for optical clarity; selection impacts imaging depth and quality [54] |
| Visualization Tools | Fluorophore-conjugated secondary antibodies, DAPI | Enable target detection and nuclear counterstaining; fluorophore selection depends on microscope capabilities [1] [16] |
Advanced Technical Considerations
Tissue Clearing Techniques
For particularly challenging thick samples, advanced tissue clearing methods can significantly improve antibody penetration and imaging depth. The ACT-PRESTO (Active Clarity Technique-Pressure Related Efficient and Stable Transfer of Macromolecules into Organs) method achieves rapid tissue clearing within 1 day while preserving endogenous fluorescent signals and tissue architecture [56]. This approach combines tissue-hydrogel hybridization with electrophoretic tissue clearing (ETC) and applies pressure to facilitate antibody penetration into dense specimens [56]. The method demonstrates compatibility with 91.5% of commercially available antibodies tested, making it a valuable approach for challenging targets [56].
Imaging Optimization
Advanced microscopy techniques are essential for extracting meaningful data from cleared whole-mount specimens:
- Two-photon microscopy provides superior depth penetration compared to confocal microscopy, with 80% glycerol clearing demonstrating a 3-fold reduction in intensity decay at 100μm depth [54]
- Dual-view imaging with registration and fusion algorithms enables complete sample reconstruction [54]
- Spectral unmixing techniques address signal cross-talk in multi-color experiments [54]
Troubleshooting Common Issues
Poor Antibody Penetration
- Problem: Strong signal limited to tissue periphery with weak or absent internal staining
- Solutions:
- Increase permeabilization agent concentration (up to 0.5-1.0% Triton X-100) and extend incubation time [16]
- Incorporate additional permeabilization steps with alternative detergents (e.g., saponin for membrane cholesterol extraction)
- Utilize tissue clearing methods like ACT-PRESTO to enhance reagent accessibility [56]
- Apply centrifugal pressure or convection flow to drive antibodies into tissue depths [56]
High Background Staining
- Problem: Non-specific signal throughout sample obscuring specific labeling
- Solutions:
- Optimize blocking conditions by increasing serum concentration (up to 10%) or extending blocking duration [1]
- Include additional blocking reagents such as BSA or fish skin gelatin
- Increase wash stringency by adding additional wash steps, extending wash durations, or incorporating mild detergents
- Titrate antibody concentrations to identify optimal signal-to-noise ratio
Tissue Damage or Morphological Alterations
- Problem: Structural artifacts compromising sample integrity
- Solutions:
- For delicate tissues, adopt acid-based fixation (NAFA protocol) that eliminates destructive proteinase K digestion [55]
- Optimize fixation duration to balance structural preservation with antigen accessibility
- Process samples in protective embedding media such as gelatin or agarose during extended incubation steps
Addressing uneven staining and poor antibody penetration in thick samples requires a systematic approach that integrates fixation optimization, permeabilization enhancement, and appropriate imaging strategies. The selection of fixation method should be guided by target antigen characteristics, with PFA preferable for nuclear proteins and TCA potentially superior for cytoplasmic and membrane targets. Implementation of the protocols outlined herein, particularly the specialized NAFA method for delicate tissues, will significantly improve staining uniformity and data reliability in whole mount embryo immunofluorescence studies. Through careful application of these optimized methods, researchers can overcome the technical barriers associated with thick sample imaging and generate robust, publication-quality data that accurately represents biological reality.
Optimizing Fixation for Multiplexing and Co-detection of Multiple Targets
In whole mount embryo immunofluorescence research, the fixation step is the cornerstone upon which reliable, high-quality multiplexed data is built. This process permanently preserves the native cellular architecture and immobilizes target antigens in their physiological locations. For multiplexing and co-detection experiments, where multiple targets are visualized simultaneously within the same sample, optimal fixation becomes particularly crucial as it must preserve diverse epitopes while maintaining tissue transparency and antibody accessibility across the entire three-dimensional structure of the embryo. Suboptimal fixation can lead to epitope masking, antigen relocation, or varied degrees of preservation across different targets, fundamentally compromising the experimental validity. The choice of fixative and protocol parameters directly influences the success of subsequent clearing, staining, and imaging steps, ultimately determining the accuracy with which researchers can visualize complex molecular interactions within their morphological context.
The growing adoption of whole mount techniques over traditional sectioning methods provides significant advantages for developmental studies, including preserving three-dimensional tissue architecture, enabling comprehensive analysis throughout the entire embryo, and improving quantitative accuracy by eliminating sampling errors associated with sectional analysis [43]. However, these benefits can only be realized when fixation is specifically optimized for the unique requirements of whole mount preparations, particularly when multiple targets with different chemical properties and subcellular localizations are being investigated simultaneously.
Fixative Comparison and Selection Guide
Quantitative Comparison of Common Fixatives
Selecting the appropriate fixative requires careful consideration of your specific targets, as different chemical fixatives preserve epitopes through distinct mechanisms that can significantly impact antigen detection. The table below summarizes the performance characteristics of common fixatives used in whole mount immunofluorescence:
Table 1: Performance Characteristics of Common Fixatives for Whole Mount Immunofluorescence
| Fixative | Concentration | Mechanism of Action | Best For | Limitations | Impact on Multiplexing |
|---|---|---|---|---|---|
| Paraformaldehyde (PFA) | 4% in PBS | Cross-links proteins through methylene bridges | Most proteins, membrane preservation, structural integrity | Can mask some epitopes; may require antigen retrieval | Good for general multiplexing but may not preserve all phospho-epitopes |
| Trichloroacetic Acid (TCA) | 2% in PBS | Precipitates proteins | Phosphorylated epitopes (e.g., pMLC), certain cytoskeletal proteins | Harsh on tissue; may alter ultrastructure | Essential for multiplexing experiments including phosphorylation-dependent antibodies |
| Methanol | 90-100% | Precipitates proteins and extracts lipids | Intracellular antigens, nuclear proteins | Removes lipids; can shrink tissue; disrupts membranes | Useful for intracellular targets but compromises membrane integrity |
| Acetone | 100% | Precipitates proteins and extracts lipids | Cytoskeletal antigens, some enzymes | Extreme dehydration; can fragment tissue | Provides permeabilization but may require optimization for different targets |
Comparative studies demonstrate that fixative choice dramatically impacts detection sensitivity for specific epitopes. Research on murine embryonic tissues showed that 2% trichloroacetic acid (TCA) fixation provided markedly clearer detection of phosphorylated myosin light chain (pMLC) compared to standard 4% PFA fixation, revealing detailed subcellular localization at apical junctions that was obscured with PFA [42]. This epitope-specific effect highlights why fixative selection must be guided by the most sensitive target in a multiplexing panel rather than adopting a one-size-fits-all approach.
Fixative Selection Decision Framework
The following diagram illustrates the decision pathway for selecting the optimal fixation strategy based on experimental goals and target characteristics:
Comprehensive Protocols for Whole Mount Embryo Immunofluorescence
Standardized Whole Mount Immunofluorescence Protocol
The following protocol has been optimized for whole mount embryo immunofluorescence, with specific attention to the requirements for multiplexed target detection:
Day 1: Embryo Dissection and Fixation
- Dissection: Dissect embryos in ice-cold PBS using fine forceps. For postnatal day 0-10 mice, the dissection can be performed at room temperature if exposure is minimal [43].
- Fixation: Transfer embryos to appropriate fixative based on the selection criteria above. For general multiplexing with 4% PFA, fix overnight at 4°C without removing tissues from culture inserts to maintain tissue integrity [43].
- Washing: Rinse fixed tissue 3× with PBS or 70% ethanol. For tissues expressing fluorescent proteins, store in PBS with 0.2% sodium azide instead of ethanol to preserve signal [43].
Day 2: Permeabilization and Blocking
- Rehydration: Place fixed tissue in 1× PBS at room temperature for a minimum of 4 hours [43].
- Permeabilization: Incubate tissues with permeabilization solution (0.1-0.5% Triton X-100 in PBS) for 4-24 hours depending on embryo size and density.
- Blocking: Incubate tissues in blocking solution (2-10% normal serum from secondary antibody host species, 0.1% Triton X-100 in PBS) for 24-48 hours at 4°C with gentle agitation [51].
Day 3-5: Primary Antibody Incubation
- Primary Antibody: Incubate with primary antibodies diluted in blocking solution for 48-72 hours at 4°C with gentle agitation. For multiplexing experiments using chimeric antibodies, ensure host species compatibility to enable simultaneous incubation [57].
Day 6-7: Secondary Antibody Incubation and Clearing
- Washing: Wash tissues 6-8× with PBS containing 0.1% Triton X-100 over 24-48 hours to remove unbound primary antibody.
- Secondary Antibody: Incubate with fluorophore-conjugated secondary antibodies diluted in blocking solution for 48-72 hours at 4°C, protected from light.
- Final Washes: Wash tissues 6-8× with PBS containing 0.1% Triton X-100 over 24-48 hours.
- Optical Clearing: Immerse tissues in ScaleS(0) or alternative clearing solution for 24-48 hours until transparent [43].
- Mounting: Mount tissues in clearing solution or specialized mounting media for imaging.
Specialized Techniques for Challenging Targets
For difficult-to-detect targets such as phosphorylated signaling proteins, additional steps are necessary:
Antigen Retrieval for Phosphorylated Epitopes
- After fixation and washing, treat tissues with antigen retrieval solution (10mM sodium citrate, 0.05% Tween-20, pH 6.0) for 30 minutes at 70°C [51].
- Alternatively, for heat-sensitive epitopes, use enzymatic antigen retrieval (e.g., 0.05% trypsin for 10 minutes at 37°C).
- Cool samples gradually to room temperature before proceeding with permeabilization.
Sequential Staining for Complex Multiplexing
- When using primary antibodies from the same species, employ sequential staining with intermediate fixation:
- Complete full staining protocol for first primary antibody.
- Fix with 4% PFA for 1 hour to cross-link bound antibodies.
- Denature with 0.1M glycine-HCl, pH 2.5, for 15 minutes to inactivate remaining antigen-binding sites.
- Resume staining protocol with next primary antibody.
Advanced Multiplexing Strategies and Experimental Design
Antibody Panel Design for Multiplexed Detection
Successful multiplexing requires careful panel design that addresses both biological and technical considerations. The following workflow outlines a systematic approach to developing robust multiplexing panels:
Chimeric Antibodies for Expanded Multiplexing Chimeric antibodies, in which the binding domain of a highly specific rabbit antibody is engineered with the backbone of a different host species (horse, mouse, or feline), dramatically expand multiplexing possibilities [57]. These reagents allow researchers to:
- Overcome limitations imposed by traditional host species availability
- Maintain the exceptional specificity of validated rabbit monoclonal antibodies
- Design panels with 3-4 targets without species compatibility constraints
- Preserve compatibility with existing unconjugated rabbit antibodies in the lab
When using chimeric antibodies in multiplex panels, always verify that secondary antibodies are Fc-specific to ensure species-specific detection and minimal cross-reactivity [57].
Essential Research Reagent Solutions
Table 2: Essential Reagents for Optimized Whole Mount Immunofluorescence
| Reagent Category | Specific Examples | Function & Importance | Optimization Tips |
|---|---|---|---|
| Fixatives | 4% PFA, 2% TCA, 90% Methanol | Preserves tissue architecture and antigen availability | Test multiple fixatives for sensitive targets; TCA superior for phospho-epitopes [42] |
| Permeabilization Agents | Triton X-100, Tween-20, Saponin | Enables antibody penetration through membranes | Harsh detergents (Triton) for nuclear antigens; mild (saponin) for membrane-associated targets [58] |
| Blocking Reagents | Normal serum, BSA, FcR blocking buffers | Reduces nonspecific antibody binding | Use serum from secondary antibody host species; include 0.1% Triton in blocking solution [51] |
| Chimeric Antibodies | CST Horse, Mouse, or Feline Chimerics | Enables multiplexing without species limitations | Verify performance matches parent antibody; use Fc-specific secondaries [57] |
| Optical Clearing Reagents | ScaleS(0), SeeDB, BABB | Reduces light scattering for deep tissue imaging | ScaleS(0) compatible with immunostaining; reduces clearing time [43] |
| Mounting Media | ProLong Gold with DAPI, Vectashield | Preserves fluorescence and provides counterstain | Use antifade mounting media for long-term storage; include DAPI for nuclear labeling [57] |
Quantification and Data Analysis Approaches
Image Processing and Quantitative Analysis
Following optimized fixation and multiplexed staining, proper image processing and quantification are essential for extracting meaningful biological insights:
Nuclear Segmentation and Intensity Quantification
- For quantitative analysis of signaling activity in embryonic tissues, segment nuclei using the StarDist plugin in Fiji/ImageJ [51].
- Measure fluorescence intensity in each channel on a per-nucleus basis to generate quantitative data for statistical analysis.
- Use CellProfiler for nuclear tracking through imaging z-stacks to ensure consistent measurement throughout the tissue volume [51].
Whole-Tissue Quantification at Single-Cell Resolution
- Process 3D image stacks to generate objective quantitative data for entire tissues [42].
- Focus on spatial distribution patterns of cellular processes rather than just presence/absence of signals.
- Account for potential z-dimension intensity attenuation when comparing signals throughout thick tissues.
Controls and Validation for Multiplexed Experiments
Rigorous controls are especially critical in multiplexed experiments to ensure specific detection of each target:
- Fluorescence Minus One (FMO) Controls: Include samples stained with all antibodies except one to establish gating boundaries and identify spillover effects [59].
- Secondary Antibody Only Controls: Process samples with secondary antibodies alone to detect nonspecific binding or cross-reactivity.
- Biological Validation: Verify expected expression patterns based on known biology or single-stain reference data.
- Fixation-Specific Controls: Compare signal intensity and patterns across different fixation methods when introducing new targets.
Optimizing fixation protocols represents a fundamental prerequisite for successful multiplexing and co-detection of multiple targets in whole mount embryo immunofluorescence. The systematic approach outlined in this application note—from rational fixative selection through validated detection and quantification—enables researchers to overcome the unique challenges associated with complex multiplexed experiments in three-dimensional embryonic tissues. By implementing these optimized protocols and considerations, researchers can reliably detect multiple targets while preserving the intricate spatial relationships and subtle expression patterns that underlie developmental processes, ultimately generating more comprehensive and biologically relevant data from each precious sample.
The integration of advanced reagents such as chimeric antibodies with optimized fixation methods creates new possibilities for investigating complex signaling networks and cellular interactions within their native three-dimensional context, accelerating discovery in developmental biology and embryonic research.
In whole-mount embryo immunofluorescence research, the careful steps of fixation, antibody staining, and imaging can be swiftly undermined by two final, critical factors: improper mounting media selection and inadequate storage conditions. Photobleaching, the fading of fluorescent signals upon exposure to light, and signal degradation during storage pose significant threats to data integrity, particularly for precious three-dimensional embryo samples. The selection of an appropriate mounting medium is not merely a terminal step but a strategic decision that directly impacts signal preservation, optical clarity, and the long-term viability of experimental results [60]. This application note, framed within a broader thesis on optimization of fixation methods for whole-mount immunofluorescence, provides detailed protocols and data-driven guidance for these crucial phases.
Mounting Media Fundamentals and Selection Criteria
Mounting media serve two primary functions: providing an optically clear environment for high-resolution microscopy and preserving the fluorescent signal. The choice between aqueous and solvent-based media hinges on the nature of the sample and the fluorophores used.
Table 1: Comparison of Mounting Media Types
| Characteristic | Aqueous Mounting Media | Solvent-Based Mounting Media |
|---|---|---|
| Composition | Water-based, often containing glycerol [60] | Resinous (e.g., historical Canada balsam) [60] |
| Compatibility | Essential for fluorescent markers; preserves most fluorophores in their optimal aqueous environment [60] | Ideal for chromogenic stains (e.g., DAB, hematoxylin) and enzymatic substrates [60] |
| Refractive Index (RI) | ~1.47 (glycerol-based) [60] | 1.45 - 1.49 (final dried film) [60] |
| Setting Properties | Non-setting (requires sealant) or setting (forms a solid film) [60] | Generally setting; solidifies to a permanent seal [60] |
| Sample Preparation | Mount directly from aqueous buffers [60] | Requires sample dehydration through ethanol series and clearing with xylene [60] |
| Primary Application | Immunofluorescence [60] | Immunohistochemistry with chromogenic detection [60] |
For whole-mount immunofluorescence, aqueous, antifade mounting media are universally recommended. Their composition matches the aqueous environment fluorophores are designed for, and they contain antioxidants that scavenge free radicals generated during illumination, thereby "preventing the photoinduced damage that causes fluorescent molecules to fade" [60]. The refractive index (RI) is another critical parameter. A mismatch between the RI of the mounting medium and the glass slide (RI ~1.51) causes spherical aberration, leading to resolution degradation and reduced sample brightness [60]. While water has an RI of 1.33, commercial aqueous mounting media are formulated with glycerol (RI ~1.47) or other components to closely match glass, thus optimizing image clarity [60].
Quantitative Comparison of Antifade Agents
While specific quantitative data on the performance of various commercial antifade reagents in whole-mount embryos requires empirical testing, the mechanism of action is well-established. The effectiveness of an antifade medium is measured by its ability to maintain fluorescence intensity over time under illuminated observation.
Table 2: Key Considerations for Evaluating Antifade Mounting Media
| Feature | Impact on Signal Preservation | Considerations for Whole-Mount Embryos |
|---|---|---|
| Antioxidant Mechanism | Counters oxygen-dependent and oxygen-independent photobleaching processes [60] | Superior formulations offer comprehensive protection against different fading pathways. |
| Signal Intensity | High-quality media maximize initial signal brightness. | A strong initial signal provides a buffer against gradual fading. |
| pH Stability | Maintains a pH that stabilizes fluorophores (often alkaline). | Stable pH is crucial for the longevity of many common fluorophores. |
| Curing/Hardening | Setting media seal the sample and prevent evaporation. | Prevents sample collapse and medium leakage, which is vital for long-term storage. |
| Optical Clarity | RI matching glass (~1.5) minimizes spherical aberration. | Essential for obtaining high-resolution Z-stacks in 3D imaging. |
Formulations like VECTASHIELD are explicitly engineered to produce high signal intensity while providing superior protection against photobleaching [60]. The protocol for cardiac crescent-stage mouse embryos, for instance, uses a specific anti-fade mounting media containing 2% w/v n-Propyl gallate (nPG) in glycerol and PBS [61]. n-Propyl gallate is an antioxidant that functions as an effective antifading agent.
Detailed Experimental Protocols
Protocol: Mounting Whole-Mount Embryos for Confocal Microscopy
This protocol is adapted from a established method for quantitative whole-mount immunofluorescence of cardiac crescent-stage mouse embryos [61].
I. Materials and Reagents
- Anti-fade Mounting Media: e.g., commercial formula or laboratory-made (2% w/v n-Propyl gallate, 90% glycerol, 1x PBS) [61]
- Microscope slides
- High-performance coverslips
- Double-stick tape or silicone spacers
- Fine forceps
- Dissecting needle or fine pipette
II. Procedure
- Slide Preparation: Create a supportive chamber on a microscope slide using two parallel stacks of 5-6 layers of double-stick tape, spaced 15-20 mm apart. This creates a well that prevents the embryo from being crushed [61].
- Equilibration: Following immunofluorescence staining and final washes, slowly suspend the embryo in the anti-fade mounting media in a tube. Allow it to equilibrate for at least 1 hour at room temperature, gently flicking the tube periodically to encourage the embryo to settle into the solution [61].
- Mounting: Place a 15 µL drop of anti-fade mounting media in the center of the prepared slide chamber [61].
- Transfer: Carefully transfer one embryo from the tube to the drop of media using a fine pipette. Position the embryo as needed.
- Coverslipping: Gently lower a coverslip onto the slide, allowing the surface tension to pull it down slowly. Avoid pressing down, as this can damage the 3D structure of the embryo. If using the "coverslip method," apply the media to the coverslip first, then invert the slide onto it [60].
- Sealing (if required): If using a non-setting aqueous medium, seal the edges of the coverslip with nail polish or paraffin wax to prevent evaporation and medium movement [60].
- Curing: Allow the slide to dry horizontally in the dark. The refractive index of setting media may require up to 24 hours to stabilize completely [60].
Protocol: Post-Imaging Storage and Validation
I. Short-Term Storage (≤1 Week)
- Condition: Store mounted slides in the dark at 4°C in a slide box.
- Validation: Re-image a control region after 24 hours and one week to monitor for any signal loss or background increase.
II. Long-Term Storage (Months to Years)
- Condition: For permanent records, store slides in a sealed box with desiccant at -20°C or lower. Freezing prevents the breakdown of antifade agents and slows oxidative processes.
- Sample Preservation: An alternative for unmatched flexibility is to store the stained embryos unmounted. After the final wash in PBS, they can be stored in PBS with 0.1% sodium azide (to prevent microbial growth) at 4°C for up to two weeks, and remounted for imaging as needed [62].
- Validation: Periodically image a control slide to assess the rate of signal degradation over time.
The following workflow summarizes the key decision points and steps from fixation through to imaging and storage:
Workflow for Mounting and Storage of Whole-Mount Embryos
The Scientist's Toolkit: Essential Reagents for Mounting and Storage
Table 3: Research Reagent Solutions for Mounting and Storage
| Reagent / Solution | Function / Purpose | Example / Composition |
|---|---|---|
| Antifade Mounting Medium | Prevents photobleaching of fluorophores during imaging and storage; provides optimal refractive index. | VECTASHIELD [60]; Lab-made: 2% nPG in 90% glycerol/PBS [61] |
| Permanent Mounting Medium | Provides a permanent, optically clear seal for chromogenic samples; used after dehydration. | VectaMount Permanent Mounting Medium [60] |
| Phosphate-Buffered Saline (PBS) | Isotonic buffer for washing and temporary storage of stained samples. | 1x PBS, pH 7.4 [61] [62] |
| Sodium Azide | Antimicrobial agent to prevent microbial growth in stored, unmounted samples. | 0.1% in PBS [62] |
| Glycerol | Primary component of many aqueous media; provides viscosity and favorable refractive index. | 90% glycerol in anti-fade formulations [61] |
| n-Propyl Gallate (nPG) | Antioxidant acting as an antifading agent in laboratory-formulated mounting media. | 2% (w/v) in glycerol/PBS [61] |
| Nail Polish / Sealant | Seals the edges of coverslips when using non-setting mounting media. | Clear nail polish or specialized slide sealant |
The integrity of data generated from whole-mount embryo immunofluorescence is profoundly affected by the final stages of sample preparation. The strategic selection of an aqueous, antifade mounting medium matched to the optical physics of microscopy, combined with deliberate storage practices, is not an afterthought but a fundamental component of a rigorous research protocol. By implementing the guidelines and detailed methods outlined in this application note, researchers can ensure their hard-won signals are preserved with fidelity, enabling high-quality imaging, robust quantitative analysis, and the long-term viability of valuable specimens.
Ensuring Reliability: Validation, Controls, and Comparative Analysis of Fixation Efficacy
Within the context of a broader thesis on fixation methods for whole mount embryo immunofluorescence, the establishment of rigorous experimental controls is not merely a supplementary step but a foundational requirement for data integrity. Whole mount immunofluorescence presents unique challenges, including heightened risks of non-specific antibody binding, increased autofluorescence, and variable reagent penetration throughout thick tissue samples [63] [16]. The choice of fixation method—be it paraformaldehyde (PFA), trichloroacetic acid (TCA), or methanol—significantly impacts tissue morphology and epitope accessibility, making controlled validation of antibody performance under these specific conditions absolutely critical [20] [16]. This application note details the implementation of three essential negative controls—Isotype, No-Primary Antibody, and Knockout Validation—to ensure the accurate interpretation of protein localization and expression data in whole mount embryo studies.
The Control Framework: Principles and Applications
Understanding Control Functions
Robust immunofluorescence controls are designed to account for and isolate various sources of non-specific signal, thereby validating that the observed fluorescence originates from specific antigen-antibody binding.
The table below summarizes the purpose and interpretation of three key negative controls:
| Control Type | Experimental Purpose | Interpretation of Result |
|---|---|---|
| Isotype Control [64] [65] | Distinguishes specific antibody signal from background caused by non-specific Fc receptor binding or interactions with cellular components. | Background signal should be minimal and distinct from the specific staining pattern. Matching the host species, immunoglobulin class, and subclass is critical. |
| No-Primary Antibody Control [65] | Identifies signal contributed by non-specific binding of the secondary antibody or tissue autofluorescence. | Any observed signal is attributable to secondary antibody aggregation, cross-reactivity, or innate tissue fluorescence. |
| Knockout Validation [66] | Provides a definitive confirmation of antibody specificity by using genetically modified samples where the target protein is absent. | A specific signal should be absent in the knockout sample. Its presence indicates non-specific antibody binding. |
Integration with Fixation Methods
The effectiveness of controls is intrinsically linked to the fixation protocol. For instance, TCA fixation has been shown to alter nuclear morphology and the subcellular localization and fluorescence intensity of various proteins compared to PFA fixation in chick embryos [20]. These fixation-induced changes can affect epitope presentation and background staining levels, thereby influencing the baseline for your negative controls. Consequently, a control validated for a PFA-fixed sample may not be directly transferable to a TCA-fixed sample without re-optimization. The diagram below illustrates the logical workflow for selecting the appropriate control based on the specific experimental variable being tested.
Experimental Protocols for Control Implementation
Protocol: Isotype Control Application
Isotype controls are primary antibodies that lack specificity to the target but match the class and type (e.g., IgG2a kappa) of the primary antibody used in the application [64]. They are essential for identifying background caused by Fc receptor binding or non-specific protein interactions [64].
Procedure:
- Preparation: Concurrently with your test sample, prepare a control sample (e.g., a sibling embryo).
- Fixation: Fix the control sample identically to the test sample (e.g., in 4% PFA overnight at 4°C) [16].
- Permeabilization and Blocking: Permeabilize and block the control sample using the same protocol as for the test sample. For whole mount embryos, an extended blocking time (several hours to overnight) may be necessary to ensure complete penetration [16].
- Isotype Incubation: Instead of the target-specific primary antibody, incubate the control sample with the isotype control antibody. Crucially, the isotype control must be used at the same concentration (μg/mL) as the primary antibody. [65].
- Secondary Detection and Imaging: Process the control sample identically to the test sample for all subsequent steps (secondary antibody incubation, washes, and mounting). Image both samples using the same microscope settings (exposure time, laser power, gain).
Protocol: No-Primary Antibody Control
This control identifies signal stemming from non-specific secondary antibody binding or from tissue autofluorescence, which is common in tissues rich in elastin and collagen [65].
Procedure:
- Sample Preparation: Include a control sample processed in parallel with the test sample.
- Fixation and Permeabilization: Treat the control sample identically through fixation and permeabilization steps.
- Omission of Primary Antibody: During the primary antibody incubation step, replace the primary antibody solution with antibody dilution buffer alone [65].
- Standard Secondary Incubation: Continue with the standard protocol for secondary antibody application, washes, and mounting.
- Analysis: Any fluorescent signal observed in this control is non-specific. If this signal is high, consider using pre-adsorbed secondary antibodies, optimizing blocking conditions, or utilizing spectral imaging to separate autofluorescence from specific signal [65].
Protocol: Genetic Knockout Validation
Knockout validation using CRISPR-Cas9 provides the most rigorous evidence of antibody specificity by demonstrating loss of signal in cells or tissues where the target gene has been ablated [67] [66].
Workflow for Knockout Validation in a Research Model: The following diagram outlines the key steps in generating a knockout model for antibody validation, which can be applied to cell lines that may subsequently be used to generate embryos or be analyzed directly.
Detailed Methodology (based on CRISPR-Cas9 RNP electroporation):
- sgRNA Design: Design and synthesize single-guide RNAs (sgRNAs) targeting exonic regions of your gene of interest. Using a multi-guide RNA strategy can increase knockout efficiency [68].
- RNP Complex Formation: Complex the purified sgRNA(s) with recombinant Cas9 protein to form a ribonucleoprotein (RNP) complex.
- Delivery: Introduce the RNP complex into your target cells (e.g., a relevant cell line or primary cells) via electroporation [68].
- Clonal Selection: Culture the transfected cells and isolate single clones to establish a pure knockout population.
- Validation of Knockout: Confirm the knockout at the genetic level (e.g., by DNA sequencing) and at the protein level.
- Immunofluorescence Staining:
- Culture control (wild-type) and knockout cells on glass-bottom dishes or process control and knockout embryo tissues.
- Fix cells/tissues with 4% PFA for 15 minutes [66].
- Permeabilize with 0.1% Triton X-100 for 10 minutes [66].
- Block with 1-5% BSA or serum for 1 hour at room temperature.
- Incubate with the primary antibody against the target protein, followed by the appropriate fluorescent secondary antibody and nuclear stain (e.g., DAPI).
- Image using identical settings for both control and knockout samples. A clear loss of signal in the knockout sample confirms antibody specificity, as demonstrated in the example for EGFR [66].
Data Presentation and Analysis
Quantitative Comparison of Control Signals
The quantitative potential of immunofluorescence can be realized through rigorous standardization, including the use of optimized controls. The signal-to-noise ratio, a key metric for antibody validation, can be quantitatively assessed by comparing the fluorescence intensity of specific staining to that of the isotype control [69] [67].
The table below provides a theoretical quantitative comparison of how proper controls aid in data interpretation:
| Experimental Condition | Mean Fluorescence Intensity (Target Channel) | Mean Fluorescence Intensity (Isotype Control Channel) | Signal-to-Noise Ratio | Interpretation |
|---|---|---|---|---|
| Test Sample + Primary Ab | 5,000 AU | 250 AU | 20:1 | Valid specific signal. |
| Isotype Control | 280 AU | 255 AU | ~1:1 | Background level; validates specificity. |
| Knockout Sample + Primary Ab | 300 AU | Not Applicable | ~1:1* | Confirms antibody specificity; loss of signal. |
| No-Primary Antibody Control | 260 AU | Not Applicable | ~1:1* | Defines background from secondary Ab/autofluorescence. |
AU = Arbitrary Units; *Compared to the specific signal in the test sample.
The Scientist's Toolkit: Essential Research Reagents
Successful implementation of these controls requires high-quality, well-defined reagents.
| Reagent Category | Specific Example | Function in Control Experiments |
|---|---|---|
| Isotype Controls [64] | Mouse IgG2a kappa, Rabbit IgG | Matched negative control antibody to establish background from non-specific primary antibody binding. |
| Validated Primary Antibodies [67] [66] | Phospho-specific antibodies, EGFR Antibody | Target-specific antibodies that have been verified using knockout or other validation methods to ensure specificity. |
| Pre-adsorbed Secondaries [65] | Goat anti-Rabbit IgG (H+L) Cross-Adsorbed | Secondary antibodies processed to reduce cross-reactivity with non-target immunoglobulins, minimizing background. |
| Fixation Reagents [20] [16] | 4% Paraformaldehyde (PFA), Trichloroacetic Acid (TCA), Methanol | Preserves tissue architecture and antigenicity; choice of fixative significantly impacts epitope accessibility and background. |
| Permeabilization Agents [63] [66] | Triton X-100, Saponin | Creates pores in membranes to allow antibody penetration; concentration and time must be optimized for whole mounts. |
| Blocking Agents [63] [16] | Horse Serum, BSA, SUPERase•In RNase Inhibitor | Reduces non-specific binding by saturating reactive sites. RNase inhibitors are crucial for combined IF/RNA FISH protocols [63]. |
Incorporating isotype, no-primary antibody, and knockout controls into whole mount immunofluorescence protocols is non-negotiable for producing scientifically rigorous and interpretable data. The interplay between fixation methods and antibody performance necessitates that these controls be optimized within the specific context of the chosen fixation protocol, be it PFA or TCA. By adhering to the detailed protocols and analytical frameworks provided herein, researchers can confidently validate their findings, ensuring that observed fluorescence patterns accurately reflect the true biology of the specimen and not methodological artifacts.
Comparing Fixation Efficacy Across Different Embryonic Stages and Sizes
The efficacy of chemical fixation is a critical, yet often overlooked, variable in whole mount embryo immunofluorescence research. Successful fixation must achieve a delicate balance: it must preserve tissue morphology perfectly while simultaneously maintaining the antigenicity of target proteins to allow for effective antibody binding [70]. This challenge is compounded when working with whole mount embryos, as the three-dimensional architecture and increasing size and opacity at later developmental stages present significant barriers to the uniform penetration of fixatives and antibodies [16]. Furthermore, the choice of fixative is not one-size-fits-all; it can profoundly influence the visualization of specific proteins and subcellular structures, as evidenced by recent studies showing that trichloroacetic acid (TCA) fixation can reveal protein localization domains that are inaccessible with the more standard paraformaldehyde (PFA) fixation [20].
This Application Note provides a structured comparison of fixation efficacy, focusing on the interplay between embryonic stage, sample size, and fixative chemistry. We summarize quantitative data on fixation outcomes, provide detailed optimized protocols for different embryonic stages, and outline key reagent solutions to ensure reproducible and high-quality results in whole mount immunofluorescence.
Comparative Analysis of Fixation Methods
The selection of an appropriate fixative is a fundamental decision that can dictate the success of an experiment. The following table synthesizes key findings from recent comparative studies on fixation efficacy.
Table 1: Comparative Analysis of Fixative Impact on Staining Outcomes
| Fixative | Key Effects on Morphology & Staining | Best Suited For | Key Considerations |
|---|---|---|---|
| Paraformaldehyde (PFA) | Standard cross-linking fixative. May mask certain epitopes due to protein cross-linking, potentially leading to reduced or absent signal for some targets [16] [20]. | General morphology preservation; widely used for many antibodies validated in IHC-Fr [16]. | Unsuitable for some antibodies sensitive to cross-linking; antigen retrieval is generally not feasible in fragile whole-mount embryos [16]. |
| Trichloroacetic Acid (TCA) | Protein precipitating fixative. Can result in larger and more circular nuclei compared to PFA. Alters subcellular localization and fluorescence intensity for some proteins (e.g., transcription factors, cytoskeletal proteins), potentially revealing novel protein domains [20]. | Targets where PFA fixation fails, particularly for visualizing specific nuclear and cytoskeletal antigens [19] [20]. | Causes significant changes in nuclear morphology and protein presentation, which must be considered during data interpretation [20]. |
| Methanol | Protein precipitating and dehydrating fixative. Useful as an alternative when PFA causes epitope masking, as it avoids protein cross-linking [16]. | A secondary choice when optimizing whole-mount procedures and PFA is ineffective [16]. | Can be tried when an antibody is sensitive to PFA-based cross-linking. |
Beyond the chemical nature of the fixative, the duration of fixation is a critical parameter. Prolonged fixation, such as overnight (O/N) post-fixation, can significantly compromise the detection of cell surface antigens, particularly on fine cellular protrusions, without necessarily improving structural preservation [70]. Shorter fixation times (e.g., 1-2 hours) are often beneficial for preserving antigenicity for immunohistochemistry [70].
Stage- and Size-Dependent Experimental Protocols
The thickness and complexity of embryonic samples require careful protocol optimization to ensure adequate fixative penetration and antibody access throughout the tissue.
General Whole-Mount Immunofluorescence Protocol
The core workflow for whole-mount immunofluorescence, adapted for embryonic samples, involves several key stages [16]:
- Fixation: Immerse embryo in an appropriate volume of fixative (e.g., 4% PFA). Incubation times must be extended compared to sectioned samples—from 30 minutes at room temperature to overnight at 4°C—to allow penetration to the sample's center [16].
- Permeabilization and Blocking: Following PBS washes, permeabilize the tissue with a solution like 0.1% Triton X-100 or 10% DMSO in PBS. This is followed by incubation in a blocking buffer (e.g., containing 1% BSA) to reduce non-specific antibody binding [16] [71].
- Antibody Incubation: Incubate with primary and subsequently secondary antibodies. These incubation steps also require significantly more time than for sections, potentially lasting several days, with gentle agitation to ensure deep and even penetration [16].
- Imaging and Clearing: For smaller embryos (e.g., chicken up to E6), imaging can be performed in a glycerol-based mounting medium. For older, opaque embryos, a clearing step is essential. Ethyl cinnamate (ECi) clearing has been shown to be effective for E3.5 to E5.5 chicken embryos, providing high signal-to-noise ratio and enabling deep-tissue imaging via light sheet microscopy [71].
Recommendations by Embryonic Stage
Table 2: Stage- and Size-Dependent Fixation and Processing Guidelines
| Embryonic Stage / Size | Recommended Fixation Protocol | Processing & Imaging Considerations |
|---|---|---|
| Early Stages (e.g., Chick HH4-HH18) | Standard 4% PFA fixation (30 min to O/N) is often sufficient due to small size and high permeability [71]. | Standard whole-mount protocol typically adequate. ECi clearing can be applied to enhance imaging clarity [71]. |
| Mid-Stages (e.g., Chick E3.5-E5.5) | Requires extended fixation times for full penetration. If standard HCR RNA-FISH or IHC fails, protocol optimization including adjusted permeabilization is needed [71]. | Tissue clearing (ECi) is highly recommended prior to light-sheet imaging to resolve internal structures [71]. |
| Late Stages / Large Embryos | Chicken embryos after E6, mouse embryos after E12 become too large for whole-mount staining. Dissection into smaller segments is required before fixation to enable reagent penetration [16]. | Removal of surrounding muscle and skin is necessary. For very large samples (e.g., adult zebrafish spinal cord), specialized whole-mount protocols for dissected organs are required [16] [30]. |
Advanced Visualization and Analysis
For comprehensive 3D analysis of gene expression and protein localization, combining immunofluorescence with advanced techniques is powerful. For instance, HCR RNA-FISH for multiplex RNA detection can be successfully combined with whole-mount immunofluorescence on the same embryo [71]. This allows for the correlation of gene expression with protein localization and morphological differentiation. Following this combined labeling, ECi clearing and light-sheet microscopy enable the acquisition of high-resolution 3D datasets throughout the embryo, revealing complex spatial relationships that are impossible to discern in non-cleared samples or 2D sections [71].
The Scientist's Toolkit: Essential Research Reagents
The following table details key reagents and their critical functions in whole-mount embryo fixation and staining protocols.
Table 3: Essential Reagents for Whole-Mount Embryo Fixation and Staining
| Reagent / Resource | Function / Application | Example |
|---|---|---|
| Paraformaldehyde (PFA) | Cross-linking fixative; standard for general morphology preservation [16] [72]. | 4% PFA in PBS [16]. |
| Trichloroacetic Acid (TCA) | Protein precipitating fixative; alternative for antigens masked by PFA cross-linking [19] [20]. | Used in comparative fixation studies [20]. |
| Methanol | Precipitating fixative; alternative for PFA-sensitive epitopes [16]. | 100% Methanol [16]. |
| Triton X-100 | Non-ionic detergent used for permeabilization of lipid membranes to allow antibody penetration [16] [72]. | 0.1-1% in PBS [16]. |
| Primary Antibodies | Proteins that bind specifically to the target antigen of interest. | Anti-PDGFRα, Anti-NG2, Anti-α-tubulin [20] [70]. |
| Secondary Antibodies | Conjugated antibodies that bind to the primary antibody for detection (e.g., fluorophore-conjugated). | Goat anti-mouse Alexa Fluor 488 [72]. |
| Ethyl Cinnamate (ECi) | A mounting medium with a refractive index matching that of cleared tissue, used for optical clearing of embryos [71]. | Used prior to light-sheet imaging of E3.5-E5.5 chick embryos [71]. |
| Blocking Agent | Protein or serum used to occupy non-specific binding sites and reduce background staining. | 1% Bovine Serum Albumin (BSA) [70]. |
Workflow and Signaling Diagrams
Experimental Workflow for Whole-Mount Fixation and Staining
The following diagram outlines the key decision points and steps in a generalized protocol for whole-mount immunofluorescence of embryos, integrating fixation choices and stage-specific considerations.
Fixation Mechanism and Impact on Staining
This diagram illustrates the fundamental mechanisms of different fixative types and their downstream effects on antigen availability and staining quality.
In whole mount embryo immunofluorescence research, the choice of fixation method significantly influences experimental outcomes by altering tissue morphology and protein accessibility [20]. While immunohistochemistry (IHC) excels at localizing proteins within their morphological context, it provides only semi-quantitative data on expression levels [18]. Western blotting complements this by offering quantitative measurement of protein expression and molecular weight confirmation [73]. This application note details rigorous methodologies for cross-validating IHC results with Western blotting, with particular emphasis on how fixation conditions affect antibody performance across these techniques.
The fundamental differences between these techniques necessitate cross-validation. IHC preserves spatial relationships but is subject to variables in fixation permeability and epitope masking, whereas Western blotting provides superior quantification but loses histological context [18]. For researchers studying embryonic development, where protein localization and expression levels dynamically change, employing both methods provides a more comprehensive understanding of protein expression patterns while controlling for methodological artifacts that may arise from different fixation approaches [20] [19].
Experimental Protocols
Immunohistochemistry Protocol for Embryonic Tissue Sections
This protocol has been optimized for embryonic tissue samples, with special considerations for fixation methods evaluated in whole mount embryo studies [20] [19].
Tissue Preparation and Fixation
- Fixation Options: Compare paraformaldehyde (PFA) and trichloroacetic acid (TCA) fixation
- PFA Fixation: Prepare 4% PFA in phosphate buffer. Fix tissue by immersion for 2-24 hours at 4°C based on tissue size [18]. PFA creates methylene cross-links between proteins, preserving morphology but potentially masking some epitopes.
- TCA Fixation: Prepare 4-10% TCA in distilled water. Fix tissue for 1-4 hours at 4°C [20]. TCA precipitates proteins through dehydration and disruption of hydrophobic interactions, which may reveal different protein localization domains compared to PFA.
- Embedding and Sectioning: After fixation, dehydrate tissues through graded ethanol series, clear with xylene, and embed in paraffin. Section at 5-10μm thickness using a microtome [74].
Deparaffinization and Antigen Retrieval
- Deparaffinization: Immerse slides in xylene (2×10 minutes), then rehydrate through graded ethanol series (100%→70%) to distilled water [74].
- Antigen Retrieval: Perform heat-induced epitope retrieval (HIER) using citrate buffer (pH 6.0) or Tris-EDTA buffer (pH 9.0). Heat in microwave or pressure cooker for 10-20 minutes, then cool for 30 minutes at room temperature [74].
Immunostaining Procedure
- Blocking: Incubate sections with blocking buffer (5% normal serum from secondary antibody host species in PBS with 0.1% Triton X-100) for 1-2 hours at room temperature to prevent non-specific binding [75] [74].
- Primary Antibody Incubation: Apply primary antibody diluted in PBS with 1% blocking serum. Incubate overnight at 4°C in a humidified chamber. See Table 3 for dilution guidelines.
- Washing: Wash slides with three changes of PBS for 5-7 minutes each [75].
- Secondary Antibody Incubation: Apply enzyme-conjugated (HRP or AP) or fluorophore-conjugated secondary antibody diluted in blocking buffer. Incubate for 30-45 minutes at room temperature [75].
- Detection:
- Counterstaining and Mounting: Counterstain with hematoxylin (chromogenic) or DAPI (fluorescence), dehydrate through graded alcohols, clear in xylene, and mount with appropriate mounting medium [74].
Western Blot Protocol with Total Protein Normalization
This protocol emphasizes total protein normalization (TPN), which is increasingly required by journals as it provides more reliable quantification than housekeeping proteins [73].
Sample Preparation and Electrophoresis
- Protein Extraction: Homogenize embryonic tissues in RIPA buffer with protease and phosphatase inhibitors. Centrifuge at 12,000×g for 15 minutes at 4°C and collect supernatant.
- Protein Quantification: Determine protein concentration using BCA or Bradford assay.
- Gel Electrophoresis: Load 20-40μg of protein per lane on 4-20% gradient SDS-PAGE gels. Include molecular weight markers. Run at constant voltage until dye front reaches bottom of gel [73].
Transfer and Total Protein Normalization
- Membrane Transfer: Transfer proteins to PVDF or nitrocellulose membrane using wet or semi-dry transfer systems.
- Total Protein Normalization:
- Labeling: Use fluorescent total protein stains (e.g., No-Stain Protein Labeling Reagent) according to manufacturer's instructions [73].
- Imaging: Image total protein signal before immunodetection using appropriate imaging systems (e.g., iBright Imaging System) [73].
- Normalization: Use total protein signal for lane-to-lane normalization instead of traditional housekeeping proteins.
Immunodetection
- Blocking: Incubate membrane in 5% non-fat dry milk or BSA in TBST for 1 hour at room temperature.
- Primary Antibody Incubation: Incubate with primary antibody diluted in blocking buffer overnight at 4°C with gentle agitation.
- Washing: Wash membrane with TBST (3×10 minutes).
- Secondary Antibody Incubation: Incubate with HRP-conjugated or fluorescently-labeled secondary antibody for 1 hour at room temperature.
- Detection:
- Chemiluminescent: Develop with ECL substrate and image with digital imaging system.
- Fluorescent: Image with appropriate laser and filter sets.
Table 1: Troubleshooting Common Issues in IHC and Western Blot
| Issue | Possible Causes | Solutions |
|---|---|---|
| High Background (IHC) | Inadequate blocking, over-fixation, improper antibody concentration | Optimize blocking serum concentration, reduce fixation time, titrate antibodies [74] |
| Weak Signal (IHC) | Under-fixation, insufficient antigen retrieval, low antibody concentration | Increase fixation time, optimize antigen retrieval method, increase primary antibody concentration [74] |
| Multiple Bands (WB) | Protein degradation, non-specific antibody binding, improper extraction | Use fresh protease inhibitors, validate antibody specificity with knockout controls, optimize lysis conditions [73] [76] |
| Inconsistent WB Results | Uneven transfer, protein quantification errors, inadequate normalization | Use total protein normalization, verify transfer efficiency with stains, standardize protein quantification [73] |
Data Interpretation and Correlation
Analyzing Complementary Data Sets
When comparing IHC and Western blot results, consider these key aspects:
- Spatial vs. Quantitative Information: IHC provides subcellular localization data, while Western blot confirms protein identity through molecular weight and provides quantitative expression levels [18].
- Fixation-Dependent Variations: Note that different fixation methods (PFA vs. TCA) may yield different apparent protein localizations in IHC, while Western blot results should remain consistent across extraction methods when properly controlled [20].
- Validation of Findings: Use Western blot to confirm IHC results when observing unexpected protein localizations or when antibody specificity is questionable.
Addressing Discrepancies Between Techniques
Discrepancies between IHC and Western blot results can arise from several sources:
- Epitope Accessibility: Fixation and processing for IHC may mask or alter epitopes recognized by antibodies, while Western blotting uses denatured proteins where most epitopes are exposed [18].
- Spatial Resolution Limitations: IHC may detect protein in specific cellular compartments that appear as different bands on Western blot due to post-translational modifications.
- Sensitivity Differences: Western blotting typically has higher sensitivity for low-abundance proteins, while IHC provides context for negative results.
Table 2: Comparative Analysis of IHC and Western Blot Capabilities
| Parameter | IHC/Immunofluorescence | Western Blot |
|---|---|---|
| Protein Localization | Excellent subcellular resolution | Limited to fractionated samples |
| Quantification | Semi-quantitative at best | Highly quantitative with proper normalization |
| Multiplexing | Up to 4+ targets with spectral separation | 2-3 targets with fluorescent detection |
| Throughput | Low to medium | Medium to high |
| Sample Preservation | Maintains tissue architecture | Destructive to tissue structure |
| Molecular Weight Confirmation | Not available | Essential feature |
| Fixation Sensitivity | Highly sensitive to fixation method | Less affected by original fixation |
Research Reagent Solutions
Table 3: Essential Reagents for Cross-Validation Experiments
| Reagent Category | Specific Examples | Function & Importance |
|---|---|---|
| Fixatives | 4% PFA, 4-10% TCA [20] | Preserve tissue architecture and antigen integrity; different fixatives reveal different protein domains |
| Antigen Retrieval Reagents | Citrate buffer (pH 6.0), Tris-EDTA buffer (pH 9.0) [74] | Reverse formaldehyde-induced cross-links to expose hidden epitopes |
| Blocking Agents | Normal serum, BSA, non-fat dry milk [75] [74] | Reduce non-specific antibody binding and background staining |
| Primary Antibodies | Target-specific validated antibodies [77] [78] | Specifically bind to protein of interest; require application-specific validation |
| Detection Systems | HRP-conjugated secondaries with DAB, fluorescent secondaries [75] [74] | Visualize antibody-antigen interactions with high sensitivity |
| Total Protein Normalization | No-Stain Protein Labeling Reagents, fluorescent total protein stains [73] | Superior normalization method for Western blot quantitation |
| Validation Tools | Knockout cell lines, peptide competition assays [77] [76] | Confirm antibody specificity and experimental reliability |
Visualizing Experimental Workflows and Relationships
The following diagrams illustrate the key experimental workflows and logical relationships for cross-validating IHC and Western blot results.
IHC Experimental Workflow
This diagram illustrates the sequential steps in immunohistochemistry processing, highlighting the critical fixation method comparison between PFA (cross-linking) and TCA (precipitative) approaches that significantly impact epitope accessibility and staining outcomes [20] [19].
Cross-Validation Decision Logic
This diagram outlines the logical workflow for cross-validating IHC results with Western blotting, including pathways for addressing discrepancies through additional validation methods such as knockout controls and peptide competition assays [77] [78] [76].
The cross-validation of IHC and Western blot data provides a powerful approach for comprehensive protein analysis in embryonic development research. By implementing the detailed protocols and data interpretation frameworks outlined in this application note, researchers can confidently correlate protein localization with expression levels while controlling for methodological variables. The integration of total protein normalization in Western blotting and careful consideration of fixation effects in IHC significantly enhances the reliability and reproducibility of research findings. This multifaceted validation approach is particularly crucial in developmental biology, where precise understanding of protein dynamics underpins mechanistic insights into embryogenesis.
Limitations of Whole-Mount Fixation: When Sectioning is Necessary
Whole-mount fixation and staining is a powerful technique for preserving three-dimensional architecture in biological specimens, enabling comprehensive spatial analysis of protein distribution and gene expression in intact tissues. However, this method faces significant limitations related to specimen size, antibody penetration, and imaging constraints. This application note details the specific scenarios where traditional sectioning methods become necessary, supported by quantitative data, optimized protocols for both approaches, and a structured framework for selecting the appropriate methodology. We provide actionable guidance for researchers and drug development professionals to navigate the trade-offs between structural context and technical feasibility in fixation-based research.
Whole-mount techniques allow for the immunostaining or hybridization of intact tissue samples without sectioning, preserving valuable three-dimensional spatial relationships that are critical for understanding biological structure and function [16]. This approach is particularly valuable in developmental biology, neurobiology, and embryology, where the architecture of tissues and embryos provides essential context for interpreting molecular localization [16] [79].
The fundamental challenge, however, lies in the physical limitations of reagent penetration and light microscopy. As specimen size increases, the ability of fixatives, antibodies, and RNA probes to permeate the entire tissue becomes progressively constrained [16]. Similarly, optical limitations prevent clear visualization of signals in thick, opaque specimens. Consequently, researchers must make critical methodological choices based on their specific experimental requirements, balancing the desire for complete 3D context against the technical constraints imposed by their model system.
Critical Limitations of Whole-Mount Techniques
Physical and Technical Constraints
The primary limitations of whole-mount methods can be categorized into three key areas: penetration barriers, imaging challenges, and methodological inflexibility.
Penetration Barriers: The thickness of whole samples necessitates extended incubation times for fixatives, antibodies, and washing buffers to reach the tissue core [16]. Inadequate permeabilization results in uneven or false-negative staining, particularly in dense tissue regions. The fixative concentration and duration must be carefully balanced; under-fixation compromises structural integrity, while over-fixation through prolonged exposure can cause epitope masking by excessive protein cross-linking [16]. Critically, antigen retrieval techniques commonly applied to paraffin sections to recover masked epitopes—such as heat-induced epitope retrieval—are generally not feasible for whole-mount embryos or fragile tissues, as the heating process would destroy the sample [16].
Imaging Challenges: Visualizing signals in whole-mount specimens requires specialized imaging approaches. While confocal microscopy can scan through optical sections of smaller embryos, larger specimens present significant challenges due to light scattering and opacity [16]. For large embryos or tissue samples, obtaining a clear view of internal structures often requires physical sectioning after staining, negating the primary advantage of the whole-mount approach [16].
Size and Age Restrictions: Practical application of whole-mount techniques is limited to specimens below specific size thresholds. As a guideline, successful whole-mount staining is typically feasible for chicken embryos up to 6 days and mouse embryos up to 12 days of development [16]. Beyond these stages, specimens often become too large for effective reagent penetration, requiring dissection into smaller segments or a return to sectioning methods.
Quantitative Comparison: Whole-Mount vs. Sectioning
The table below summarizes the key technical limitations that necessitate sectioning-based approaches.
Table 1: Technical Limitations of Whole-Mount Approaches and Sectioning Alternatives
| Limiting Factor | Impact on Whole-Mount Experiments | Sectioning Solution |
|---|---|---|
| Specimen Size [16] | Mouse embryos >12 days; Chicken embryos >6 days become impermeable | Enables analysis of tissues and embryos at any developmental stage |
| Antibody Penetration [16] | Limited diffusion into dense tissue cores; uneven staining | Uniform antibody access to all cells on the section surface |
| Epitope Masking [16] | Antigen retrieval not feasible in fragile whole-mounts | Robust antigen retrieval possible (heat, enzymes) |
| Imaging Depth [16] | Limited to superficial signals or requires advanced microscopy | Clear visualization of entire specimen thickness |
| Method Complexity [80] [81] | Extended protocols (several days); multiple optimization steps | Relatively standardized and shorter protocols |
Methodological Workflows: From Whole-Mount to Sectioning
Whole-Mount Immunofluorescence Protocol for Murine Intestine
The following protocol, adapted from Karaman et al. (2023), details a robust method for whole-mount immunofluorescence staining of blood and lymphatic vessels in the adult mouse small intestine [80]. This protocol exemplifies the extensive processing times required for adequate whole-mount staining.
Figure 1: Workflow for whole-mount immunofluorescence staining of adult mouse intestine, highlighting the extended incubation and washing periods required for adequate tissue penetration [80].
Key Reagent Solutions:
- Perfusion Fixative: 4% Paraformaldehyde (PFA) in PBS. Critical: pH must be adjusted to 7.4 for optimal tissue preservation [80].
- Washing/Permeabilization Buffer: 0.3% Triton X-100 in PBS (0.3% PBST) [80].
- Blocking Solution: Donkey immunomix (DIM) containing serum, detergent, and azide to prevent microbial growth during extended incubations [80].
- Mounting Medium: Mowiol 4-88, a polyvinyl alcohol-based medium that preserves fluorescence [80].
Protocol Details:
- Perfusion Fixation: Perform intracardiac perfusion with approximately 40 mL of ice-cold 4% PFA to rapidly fix tissues in situ [80].
- Tissue Preparation: Dissect the small intestine and further fix samples in 4% PFA for 2 hours at 4°C with gentle agitation [80].
- Permeabilization: Incubate tissues in 0.3% PBST for 2-3 days at 4°C to allow detergent penetration throughout the tissue [80].
- Blocking: Incubate in blocking solution for a minimum of 6 hours at 4°C to minimize non-specific antibody binding [80].
- Antibody Incubations:
- Mounting: Place stained tissues on silicone-coated plates to prevent deformation and coverslip with Mowiol mounting medium [80].
Immunofluorescence Protocol for Paraffin Sections
When whole-mount limitations preclude its use, section-based immunofluorescence provides a reliable alternative. The following protocol is optimized for paraffin-embedded tissues.
Figure 2: Standard workflow for immunofluorescence staining of paraffin sections, featuring key differentiators like dewaxing and antigen retrieval that enable high-quality staining in processed tissues [82].
Key Reagent Solutions:
- Dewaxing Solutions: Xylene, Xylene/Ethanol (1:1), and ethanol series (100%, 95%, 70%) [82].
- Antigen Retrieval Buffer: Citrate-based solution (pH 6.0). The pH is critical and may require optimization from 3 to 10 depending on the antigen [82].
- Permeabilization Buffer: PBS containing 0.2% gelatin and 0.25% Triton X-100 [82].
- Blocking Solution: 5% Bovine Serum Albumin (BSA) in permeabilization buffer [82].
Protocol Details:
- Tissue Fixation: Fix dissected tissues in 4% PFA (4 hours to overnight at 4°C). Note: The optimal fixation time must be determined empirically to preserve antigenicity [82].
- Processing & Embedding: Dehydrate through graded ethanol series, clear in xylene, and embed in paraffin using standard histological protocols [82].
- Sectioning: Cut 5-10 μm sections using a microtome and mount on charged slides (e.g., SuperFrost Plus) [82].
- Dewaxing and Rehydration: Deparaffinize slides by sequential incubation in xylene (3 × 10 min), xylene/ethanol (1:1, 5 min), then ethanol series (100%, 95%, 70% - 5 min each), followed by dH₂O [82].
- Antigen Retrieval: Incubate slides in preheated citrate-based unmasking solution (pH 6.0) using a water bath or steamer at 95-100°C for 20-30 min. Cool slides for 20 min at room temperature before proceeding [82].
- Permeabilization and Blocking: Permeabilize with 0.25% Triton X-100 for 10 min, then block with 5% BSA for 1 hour at room temperature [82].
- Antibody Incubations:
- Mounting: Apply antifade mounting medium containing DAPI for nuclear counterstaining and coverslip [82].
The Scientist's Toolkit: Essential Research Reagents
Table 2: Key Reagents for Whole-Mount and Section-Based Immunofluorescence
| Reagent Category | Specific Examples | Critical Function | Application Notes |
|---|---|---|---|
| Fixatives | 4% Paraformaldehyde (PFA) [80] | Preserves tissue architecture and antigenicity | pH must be 7.4; cross-linking may mask some epitopes [80] |
| Permeabilization Agents | Triton X-100 [80] [82] | Dissolves membranes for antibody penetration | Concentration varies (0.1-0.3% for whole-mount; 0.25% for sections) [80] [82] |
| Blocking Agents | Normal Serum, BSA [80] [82] | Reduces non-specific antibody binding | Donkey immunomix for whole-mount; 5% BSA for sections [80] [82] |
| Mounting Media | Mowiol 4-88 [80], VECTASHIELD [80] | Preserves fluorescence and optical clarity | Mowiol for whole-mount; commercial antifade for sections [80] |
| Antigen Retrieval Reagents | Citrate-based solution (pH 6.0) [82] | Recovers masked epitopes after fixation | Used almost exclusively in section-based methods [82] |
The choice between whole-mount fixation and sectioning approaches represents a significant strategic decision in experimental design. Whole-mount methods provide unparalleled preservation of three-dimensional context but are constrained by specimen size, penetration limitations, and imaging challenges. Sectioning techniques, while disrupting 3D architecture, enable reliable analysis of larger specimens, permit epitope retrieval, and facilitate high-resolution imaging.
Researchers should select their methodological approach based on explicit experimental priorities: whole-mount for 3D spatial relationships in appropriately sized specimens, and sectioning for reliability, flexibility, and accessibility with larger or more dense tissues. A thorough understanding of these complementary techniques ensures that methodological constraints do not compromise scientific objectives, enabling robust and interpretable results in fixation-based research.
Best Practices for Reproducible and Quantifiable Fixation Outcomes
In whole mount embryo immunofluorescence research, the fixation step is the cornerstone upon which all subsequent data rests. It is a critical balance between preserving native tissue architecture and maintaining the antigenicity of target proteins. suboptimal fixation can introduce artifacts, diminish signal intensity, and compromise the quantifiability of results, ultimately threatening the validity of scientific conclusions. This application note details evidence-based best practices for fixation, drawing on comparative analyses to guide researchers in achieving reproducible and robust outcomes for quantitative imaging. The principles outlined here are fundamental to a broader thesis on advancing methodological rigor in developmental and organoid biology.
Fixation Agent Selection: A Quantitative Comparison
The choice of fixative is one of the most significant determinants of experimental success. The cross-linking agent paraformaldehyde (PFA) and the precipitating agent trichloroacetic acid (TCA) represent two common but mechanistically distinct approaches, each with unique effects on epitope preservation and tissue morphology.
Table 1: Comparative Analysis of PFA and TCA Fixation Agents
| Characteristic | Paraformaldehyde (PFA) | Trichloroacetic Acid (TCA) |
|---|---|---|
| Mechanism of Action | Cross-links proteins and amines in DNA/RNA via amino acid bridges [1] | Denatures and precipitates proteins through acid-induced coagulation [1] |
| Impact on Nuclear Morphology | Preserves standard nuclear architecture [1] | Results in larger and more circular nuclei [1] |
| Optimal for Nuclear Antigens | Excellent for transcription factors (e.g., SOX, PAX) [19] [1] | Suboptimal for nuclear-localized transcription factors [1] |
| Optimal for Cytoskeletal/Membrane Antigens | Adequate signal strength [1] | Superior for cytosolic microtubules (e.g., Tubulin) and membrane-bound cadherins [1] |
| Key Advantage | Superior preservation of structural epitopes and tissue architecture [1] | Can reveal protein localization domains inaccessible to PFA [1] |
This comparative data underscores that the "best" fixative is epitope- and application-dependent. PFA is generally the default for its superior structural preservation, but TCA can be a powerful alternative for specific targets, particularly those in the cytoplasm or cell membrane [1].
Standardized Experimental Protocols
Protocol: Whole-Mount Immunofluorescence for Mouse Embryos (Cardiac Crescent Stage)
This protocol, adapted from a detailed methodological guide, is designed for the quantitative 3D analysis of progenitor cell populations [61].
1. Harvesting and Fixation
- Sacrifice a pregnant mouse at E8.25 and dissect the uterus in phosphate-buffered saline (PBS).
- Isolate individual embryos and remove extraembryonic tissues carefully to preserve morphology.
- Fix embryos in 4% PFA in PBS for 1 hour at room temperature (or overnight at 4°C).
- Rinse embryos three times with PBS and store at 4°C until use [61].
2. Immunofluorescence Staining
- Permeabilize and block embryos by incubating in blocking buffer (0.5% saponin, 1% BSA in PBS) for a minimum of 4 hours at room temperature.
- Incubate embryos in primary antibody mixture diluted in blocking buffer overnight at 4°C with gentle agitation.
- Wash embryos 3 times for 1 hour each with 0.1% Triton X-100 in PBS.
- Incubate with secondary antibody mixture in blocking buffer for 3 hours at room temperature (or overnight at 4°C).
- Perform washes again, as after the primary antibody.
- Counterstain nuclei with DAPI (e.g., 10 minutes) [61].
3. Mounting and Imaging
- Equilibrate embryos in an anti-fade mounting medium (e.g., 2% n-Propyl gallate, 90% glycerol, 1x PBS).
- Mount embryos on a microscope slide using double-stick tape or silicone spacers to prevent compression.
- Image using confocal microscopy, ensuring optimal settings for 3D reconstruction and quantification [61].
Protocol: Comparative Fixation for Avian Embryos
This protocol allows for the direct comparison of PFA and TCA on the same biological system [1].
1. PFA Fixation
- Prepare a 4% PFA solution in 0.2M phosphate buffer.
- Fix dissected chicken embryos at room temperature for 20 minutes.
- After fixation, wash embryos in Tris-Buffered Saline or PBS containing 0.1–0.5% Triton X-100 (TBST or PBST) [1].
2. TCA Fixation
- Prepare a 2% TCA solution in PBS from a 20% stock.
- Fix embryos at room temperature for 1–3 hours.
- After fixation, wash embryos in TBST or PBST [1].
Following fixation and washing, both PFA- and TCA-fixed samples can proceed with a standard whole-mount immunohistochemistry protocol, including blocking, incubation with primary and secondary antibodies, and final washing steps [1].
Workflow Visualization
The following diagram illustrates the critical decision points and steps involved in establishing a reproducible fixation and imaging pipeline.
The Scientist's Toolkit: Essential Research Reagents
Successful and reproducible whole-mount immunofluorescence relies on a core set of reagents, each with a specific function in the pipeline.
Table 2: Essential Reagents for Whole-Mount Embryo Fixation and Staining
| Reagent Category | Specific Examples | Function & Importance |
|---|---|---|
| Fixatives | 4% Paraformaldehyde (PFA), 2% Trichloroacetic Acid (TCA), Methanol [1] [16] | Preserves tissue morphology and stabilizes antigens; choice depends on epitope sensitivity [1] [16]. |
| Buffers & Salines | Phosphate Buffered Saline (PBS), Tris-Buffered Saline (TBS) [1] [61] | Provides a physiological ionic and pH environment for fixation, washing, and antibody dilution. |
| Permeabilization Agents | Triton X-100, Saponin, Tween-20 [61] [83] | Disrupts lipid membranes to allow antibody penetration into the tissue. |
| Blocking Agents | Bovine Serum Albumin (BSA), Donkey Serum, Fish Skin Gelatin [1] [61] | Reduces non-specific antibody binding, lowering background signal. |
| Mounting Media | Glycerol-based anti-fade (e.g., with n-Propyl gallate), ProLong Gold [61] [54] | Preserves fluorescence, reduces photobleaching, and provides refractive index matching for clearer imaging [54]. |
| Clearing Agents | 80% Glycerol, Fructose-glycerol, OptiPrep [54] [83] | Reduces light scattering in thick samples, enabling deeper imaging. 80% Glycerol shows a 3-8 fold reduction in intensity decay at depth [54]. |
| Enzymes | Proteinase K [84] [83] | Used for additional permeabilization, particularly for dense tissues or to enhance mRNA probe access in hybridizations [83]. |
Reproducible and quantifiable fixation is not a single formula but a carefully considered strategic process. It begins with selecting a fixative based on the biological question and target antigen, as evidenced by quantitative comparisons between PFA and TCA. This is followed by meticulous execution of standardized protocols for fixation, staining, and mounting. Finally, the use of specialized reagents for clearing and imaging ensures that the high-quality preservation achieved through proper fixation is translated into quantifiable, high-resolution 3D data. Adhering to these best practices is essential for generating reliable, publication-ready results in whole mount embryo research and for building a robust thesis on advanced fixation methodologies.
Conclusion
Successful whole-mount embryo immunofluorescence hinges on selecting and optimizing the appropriate fixation method, a decision that profoundly impacts antigen preservation, tissue integrity, and final image quality. This guide has synthesized key takeaways, from foundational principles to advanced troubleshooting, emphasizing that there is no universal fixative. The choice between 4% PFA and methanol must be empirically determined based on the target antigen and embryo model. As the field advances, future directions will see a tighter integration of optimized fixation protocols with sophisticated downstream applications like long-term live imaging, highly multiplexed spatial transcriptomics, and quantitative 3D image analysis. Mastering these fixation fundamentals is therefore not merely a technical requirement but a gateway to generating robust, high-fidelity data that can propel discoveries in developmental biology, disease mechanisms, and therapeutic development.
References
- 1. Effectiveness of fixation methods for wholemount ... [https://pmc.ncbi.nlm.nih.gov/articles/PMC10996528/]
- 2. 3D Immunolocalization with Plastic Sections [https://www.sciencedirect.com/science/article/abs/pii/S0091679X06790197]
- 3. ICC/IF Protocol [https://www.antibodies.com/applications/immunofluorescence/immunofluorescence-protocol]
- 4. High-quality ultrastructural preservation using cryofixation ... [https://elifesciences.org/articles/35524]
- 5. Critical importance of appropriate fixation conditions for faithful ... [https://pmc.ncbi.nlm.nih.gov/articles/PMC5051640/]
- 6. Successful Immunofluorescence: Fixation & Permeabilization [https://blog.cellsignal.com/successful-immunofluorescence-fixation-and-permeabilization]
- 7. The effect of methanol fixation on single-cell RNA sequencing ... [https://bmcgenomics.biomedcentral.com/articles/10.1186/s12864-021-07744-6]
- 8. Comparison of Fixation Methods for Preservation of ... - PMC [https://pmc.ncbi.nlm.nih.gov/articles/PMC3201123/]
- 9. High-throughput RNA sequencing of paraformaldehyde ... [https://www.nature.com/articles/s41467-021-25871-2]
- 10. Protocol for whole-mount immunofluorescence staining of ... [https://pmc.ncbi.nlm.nih.gov/articles/PMC11227007/]
- 11. Protocol: Immunofluorescence Staining of Cells for ... [https://biotium.com/tech-tips-protocols/protocol-immunofluorescence-staining-of-cells-for-microscopy/]
- 12. Cells - 5 Crucial Steps for Obtaining a Great ... [https://animalab.eu/knowledge-base/cells-5-crucial-steps-for-obtaining-a-great-immunofluorescent-cell-image]
- 13. Immunofluorescence Protocol for Cell-based Assays ... [https://www.cellsignal.com/learn-and-support/protocols/protocol-if-methanol-fixation?srsltid=AfmBOor_sEH42nAEPixP-OFs1XJWGaSxH9aSSnKvKpotYybn803VGcdT]
- 14. The effect of chemical fixation with paraformaldehyde ... [https://pmc.ncbi.nlm.nih.gov/articles/PMC11837135/]
- 15. Fixation can change the appearance of phase separation ... [https://elifesciences.org/articles/79903]
- 16. IHC staining protocol for whole mount samples [https://www.abcam.com/en-us/technical-resources/protocols/wholemount-staining-for-ihc]
- 17. A novel protocol of whole mount electro-immunofluorescence ... [https://pmc.ncbi.nlm.nih.gov/articles/PMC2650717/]
- 18. Immunohistochemistry (IHC): The Complete Guide [https://www.antibodies.com/applications/immunohistochemistry]
- 19. Comparative analysis of fixation techniques for signal ... [https://www.sciencedirect.com/science/article/pii/S0012160624002276]
- 20. Effectiveness of fixation methods for wholemount ... - PubMed [https://pubmed.ncbi.nlm.nih.gov/38585750/]
- 21. An open-source semi-automated robotics pipeline for ... [https://www.nature.com/articles/s41598-021-89676-5]
- 22. Comparative analysis of fixation and embedding techniques ... [https://pmc.ncbi.nlm.nih.gov/articles/PMC5936644/]
- 23. Fixation of Embryonic Mouse Tissue for Cytoneme Analysis [https://pmc.ncbi.nlm.nih.gov/articles/PMC9590306/]
- 24. Comparison of Different Fixation Methods for Combined ... [https://pmc.ncbi.nlm.nih.gov/articles/PMC9326524/]
- 25. Protocol for isolation of mouse pre-implantation embryos ... [https://pmc.ncbi.nlm.nih.gov/articles/PMC10394003/]
- 26. Preparation of Postimplantation Mouse Embryos for Imaging [https://pmc.ncbi.nlm.nih.gov/articles/PMC6830062/]
- 27. Immunofluorescence techniques in zebrafish retina [https://www.ptglab.com/news/blog/immunofluorescence-techniques-in-zebrafish-retina/?srsltid=AfmBOor_QjTRqdqjNg728ZD3zZMHQbF9JaonDk7OJPS_nQ7Gs5EeLLnV]
- 28. whole mount microRNA in situ hybridization protocol for ... [https://pmc.ncbi.nlm.nih.gov/articles/PMC3509442/]
- 29. Quantitative In Vivo Imaging of Embryonic Development [https://pmc.ncbi.nlm.nih.gov/articles/PMC3694278/]
- 30. Protocol for whole-mount preparation, clearing, and ... [https://www.sciencedirect.com/science/article/pii/S2666166724006567]
- 31. Dechorionated zebrafish embryos improve evaluation of ... [https://www.frontiersin.org/journals/toxicology/articles/10.3389/ftox.2024.1476110/full]
- 32. Automated Zebrafish Chorion Removal and Single Embryo ... [https://pmc.ncbi.nlm.nih.gov/articles/PMC3327291/]
- 33. Embryonic cell culture in zebrafish - PMC [https://pmc.ncbi.nlm.nih.gov/articles/PMC6020034/]
- 34. ZFIN: Zebrafish Book: Molecular Methods [https://zfin.org/zf_info/zfbook/chapt9/9.8.html]
- 35. Fix, Perm, and Block protocol [https://www.thermofisher.com/us/en/home/life-science/cell-analysis/cell-analysis-learning-center/molecular-probes-school-of-fluorescence/imaging-basics/protocols-troubleshooting/protocols/fix-perm-block.html]
- 36. Immunocytochemistry protocol | Abcam [https://www.abcam.com/en-us/technical-resources/protocols/icc-protocol]
- 37. Flow Cytometry, Triton X-100 Permeabilization Protocol | Cell Signaling Technology [https://www.cellsignal.com/learn-and-support/protocols/protocol-flow-triton-x100]
- 38. A modified immunofluorescence in situ hybridization ... [https://pmc.ncbi.nlm.nih.gov/articles/PMC5958724/]
- 39. RNA In situ Hybridization with Sequential Protein ... [https://app.jove.com/t/68615/rna-situ-hybridization-with-sequential-protein-immunofluorescence]
- 40. Fully automated sequential immunofluorescence (seqIF) ... [https://www.nature.com/articles/s41598-023-43435-w]
- 41. Multiplex Staining by Sequential Immunostaining and ... [https://pmc.ncbi.nlm.nih.gov/articles/PMC5533273/]
- 42. Procedures for the Quantification of Whole-Tissue ... [https://journals.plos.org/plosone/article?id=10.1371/journal.pone.0135343]
- 43. Whole Mount Immunofluorescence and Follicle ... [https://pmc.ncbi.nlm.nih.gov/articles/PMC6101098/]
- 44. A simple and fast optical clearing method for whole-mount ... [https://pmc.ncbi.nlm.nih.gov/articles/PMC12342960/]
- 45. Tridimensional Visualization and Analysis of Early Human ... [https://www.sciencedirect.com/science/article/pii/S0092867417302878]
- 46. Protocol for immunofluorescence detection and ... [https://www.sciencedirect.com/science/article/pii/S2666166725002552]
- 47. Quantitative Evaluation of the Association Between ... [https://pmc.ncbi.nlm.nih.gov/articles/PMC8965591/]
- 48. Visualization of the Cytoskeleton in Fixed Drosophila Embryos [https://pubmed.ncbi.nlm.nih.gov/40372005/]
- 49. Immunofluorescence (IF) Troubleshooting Guide [https://www.cellsignal.com/learn-and-support/troubleshooting/if-troubleshooting-guide?srsltid=AfmBOorx0tK8y6JxEa9r1Acfy-iUw4JXMz7piEZe7I7xaH3KPGzPGp5q]
- 50. Reconciling specificity and non-specificity in antibody binding [https://pmc.ncbi.nlm.nih.gov/articles/PMC12443689/]
- 51. Protocol for immunofluorescence detection and ... [https://pmc.ncbi.nlm.nih.gov/articles/PMC12156156/]
- 52. How to Eliminate Non Specific Binding of Antibody Oligo ... [https://www.aboligo.com/resources/bioconjugation-optimization/eliminate-nonspecific-binding]
- 53. In toto analysis of embryonic organisation reduces tissue ... [https://www.nature.com/articles/s41467-025-62127-9]
- 54. A quantitative pipeline for whole-mount deep imaging and ... [https://elifesciences.org/reviewed-preprints/107154]
- 55. A powerful and versatile new fixation protocol for ... [https://bmcbiol.biomedcentral.com/articles/10.1186/s12915-024-02052-3]
- 56. ACT-PRESTO: Rapid and consistent tissue clearing ... [https://www.nature.com/articles/srep18631]
- 57. with Chimeric Antibodies Multiplex Immunofluorescence [https://blog.cellsignal.com/designing-multiplex-if-experiments-for-neuroscience-research]
- 58. Flow Cytometry Protocol | Abcam [https://www.abcam.com/en-us/technical-resources/protocols/flow-cytometry-for-intracellular-and-extracellular-targets]
- 59. Best Practices for Multiparametric Flow Cytometry [https://www.thermofisher.com/us/en/home/references/newsletters-and-journals/bioprobes-journal-of-cell-biology-applications/bioprobes-79/best-practices-multiparametric-flow-cytometry.html]
- 60. The End Of The Line: Considerations For Mounting Media ... [https://vectorlabs.com/blog/considerations-for-mounting-media-selection-html/?srsltid=AfmBOookjbq-sL-XHkbI1XX0ZnloyPKzHOeZiDiOQ00t5v_vEdNHCpQf]
- 61. Quantitative Whole-mount Immunofluorescence Analysis of ... [https://pmc.ncbi.nlm.nih.gov/articles/PMC6475905/]
- 62. Immunofluorescence techniques in zebrafish retina [https://www.ptglab.com/news/blog/immunofluorescence-techniques-in-zebrafish-retina/?srsltid=AfmBOooZy0BAWFjPm7cauc_1gLiQWZCTMGHwdRFo73KPKtzBV8jP9R07]
- 63. Simultaneous visualization of RNA transcripts and proteins ... [https://pmc.ncbi.nlm.nih.gov/articles/PMC9577017/]
- 64. Isotype Control Antibodies [https://www.thermofisher.com/us/en/home/life-science/antibodies/primary-antibodies/control-antibodies/isotype-control-antibodies.html]
- 65. 5 Controls for Immunofluorescence: An Easy Guide [https://bitesizebio.com/44370/controls-for-immunofluorescence-a-beginners-guide/]
- 66. Knockout and Knockdown Antibody Validation [https://www.thermofisher.com/us/en/home/life-science/antibodies/invitrogen-antibody-validation/knockout-knockdown-antibody-validation.html]
- 67. Antibody Validation for Immunofluorescence [https://www.cellsignal.com/about-us/our-approach-process/antibody-validation-immunofluorescence?srsltid=AfmBOorx4A42anCfmUltq5AIK3YiWijdknb9cgW9LEnnhj14v77Bgwa7]
- 68. Generation and immunofluorescent validation of gene ... [https://pmc.ncbi.nlm.nih.gov/articles/PMC9826973/]
- 69. Proof of the Quantitative Potential of Immunofluorescence ... [https://pmc.ncbi.nlm.nih.gov/articles/PMC5334147/]
- 70. The Impact of Fixation on the Detection of Oligodendrocyte ... [https://www.mdpi.com/2073-4409/10/6/1302]
- 71. 3D exploration of gene expression in chicken embryos ... [https://bmcbiol.biomedcentral.com/articles/10.1186/s12915-024-01922-0]
- 72. Protocol for tissue expansion microscopy for ultrastructure ... [https://pmc.ncbi.nlm.nih.gov/articles/PMC12305189/]
- 73. 2024 Guide to Quantitative Western Blot Publication [https://www.thermofisher.com/blog/life-in-the-lab/2023-guide-to-quantitative-western-blot-publication/]
- 74. IHC Protocol [https://www.bostonbioproducts.com/resources/ihc-protocol/]
- 75. Immunohistochemistry protocol for visualization of the ... [https://www.protocols.io/view/immunohistochemistry-protocol-for-visualization-of-hcz3b2x8p.html]
- 76. Inside our application testing [https://www.abcam.com/en-us/stories/articles/inside-our-application-testing]
- 77. Hallmarks of Antibody Validation: Complementary Strategies [https://www.cellsignal.com/about-us/approach-validation-principles/complementary-assay?srsltid=AfmBOoouGq6hq2T3djrXo11OrbV-unHAtL5enu8wZ3iyKQ2SH9qas17s]
- 78. Product Performance & Validation [https://www.cellsignal.com/about-us/cst-antibody-validation-principles?srsltid=AfmBOoqaLhGCCrYW3h8YycxbZMmE9XSSUefb-jplWKt6KKQracaTVh7t]
- 79. Wholemount in situ Hybridization for Spatial-temporal ... [https://pmc.ncbi.nlm.nih.gov/articles/PMC8635846/]
- 80. Whole-mount immunofluorescence staining of blood and ... [https://pmc.ncbi.nlm.nih.gov/articles/PMC10192636/]
- 81. Organ Culture and Whole Mount Immunofluorescence ... [https://pmc.ncbi.nlm.nih.gov/articles/PMC5352256/]
- 82. Immunofluorescence Staining of Paraffin Sections Step by ... [https://pmc.ncbi.nlm.nih.gov/articles/PMC7680859/]
- 83. Optimization of Whole Mount RNA Multiplexed in situ ... [https://www.frontiersin.org/journals/physiology/articles/10.3389/fphys.2022.882413/full]
- 84. Single Molecule Fluorescence In Situ Hybridization Using ... [https://pmc.ncbi.nlm.nih.gov/articles/PMC11986847/]