Direct vs. Indirect Immunofluorescence for Embryo Research: A Comprehensive Guide for Scientists
This article provides a detailed comparative analysis of direct and indirect immunofluorescence (IF) techniques, specifically tailored for research on embryonic tissues.
Direct vs. Indirect Immunofluorescence for Embryo Research: A Comprehensive Guide for Scientists
Abstract
This article provides a detailed comparative analysis of direct and indirect immunofluorescence (IF) techniques, specifically tailored for research on embryonic tissues. Aimed at researchers, scientists, and drug development professionals, it covers foundational principles, methodological protocols for embryo preparation, and advanced troubleshooting strategies. The scope extends to rigorous antibody validation and a head-to-head comparison of both techniques, evaluating their sensitivity, cost, flexibility, and applicability in studying key developmental processes, such as TGF-β signaling and chromosome segregation, to inform method selection for precise and reliable experimental outcomes in developmental biology.
Understanding Immunofluorescence: Core Principles for Embryo Analysis
Immunofluorescence (IF) is a foundational light microscopy technique that enables the detection and localization of a wide variety of target biomolecules within cells or tissues at a quantitative level. This method relies on the specific binding interaction between antibodies and antigens, where antibodies conjugated to fluorescent dyes (fluorophores) serve as highly specific probes for visualizing the spatial distribution of target proteins. The technique was conceptualized in the 1940s by Albert H. Coons and has since become an indispensable tool in both basic research and clinical diagnostics, particularly in the field of reproductive biology and embryo research [1] [2].
The core principle of immunofluorescence centers on the exquisite specificity of antibody-antigen recognition. Each antibody recognizes a specific region on an antigen called an epitope. By conjugating antibodies to fluorophores—molecules that absorb light at specific wavelengths and emit light at longer wavelengths—researchers can visualize the precise subcellular localization of target antigens using fluorescence microscopy. The emitted light from excited fluorophores creates a detectable signal that reveals the distribution pattern of the antigen within the sample [1] [3]. This technique is particularly valuable in embryo research, where understanding the spatial and temporal expression of key developmental proteins can provide critical insights into embryogenesis and potential causes of developmental abnormalities.
For researchers studying embryos, immunofluorescence offers several distinct advantages. It provides excellent sensitivity and signal amplification compared to traditional immunohistochemistry, allows for multiplexing to detect multiple targets simultaneously, and preserves the architectural context of cellular components within the delicate embryo structure. The ability to visualize virtually any component within embryonic tissues or cells through combinations of specific antibodies tagged with fluorophores makes it particularly powerful for developmental biology applications [2] [4]. When working with precious embryo samples, the choice between direct and indirect immunofluorescence becomes particularly critical, as each approach offers different benefits in terms of sensitivity, specificity, multiplexing capability, and experimental workflow.
Comparative Analysis of Direct and Indirect Immunofluorescence
Fundamental Principles and Workflows
Direct immunofluorescence (DIF), also referred to as primary immunofluorescence, employs a single incubation step where the primary antibody is directly conjugated to a fluorophore. This antibody-fluorophore complex is applied to the sample, where it specifically binds to the target antigen. The direct attachment of the fluorophore to the primary antibody simplifies the staining procedure, reduces total incubation time, and minimizes potential non-specific binding that might occur with additional antibody layers [5] [1]. The streamlined nature of this approach makes it particularly useful for rapid detection of targets in clinical diagnostics and for studying highly expressed proteins in embryonic systems where background signal must be minimized.
Indirect immunofluorescence (IIF), or secondary immunofluorescence, utilizes a two-step incubation process. First, an unlabeled primary antibody binds specifically to the target antigen. Subsequently, a fluorophore-conjugated secondary antibody that recognizes and binds to the primary antibody is applied. This secondary antibody is typically raised against the immunoglobulin of the species in which the primary antibody was produced (e.g., goat anti-mouse IgG) [2] [4]. The indirect method introduces an amplification step since multiple secondary antibodies, each carrying several fluorophore molecules, can bind to a single primary antibody molecule. This signal amplification makes IIF significantly more sensitive than the direct method, particularly advantageous when detecting low-abundance targets in limited embryo samples [3] [1].
Table 1: Core Characteristics of Direct and Indirect Immunofluorescence
| Characteristic | Direct Immunofluorescence | Indirect Immunofluorescence |
|---|---|---|
| Antibodies Used | Single fluorophore-conjugated primary antibody | Unlabeled primary antibody + fluorophore-conjugated secondary antibody |
| Experimental Workflow | One-step incubation | Two-step incubation |
| Process Time | Shorter (fewer steps) | Longer (additional incubation and wash steps) |
| Signal Amplification | Limited | Significant (multiple secondaries per primary) |
| Sensitivity | Lower | Higher |
| Flexibility | Limited to available conjugated primaries | High (same secondary can be used with various primaries) |
| Species Cross-Reactivity | Lower | Higher (can be mitigated with adsorbed secondaries) |
| Background Signal | Generally lower | Potentially higher due to additional antibody layer |
| Multiplexing Capability | Limited | Excellent with proper host species matching |
Performance Comparison in Research Applications
The choice between direct and indirect immunofluorescence significantly impacts experimental outcomes, particularly in embryo research where sample preservation and signal clarity are paramount. Sensitivity represents one of the most distinguishing factors between these techniques. Indirect IF provides substantially greater sensitivity due to the binding of multiple secondary antibodies to each primary antibody, with each secondary carrying several fluorophore molecules. This signal amplification makes IIF particularly valuable for detecting low-abundance antigens in embryo samples, where protein expression levels might be minimal during critical developmental windows [3] [1]. In contrast, direct IF typically produces weaker signals as each primary antibody carries only a finite number of fluorophores, making it more suitable for highly expressed targets.
Specificity and background signals present another crucial consideration. Direct IF generally produces lower background staining because it involves only one antibody incubation step, reducing opportunities for non-specific binding. This characteristic is particularly advantageous when working with embryonic tissues that may contain endogenous immunoglobulins or exhibit autofluorescence [5] [3]. Indirect IF carries a higher risk of non-specific binding due to the additional secondary antibody layer, though this can be mitigated through careful blocking steps, using cross-adsorbed secondary antibodies, and appropriate dilution optimization. For embryo research specifically, the potential for cross-reactivity with endogenous immunoglobulins must be carefully considered when selecting the primary antibody host species [2].
Experimental flexibility and cost-effectiveness vary considerably between the two approaches. Indirect IF offers significantly greater flexibility as the same fluorophore-conjugated secondary antibody can be used with various primary antibodies from the same host species. This makes it economically advantageous for laboratories conducting diverse research projects, as it eliminates the need to maintain expensive inventories of directly conjugated primary antibodies [5] [4]. Direct IF, while less flexible, provides consistency in staining protocols and is particularly valuable for high-throughput applications or clinical diagnostics where standardized, reproducible protocols are essential.
Multiplexing capability for detecting multiple antigens simultaneously is another area where these techniques differ substantially. Indirect IF excels in multiplex experiments because researchers can use primary antibodies raised in different host species (e.g., mouse, rabbit, goat) combined with species-specific secondary antibodies conjugated to distinct fluorophores. This enables simultaneous visualization of multiple targets within the same embryo sample, providing critical information about protein co-localization and spatial relationships during development [6] [4]. Direct IF is considerably more limited for multiplexing, as it requires the availability of multiple primary antibodies directly conjugated to different fluorophores, which may be commercially limited or require custom conjugation.
Table 2: Performance Comparison for Embryo Research Applications
| Performance Metric | Direct Immunofluorescence | Indirect Immunofluorescence |
|---|---|---|
| Detection of Low-Abundance Targets | Limited effectiveness | Excellent due to signal amplification |
| Suitability for Multiplexing | Limited unless multiple conjugated primaries available | Excellent with proper species matching |
| Experimental Time Requirements | Shorter (typically 1-2 hours incubation) | Longer (typically overnight + 1-2 hours) |
| Technical Expertise Required | Lower | Moderate to high (optimization needed) |
| Reagent Costs | Higher (conjugated primaries are expensive) | Lower (versatile secondaries reduce overall costs) |
| Quantification Potential | Good (linear signal response) | Good to excellent (amplified signal aids detection) |
| Adaptability to Different Sample Types | Limited by conjugated antibody availability | High (same secondary works with various sample types) |
Experimental Protocols for Embryo Research
Sample Preparation and Fixation
Proper sample preparation is critical for successful immunofluorescence in embryo research. Fixation represents the first essential step, serving to preserve cellular architecture, prevent autolysis, and maintain antigenicity while immobilizing target antigens. The ideal fixation method must strike a delicate balance between preserving morphology and maintaining antibody accessibility to epitopes. For embryo research, common fixatives include cross-linking reagents like formaldehyde and glutaraldehyde, which create intra- and intermolecular cross-links, or organic solvents such as methanol and acetone that precipitate cellular components while permeabilizing membranes [2]. The choice of fixative requires empirical optimization as different epitopes may respond variably to fixation methods—some may be well-preserved while others become masked or degraded.
Permeabilization is typically necessary when targeting intracellular antigens in embryo samples, as antibodies are generally too large to penetrate intact cellular membranes. This step is commonly achieved using detergents such as Triton X-100 or saponin, which create pores in lipid membranes while preserving protein antigenicity. For embryo research, gentle permeabilization is essential to maintain the delicate structural integrity of embryonic tissues while allowing antibody access to intracellular targets [2] [4]. Following permeabilization, antigen retrieval may be required, particularly when using cross-linking fixatives that can mask epitopes through protein cross-links. Two primary methods are employed: Protease-Induced Epitope Retrieval (PIER) using enzymes like proteinase K or trypsin to cleave cross-links, and Heat-Induced Epitope Retrieval (HIER) using heated buffer solutions to restore protein conformation [2]. HIER generally causes less tissue damage and is often preferred for delicate embryo samples.
Staining Procedures and Optimization
Blocking is a crucial step that precedes antibody application to minimize non-specific antibody binding. Blocking reagents should ideally have no affinity for target epitopes while effectively binding to non-target reactive sites. Common blocking solutions include concentrated protein buffers like bovine serum albumin (BSA), non-fat dry milk, or gelatin; normal serum from the same species as the secondary antibody; or commercial protein-free blocking buffers [2]. For embryo research, empirical determination of the optimal blocking reagent, concentration, and incubation time is essential, as endogenous immunoglobulins or Fc receptors in embryonic tissues may contribute to background staining if not properly blocked.
Antibody incubation follows blocking, with procedures differing significantly between direct and indirect methods. For direct immunofluorescence, the fluorophore-conjugated primary antibody is diluted in appropriate buffer and applied to the sample for a specified incubation period (typically 1-2 hours at room temperature or overnight at 4°C). For indirect immunofluorescence, the unlabeled primary antibody is applied first (often overnight at 4°C for optimal penetration), followed by thorough washing and subsequent incubation with fluorophore-conjugated secondary antibodies (typically 1 hour at room temperature) [2] [6]. Critical parameters requiring optimization include antibody concentrations, incubation times and temperatures, and buffer compositions. These factors significantly impact signal-to-noise ratios and must be carefully calibrated for embryo samples, which often exhibit higher sensitivity to experimental conditions than established cell lines or adult tissues.
Control experiments are essential for validating immunofluorescence results in embryo research. Recommended controls include: (1) positive controls using samples known to express the target antigen; (2) negative controls with samples where the target is naturally absent or has been genetically knocked down; (3) no-primary controls (secondary antibody only) to assess non-specific secondary antibody binding; (4) isotype controls to evaluate Fc receptor-mediated non-specific binding; and (5) pre-absorption controls where the antibody is pre-incubated with excess antigen to confirm binding specificity [4]. These controls are particularly crucial when working with embryonic samples, where changing expression patterns during development and potential batch-to-batch variability require careful experimental validation.
Detection and Imaging Considerations
Fluorophore selection significantly impacts the quality of immunofluorescence data in embryo research. Key considerations include matching fluorophore excitation and emission spectra to available microscope filters, selecting fluorophores with high extinction coefficients and quantum yields for bright signals, and choosing photostable fluorophores to minimize photobleaching during extended imaging sessions. Common fluorophores include FITC (green emission), TRITC (red emission), and the more photostable Alexa Fluor series dyes [2] [3]. When designing multiplex experiments, careful selection of fluorophore combinations with minimal spectral overlap is essential to prevent bleed-through between channels. For embryo research, where multiple structures may be of interest simultaneously, employing fluorophores with distinct emission spectra enables comprehensive analysis of developmental processes.
Microscopy and image capture techniques must be tailored to embryo samples. Widefield fluorescence microscopy provides rapid imaging of larger areas but may suffer from out-of-focus light, particularly in thicker embryo samples. Confocal microscopy offers optical sectioning capabilities that eliminate out-of-focus light, providing clearer images of specific planes within three-dimensional embryo structures. For the highest resolution imaging of subcellular structures in embryos, super-resolution techniques such as STED (Stimulated Emission Depletion), STORM (Stochastic Optical Reconstruction Microscopy), or SIM (Structured Illumination Microscopy) may be employed, though these require specialized equipment and expertise [1]. To minimize photobleaching during imaging, researchers should use antifade mounting media, minimize light exposure, and consider using oxygen-scavenging systems for time-lapse imaging of live embryos (when applicable).
Visualization of Experimental Workflows
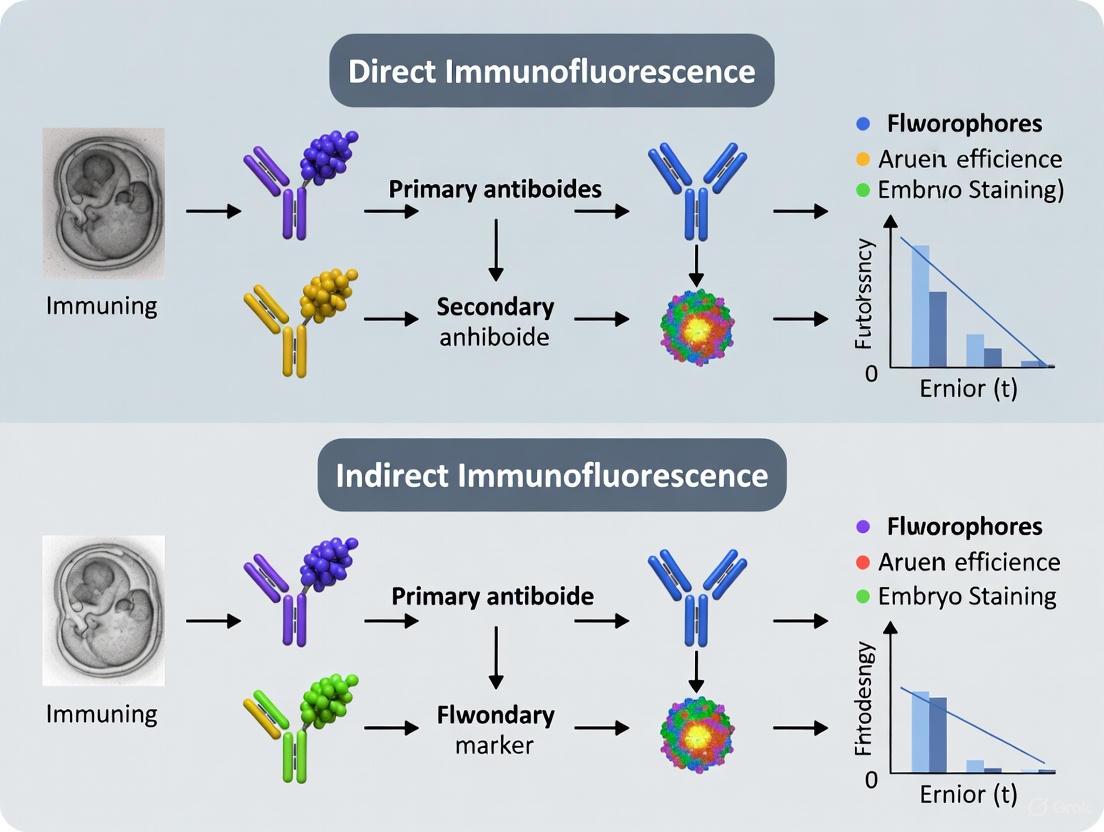
Direct Immunofluorescence Workflow
The direct immunofluorescence method involves a streamlined process where a single fluorophore-conjugated primary antibody binds directly to the target antigen. This approach requires fewer steps than indirect methods, reducing total experimental time and potential sources of non-specific binding.
Indirect Immunofluorescence Workflow
Indirect immunofluorescence employs a two-step process where an unlabeled primary antibody first binds to the target antigen, followed by a fluorophore-conjugated secondary antibody that recognizes and binds to the primary antibody. This method provides significant signal amplification through multiple secondary antibodies binding to each primary antibody.
Research Reagent Solutions for Embryo Immunofluorescence
Successful immunofluorescence in embryo research requires careful selection of reagents optimized for preserving delicate embryonic structures while providing specific and robust detection. The following table outlines essential reagent solutions and their specific functions in embryo immunofluorescence applications.
Table 3: Essential Research Reagents for Embryo Immunofluorescence
| Reagent Category | Specific Examples | Function in Embryo Research | Application Notes |
|---|---|---|---|
| Fixatives | Formaldehyde, Paraformaldehyde, Methanol, Acetone | Preserve cellular architecture and antigenicity | Cross-linking fixatives (formaldehyde) better preserve structure; organic solvents (methanol) simultaneously permeabilize |
| Permeabilization Agents | Triton X-100, Saponin, Tween-20 | Enable antibody access to intracellular epitopes | Concentration and incubation time must be optimized for embryo developmental stage |
| Blocking Reagents | BSA, Normal Serum, Commercial Protein-Free Blocks | Reduce non-specific antibody binding | Serum from secondary antibody species often most effective; protein-free blocks may reduce background |
| Primary Antibodies | Target-Specific Antibodies (Validated for IF) | Recognize and bind to target antigens | Must be validated for immunofluorescence; species host should differ from embryo species |
| Fluorophore-Conjugated Secondary Antibodies | Anti-Species IgG with Alexa Fluor, Cy, or FITC Dyes | Detect primary antibodies with signal amplification | Should be cross-adsorbed to minimize cross-reactivity; multiple fluorophores enable multiplexing |
| Mounting Media | Antifade Mounting Media with DAPI | Preserve fluorescence and provide nuclear counterstain | Antifade agents reduce photobleaching; DAPI labels all nuclei for orientation |
| Antigen Retrieval Reagents | Citrate Buffer, EDTA, Tris-EDTA, Proteinase K | Reverse fixation-induced epitope masking | Heat-induced retrieval generally preferred over enzymatic for embryo integrity |
Applications in Embryo Research and Future Directions
Immunofluorescence has become an indispensable technique in embryo research, providing critical insights into developmental processes at the molecular level. The application of both direct and indirect immunofluorescence methods has enabled researchers to visualize the spatial and temporal expression patterns of key developmental regulators, characterize cell lineage specification, and identify abnormalities in experimental embryo models. In reproductive medicine, immunofluorescence techniques have been employed to investigate the impact of various factors on embryo quality and development, including the assessment of apoptotic markers like Caspase-3 in stress response studies [7].
The choice between direct and indirect immunofluorescence in embryo research depends heavily on the specific research question and experimental constraints. Direct IF offers advantages when studying highly expressed antigens, when rapid results are needed, or when minimizing background is critical for image interpretation. Its simplicity and reduced incubation times are particularly beneficial when processing large numbers of embryo samples. Conversely, indirect IF provides superior sensitivity for detecting low-abundance targets, greater flexibility through the separation of detection and amplification steps, and enhanced capacity for multiplexing experiments—all valuable attributes for comprehensive embryo analysis [5] [4].
Future developments in immunofluorescence technology will likely focus on improving fluorophore properties, enhancing microscopy capabilities, and developing novel labeling strategies. Advances in fluorophore design continue to yield brighter, more photostable dyes with narrower emission spectra, enabling more complex multiplexing experiments in embryo research [1]. Super-resolution microscopy techniques are pushing beyond the diffraction limit, allowing visualization of subcellular structures at unprecedented resolutions that were previously impossible in the complex environment of developing embryos. Additionally, the integration of immunofluorescence with other analytical techniques, such as in situ hybridization or live-cell imaging, provides opportunities for correlative analysis that can yield more comprehensive understanding of embryonic development. These technological advances, combined with carefully optimized protocols for embryo research, will continue to expand the applications and capabilities of immunofluorescence in developmental biology.
Immunofluorescence (IF) is a cornerstone technique in cellular biology, enabling researchers to visualize the distribution and localization of specific proteins within cells and tissues. For researchers studying embryos, where understanding lineage specification and protein expression is critical, choosing the right IF method is paramount. The core decision lies between two principal workflows: direct and indirect immunofluorescence. This guide provides an objective, data-driven comparison of these methods, framing them within the context of embryonic research to help scientists select the optimal approach for their experimental goals.
Core Principles and Workflow Diagrams
At its heart, immunofluorescence relies on the specific binding of an antibody to a target antigen, with a fluorophore providing the detectable signal. The key difference between the two methods is the number of antibodies used and the placement of the fluorophore.
The direct IF method uses a single incubation step. The primary antibody, which is specific to the target protein, is directly conjugated to a fluorophore [5] [8]. This complex is applied to the sample, and after washing, the sample can be imaged.
Figure 1: Direct Immunofluorescence Workflow. A single-step antibody incubation is used.
The indirect IF method employs a two-step process. First, an unlabeled primary antibody binds to the target antigen. Second, a fluorophore-conjugated secondary antibody is added, which is raised against the immunoglobulin species of the primary antibody [5] [8]. This secondary antibody binds to the primary, resulting in signal amplification.
Figure 2: Indirect Immunofluorescence Workflow. A two-step antibody incubation provides signal amplification.
Head-to-Head Method Comparison
The choice between direct and indirect IF involves balancing factors such as sensitivity, time, cost, and flexibility. The table below summarizes the key characteristics of each method.
Table 1: Comparative Analysis of Direct and Indirect Immunofluorescence
| Characteristic | Direct IF | Indirect IF |
|---|---|---|
| Number of Antibodies | One [5] | Two (or more) [5] |
| Antibody Conjugation | Primary antibody is directly labeled [5] | Secondary antibody is labeled [5] |
| Process Time | Shorter (fewer steps) [8] | Longer (additional incubation and wash steps) [5] [8] |
| Cost | Generally more expensive (costly labeled primary antibodies) [5] | Less expensive (one labeled secondary can pair with many primaries) [5] [8] |
| Complexity | Simpler protocol [5] | More complex, potential for cross-reactivity [5] [8] |
| Sensitivity | Lower (one fluorophore per primary antibody) [8] | Higher (multiple secondary antibodies amplify signal) [5] [8] |
| Flexibility | Less flexible (requires a conjugated primary for each target) [5] | Highly flexible (same secondary for multiple primaries from same host) [5] |
| Species Cross-Reactivity | Low [5] | Higher, but can be managed with pre-adsorbed secondaries [5] |
Experimental Protocols in Embryo Research
To illustrate how these methods are applied in a real-world context, below are generalized protocols adapted from recent studies on mouse and human embryo models.
Protocol for Direct Immunofluorescence in Embryos
This streamlined protocol is ideal for experiments where the target is highly expressed or when performing multi-color imaging with primary antibodies from the same species.
- Sample Preparation: Fix preimplantation (e.g., blastocyst-stage) mouse or human embryos using a standard paraformaldehyde solution (e.g., 4% in PBS), followed by permeabilization with a detergent like Triton X-100 [9].
- Blocking: Incubate embryos in a blocking solution (e.g., containing BSA or serum) to reduce nonspecific binding.
- Primary Antibody Incubation: Incubate with directly conjugated primary antibodies (e.g., anti-CDX2 conjugated to Alexa Fluor 488 for trophectoderm lineage) diluted in blocking buffer. Incubation typically occurs overnight at 4°C [10] [9].
- Wash and Mount: Wash embryos thoroughly to remove unbound antibody and mount on slides using an anti-fade mounting medium containing a nuclear counterstain like DAPI [11].
- Imaging: Image using widefield or confocal fluorescence microscopy. Light-sheet microscopy is increasingly used for long-term live imaging of embryos due to lower phototoxicity [10].
Protocol for Indirect Immunofluorescence in Embryos
This protocol, commonly used for its high sensitivity, was employed in a screen for novel factors in mouse early embryonic development [9].
- Sample Preparation and Blocking: As described in the direct IF protocol, fix and permeabilize one-cell stage or blastocyst-stage mouse embryos, then block [9].
- Primary Antibody Incubation: Incubate with an unlabeled primary antibody raised in a specific host (e.g., rabbit). For example, a study used a rabbit anti-Cathapsin D (CTSD) polyclonal antibody or a rabbit anti-CXCR2 antibody to detect novel regulatory factors in mouse embryos [9].
- Washing: Wash embryos several times with a wash buffer.
- Secondary Antibody Incubation: Incubate with a fluorophore-conjugated secondary antibody (e.g., anti-rabbit IgG) that recognizes the host species of the primary antibody. To minimize background, this is often done for 1-2 hours at room temperature [9].
- Wash, Mount, and Image: After final washes, mount the embryos with a DAPI-containing medium and proceed with imaging [9].
The Scientist's Toolkit: Essential Reagents
Successful immunofluorescence in sensitive samples like embryos relies on high-quality reagents. The table below lists key materials and their functions.
Table 2: Key Research Reagent Solutions for Immunofluorescence
| Reagent / Material | Function / Application in Embryo Research |
|---|---|
| Fluorophore-Conjugated Primary Antibodies | For direct IF; used to label specific lineage markers (e.g., CDX2 for trophectoderm, NANOG for epiblast) [10]. |
| Unlabeled Primary Antibodies | For indirect IF; targets specific embryonic antigens. Host species (e.g., mouse, rabbit) must be considered [9]. |
| Fluorophore-Conjugated Secondary Antibodies | For indirect IF; amplifies signal by binding to the primary antibody. Available in various colors for multiplexing [5]. |
| Nanobodies | Small (15 kDa) recombinant antibody fragments used as alternatives to traditional secondary antibodies; offer reduced size and improved penetration [12]. |
| SNAP-tag Technology | Enables site-specific, covalent labeling of recombinant nanobodies or proteins with BG-modified fluorophores, ensuring consistent labeling efficiency [12]. |
| DAPI (4',6-diamidino-2-phenylindole) | A fluorescent stain that binds strongly to DNA; used as a nuclear counterstain to visualize all nuclei in an embryo sample [11]. |
| Light-Sheet Fluorescence Microscope | Advanced imaging system that uses a thin sheet of light to illuminate the sample; enables long-term live imaging of embryos with minimal phototoxicity [10]. |
Both direct and indirect immunofluorescence are powerful techniques that enable profound insights into embryonic development. The direct method offers simplicity, speed, and avoids cross-reactivity, making it excellent for multiplexing and when a conjugated primary antibody is available. The indirect method provides superior sensitivity, flexibility, and cost-effectiveness, which is often crucial for detecting low-abundance targets in precious embryo samples. There is no universally "better" method; the optimal choice is dictated by the experimental question, the availability of antibodies, and the required balance between sensitivity and simplicity. By leveraging the comparisons and protocols outlined in this guide, researchers can make an informed decision to optimally apply these workflows in their investigations of early development.
Fluorophores are the fundamental components that enable the specific visualization of cellular and sub-cellular structures in fluorescence microscopy. These molecules, whether they are fluorescent proteins or synthetic dyes, function by absorbing light at a specific wavelength and subsequently emitting light at a longer, lower-energy wavelength. This process, known as fluorescence, provides the high sensitivity and specificity required to detect particular components within complex biomolecular assemblies like live cells or fixed tissues. The ability to tag antibodies, proteins, and other molecules with these dyes has revolutionized biological and medical research, allowing scientists to visualize the distribution and localization of specific antigens, structures, and organelles within cells and tissues with exquisite detail [13] [14] [15].
The fluorescence process occurs through a three-stage cycle. In the first stage, excitation, a photon of energy (hνEX) from an external source such as a laser or lamp is absorbed by the fluorophore, creating an excited electronic singlet state (S₁'). During the second stage, the excited-state lifetime, the fluorophore exists in this finite, high-energy state for typically 1-10 nanoseconds, undergoing conformational changes and interacting with its molecular environment. Some energy is dissipated in this stage, yielding a relaxed singlet excited state (S₁). Finally, in the emission stage, a photon of energy (hνEM) is emitted as the fluorophore returns to its ground state (S₀). Since energy was dissipated during the excited state, the emitted photon has lower energy and longer wavelength than the excitation photon. This difference in wavelength is known as the Stokes shift, which is fundamental to fluorescence detection sensitivity as it allows emission photons to be detected against a low background, isolated from excitation photons [15].
The figure above illustrates the Jablonski diagram showing the fluorescence process involving excitation, energy dissipation, and emission. Absorption of an excitation photon (hνEX) promotes the fluorophore to an excited state (S₁'). Energy dissipation occurs as the excited state relaxes, and emission of a photon (hνEM) returns the fluorophore to its ground state (S₀), with the Stokes shift (hνEX - hνEM) enabling detection.
For fluorescence detection to work effectively, four essential elements are required: (1) an excitation light source, (2) a fluorophore, (3) wavelength filters to isolate emission photons from excitation photons, and (4) a detector that registers the emission photons and produces a recordable output. The compatibility of these elements is crucial for optimizing fluorescence detection across various applications, from fluorescence microscopes that resolve spatial coordinates in microscopic objects to flow cytometers that measure fluorescence per cell in a flowing stream [15].
The spectral characteristics of fluorophores are defined by their excitation and emission profiles. Each fluorophore possesses unique excitation and emission spectra that determine its effectiveness in specific applications. The excitation spectrum represents the range of wavelengths that can efficiently excite the fluorophore, while the emission spectrum shows the range of wavelengths emitted as fluorescence. The Stokes shift—the difference between the peak excitation and peak emission wavelengths—is a critical parameter that enables the separation of fluorescence signal from excitation light, thereby reducing background noise and enhancing detection sensitivity [16] [15].
A fluorophore's extinction coefficient and fluorescence quantum yield collectively determine its brightness. The extinction coefficient represents the capacity for light absorption at a specific wavelength, while quantum yield indicates the number of fluorescence photons emitted per excitation photon absorbed. The fluorescence output per fluorophore ("brightness") is proportional to the product of these two parameters [15]. When selecting fluorophores for experiments, especially those involving multiple labels, it is essential to choose dyes with minimal spectral overlap to prevent bleed-through between detection channels. Fluorophores with well-separated emission spectra enable clear distinction of different targets within the same sample [16].
The performance of fluorophores can be influenced by environmental factors including pH, temperature, and the local molecular environment. Some fluorophores are susceptible to quenching (reversible loss of fluorescence due to interactions with the local environment) and photobleaching (irreversible destruction of the excited fluorophore due to photosensitized generation of reactive oxygen species). Photobleaching is particularly problematic in fluorescence microscopy applications where prolonged exposure to excitation light occurs, though it is less concerning in flow cytometry where dwell times are short [15]. Additionally, in certain conditions, fluorophores may exhibit red-edge excitation shifts, where emission spectra shift to longer wavelengths when excitation occurs at the red edge of the absorption spectrum. This phenomenon occurs in polar fluorophores in viscous environments and provides information about the dynamic properties of the fluorophore's surroundings [17].
Comparison of Common Fluorophores and Their Properties
Traditional and Modern Organic Dyes
FITC (Fluorescein Isothiocyanate) and TRITC (Tetramethylrhodamine Isothiocyanate) represent traditional organic dyes that have been widely used in immunofluorescence and flow cytometry. FITC, a fluorescein derivative, has excitation/emission peaks at 495/517 nm and is coupled to antibodies via its reactive isothiocyanate group, which binds to amino, sulfhydryl, imidazoyl, tyrosyl, or carbonyl groups on proteins. TRITC, a rhodamine derivative, is excited with green light (maximum at 550 nm) and emits at 573 nm. Despite their historical importance, both FITC and TRITC are considered rather weak fluorescent dyes by modern standards and not recommended for state-of-the-art microscopy due to limitations in brightness, stability, and pH sensitivity [14].
The Alexa Fluor dye series, developed as successors to traditional dyes, offer significant improvements in fluorescence performance. These dyes are sulfonated forms of various basic fluorescent substances like fluorescein, coumarin, cyanine, or rhodamine, making them negatively charged and hydrophilic. For example, Alexa Fluor 488, one of the most commonly used dyes, has excitation/emission maxima at 493/519 nm and can be excited with a standard 488 nm laser. Compared to FITC, which it was designed to replace, Alexa Fluor 488 demonstrates superior photostability, brightness, and lower pH sensitivity. Other popular members of this family include Alexa Fluor 555, 594, 647, and 750, each with distinct spectral properties covering the visible to near-infrared spectrum [14].
Quantitative Performance Comparison of Fluorophores
The sensitivity of fluorescence detection depends not only on the fluorophore properties but also on the instrumentation used. Different microplate readers and microscope configurations demonstrate varying lower limits of detection (LLD) for the same fluorophore. The LLD represents the smallest concentration of a fluorophore that can be reliably distinguished from background noise [18].
Table 1: Lower Limit of Detection (LLD in pM) for Common Fluorophores Across Different Detection Systems
| Fluorophore | Excitation/Emission (nm) | SpectraMax Paradigm | SpectraMax iD5 | SpectraMax i3x | SpectraMax M5e |
|---|---|---|---|---|---|
| Alexa Fluor 350 | 340-360/460 | 13.8 | 4.90 | 28.6 | 3.70 |
| Fluorescein | 485/525-535 | 0.12 | 0.35 | 0.09 | 0.07 |
| Alexa Fluor 555 | 525/575 | 1.13 | 3.51 | 1.23 | 1.18 |
| Alexa Fluor 594 | 545/625 | 0.60 | 0.69 | 0.64 | 0.46 |
| Alexa Fluor 647 | 635-640/680-690 | 0.79 | 2.60 | 0.35 | 1.92 |
| Alexa Fluor 750 | 740/780 | 26.3 | 47.1 | 117 | 67.8 |
Data adapted from Molecular Devices technical note demonstrating variable detection limits across instruments [18].
This comparative data illustrates how fluorophore performance is instrument-dependent. For example, Alexa Fluor 647 shows a 7.4-fold difference in LLD between the most sensitive (SpectraMax i3x at 0.35 pM) and least sensitive (SpectraMax iD5 at 2.60 pM) instruments under these test conditions. Similarly, near-infrared dyes like Alexa Fluor 750 generally show higher LLD values compared to visible dyes, indicating lower sensitivity in this spectral range [18].
DNA Stains and Organelle-Specific Dyes
Beyond antibody conjugation, fluorophores serve as vital stains for cellular components. DNA stains like DAPI (4',6-diamidino-2-phenylindole) and Hoechst dyes (33258, 33342, and 34580) bind preferentially to A-T rich regions of DNA. DAPI exhibits excitation/emission maxima at 358/461 nm, with intensity increasing upon DNA binding. Both DAPI and Hoechst dyes are cell-permeable, making them useful for fixed and living cells, though Hoechst stains exhibit lower toxicity. In contrast, Propidium Iodide is membrane-impermeable and frequently used to differentiate living from dead cells, as it cannot enter cells with intact membranes. It displays excitation/emission maxima at 538/617 nm when bound to nucleic acids [14].
Organelle-specific dyes enable the visualization of subcellular compartments without antibody staining. MitoTracker dyes label mitochondria through a mildly thiol-reactive chloromethyl moiety that binds covalently to matrix proteins. Unlike conventional mitochondria stains like rhodamine 123, MitoTracker dyes are not washed out after membrane potential destruction. LysoTracker dyes, available in various colors, stain acidic compartments like lysosomes through their membrane-permeable weak bases linked to fluorophores. The ER-Tracker series (Green and Red) utilize BODIPY-based dyes linked to glibenclamide, which binds specifically to ATP-sensitive potassium channels in the endoplasmic reticulum membrane. Similarly, the Golgi apparatus can be labeled with fluorescent ceramide analogs like NBD C6-ceramide and BODIPY FL C5-ceramide [14].
Experimental Protocols for Fluorophore Labeling
Determining Labeling Efficiency
Accurate quantification of fluorescent labeling efficiency is crucial for reliable data interpretation, especially in quantitative applications like single-molecule studies. A robust ratiometric method has been developed to quantify the labeling efficiency of biomolecules by exploiting two sequential reactions with different fluorophores. This approach addresses limitations of previous methods that often operated in conditions differing significantly from live-cell experiments or required additional constructs that could interfere with labeling [19].
In this protocol, a first labeling reaction attaches fluorescent probe A with efficiency eA, followed by a second reaction with fluorescent probe B (emitting in a different band) with efficiency eB. The molecules available for the second reaction are those unlabeled in the first reaction. The ratio between molecules labeled in the first and second reactions is r = eA / [eB (1 - eA)], which depends only on the two labeling efficiencies, not on the expressed molecule number. By performing the reverse experiment (probe B first, then probe A), a second ratio r' is obtained, allowing calculation of both eA and eB using the derived equations eA = (r·r' - 1)/(r·r' + r') and e_B = (r·r' - 1)/(r·r' + r) [19].
The workflow above outlines the ratiometric method for determining labeling efficiency using two sequential reactions with different fluorophores. This method allows quantification of labeling efficiency directly in experimental conditions.
Immunofluorescence Staining Protocol for Challenging Samples
Mouse embryonic stem cells (mESCs) present particular challenges for immunofluorescence due to their requirement for expensive growth media, preference for specific substrates, growth in 3D colonies, and loose cell-substrate adhesion. An optimized protocol has been developed that reduces costs while preserving the 3D structure of colonies [20].
For culture of 3D colonies, cells are plated on 0.1% gelatin-coated glass-bottom 8-well IBIDI plates. The coating is applied for at least 15 minutes at room temperature before seeding. Naïve mESCs are grown in 2i/LIF conditions containing two inhibitors and Leukemia Inhibitory Factor. For culture of 2D colonies, an alternative approach plates cells on laminin-coated surfaces (incubated at 37°C overnight or minimum 4 hours) where they grow in 2D, allowing faster imaging and easier protein visualization [20].
The staining procedure begins with cell fixation using chilled 100% methanol for 5 minutes at room temperature or 3.7% paraformaldehyde for 20 minutes. After PBS rinsing, samples are permeabilized with 0.1% Triton-X in PBS (30 minutes for anti-keratin 19, 5 minutes for intracellular anti-EGFR, or omitted for extracellular epitopes). Blocking follows overnight at 4°C in solution containing 10% normal goat serum, 1% BSA, and 0.1% Triton-X in PBS. After rinsing, primary antibody incubation occurs for 90 minutes at room temperature with agitation (diluted 1:100-1:200 in rinse buffer). Secondary antibody incubation follows with fluorophore-conjugated antibodies (diluted 1:100 for fluorophores, 1:20 for nanoparticles) for 90 minutes at room temperature with agitation. After final rinsing, samples are mounted in PBS and imaged [20] [21].
Controls for Experimental Rigor
Appropriate controls are essential for validating immunofluorescence experiments. These include [13] [22]:
- Negative controls: Samples known to lack expression of the target antigen, confirming antibody specificity.
- Secondary antibody-only controls: Samples processed without primary antibody to assess non-specific binding of the secondary antibody.
- Positive controls: Samples known to express the target antigen, validating staining protocol effectiveness.
- Isotype controls: Antibodies matching the primary antibody isotype but without target specificity, assessing non-specific binding.
Additional considerations for rigor include blinding during image acquisition to prevent bias, predetermined ROI selection methods, consistency in sample preparation between replicates, and optimal image acquisition settings that avoid saturation while providing sufficient signal-to-noise ratio. Statistical collaboration with trained biostatisticians is recommended to ensure appropriate experimental design and analysis [22].
Advanced Applications and Emerging Technologies
Fluorescence in Live-Cell Imaging and Time-Lapse Studies
Live-cell fluorescence microscopy becomes particularly powerful when introducing the fourth dimension: time. By conducting fluorescence time-lapse experiments, researchers can reveal dynamic changes in the cellular environment in response to treatments, across cell cycle stages, or during developmental processes. Instead of brief snapshots, time-lapse microscopy generates a movie of cellular events, potentially in multiple colors and 3D. This approach is invaluable for studying processes like protein trafficking, organelle dynamics, and cell division [16].
For live-cell staining, fluorescent proteins (FPs) serve as the primary source of fluorophores. Since the discovery of Green Fluorescent Protein (GFP) from the jellyfish Aequorea Victoria, genetic engineering has produced a comprehensive suite of FPs that can be genetically encoded as fusions with proteins of interest. These can be visualized in samples ranging from single cells to whole organisms, enabling tracking of localization, abundance, and changes within tagged proteins over time and/or in response to treatments. As an alternative to FPs, organelle-specific dyes like MitoTracker and LysoTracker provide membrane-permeable options for labeling subcellular compartments, while fluorescent DNA intercalating agents such as DAPI and Hoechst stain DNA in both live and fixed samples [16].
Nanoparticles as Alternative Labels
While most immunofluorescence assays utilize traditional fluorophores, gold nanoparticles present an emerging alternative with distinct advantages and limitations. These nanoparticles provide greater signal stability and scatter light efficiently, making them easily separable from biological tissue background and improving signal-to-noise ratio (SNR). Studies comparing 2.2, 10, and 40 nm diameter gold nanoparticle probes conjugated to antibodies against traditional fluorophores found that nanoparticle labels generally produced higher SNR due to lower background signal, though they exhibited a punctate appearance compared to the continuously distributed signal of immunofluorescent labels [21].
A critical issue in nanoparticle labeling is the impact of size on tissue penetration and cellular uptake. While larger nanoparticles may be brighter, they encounter challenges penetrating tissues and accessing cellular compartments. For extracellular and subplasma membrane epitopes, gold nanoparticle-conjugated antibodies provide superior labeling performance to conventional fluorophores, but this advantage does not extend to intracellular targets deep within the cytoplasm. Nanoparticle labeling of extended intracellular targets like keratin requires pretreatment with heat and sonication to achieve satisfactory results, suggesting hindrance of nanoparticle labels within fixed, permeabilized cells [21].
Table 2: Comparison of Fluorophore vs. Nanoparticle Labels for Immunofluorescence
| Parameter | Traditional Fluorophores | Gold Nanoparticles |
|---|---|---|
| Signal stability | Subject to photobleaching | Greater stability, less signal variation |
| Signal appearance | Continuous distribution | Punctate appearance |
| Background | Higher due to autofluorescence | Lower background scattering |
| Tissue penetration | Good for most applications | Size-dependent; smaller nanoparticles penetrate better |
| Intracellular labeling | Effective for most targets | Challenging for deep cytoplasmic targets |
| Quantitative analysis | Linear signal increase with binding | Nonlinear effects due to nearfield interactions |
Comparison based on study findings evaluating labeling performance for different subcellular targets [21].
Technical Considerations for Optimization
Several technical factors require careful optimization for successful fluorescence experiments. Photobleaching, the irreversible destruction of fluorophores upon prolonged illumination, can be minimized by reducing exposure time, using lower light intensity, or incorporating antifade reagents. Autofluorescence from biological samples or fixatives can be addressed by using far-red fluorophores, optimizing filters, or applying quenching agents like Sudan black B. Spectral bleed-through between channels in multiplex experiments is minimized by selecting fluorophores with non-overlapping emission spectra and using appropriate filter sets [13] [22].
For quantitative imaging, signal-to-noise ratio can be enhanced by increasing signal (using bright, stable fluorophores; high NA objectives; optimal filter sets) while decreasing noise (using media without phenol red; decreasing detector gain; eliminating ambient light; frame averaging). Proper optical sampling according to the Shannon-Nyquist criterion ensures sufficient spatial and temporal resolution, while consistent environmental control (temperature, CO₂, humidity, pH) maintains sample health and experimental reproducibility [22].
The Scientist's Toolkit: Essential Research Reagent Solutions
Table 3: Key Research Reagents for Fluorescence-Based Experiments
| Reagent Category | Specific Examples | Function and Application |
|---|---|---|
| Fixation Agents | 16% formaldehyde, chilled 100% methanol | Preserve cellular structures and immobilize antigens for staining |
| Permeabilization Agents | 0.1% Triton-X | Enable antibody penetration through cellular membranes |
| Blocking Solutions | 10% normal goat serum, 1% BSA | Prevent non-specific antibody binding to reduce background |
| Common Fluorophores | Alexa Fluor 488, Alexa Fluor 555, Alexa Fluor 647 | Bright, photostable dyes for antibody conjugation in multiplex experiments |
| DNA Stains | DAPI, Hoechst 33342 | Visualize nuclei; cell-permeable for live and fixed cells |
| Organelle Trackers | MitoTracker, LysoTracker, ER-Tracker | Label specific subcellular compartments in live cells |
| Secondary Antibodies | Alexa Fluor-conjugated donkey anti-rabbit | Signal amplification in indirect immunofluorescence |
| Mounting Media | ProLong Diamond, Vectashield | Preserve fluorescence and support imaging |
Essential reagents compiled from protocol descriptions and methodology sections [13] [20] [14].
This toolkit represents fundamental reagents required for successful fluorescence experiments. The selection of specific reagents should be guided by experimental goals, with particular attention to fluorophore compatibility with available instrumentation, antibody host species, and sample type. For embryo research specifically, considerations of developmental stage, permeability, and autofluorescence become particularly important in reagent selection.
In the quest to visualize the intricate dynamics of embryonic development, researchers consistently confront a fundamental physical barrier: the diffraction limit of light. This limit is quantitatively described by the Point Spread Function (PSF), which characterizes how a microscope blurs a single point of light into a finite-sized spot [23]. The PSF is the impulse response of an optical system; in space-invariant systems, the image of a complex object is the convolution of that object and the PSF [23]. In practical terms, the PSF determines the finest resolvable detail, directly impacting the ability to distinguish closely spaced structures, such as individual nuclei or subcellular organelles in developing embryos. For dynamic live imaging, this challenge is compounded by motion blur, where the PSF widens proportionally to the product of the integration time and the velocity of the moving sample [24]. This article examines how the combined selection of immunofluorescence (IF) techniques and advanced computational methods is pivotal for pushing beyond these constraints in embryo research, enabling unprecedented insights into gene regulatory networks.
Direct vs. Indirect Immunofluorescence: A Technical Comparison for Embryo Studies
Immunofluorescence provides the specific contrast needed to visualize molecular targets, but the choice between direct and indirect methods carries significant implications for resolution, sensitivity, and multiplexing capacity—all critical for embryo imaging where sample preservation and signal clarity are paramount.
Table 1: Core Characteristics of Direct and Indirect Immunofluorescence
| Feature | Direct Immunofluorescence | Indirect Immunofluorescence |
|---|---|---|
| Primary Antibody | Conjugated directly to a fluorophore [5] [4] | Unlabeled [5] [4] |
| Secondary Antibody | Not involved [5] | Fluorophore-conjugated; binds to the primary antibody [5] [4] |
| Process Time | Shorter (fewer steps) [5] [25] | Longer (additional incubation step) [5] [25] |
| Cost | More expensive (costly conjugated primary antibodies) [5] [8] | Less expensive (cheaper secondary antibodies) [5] [8] |
| Complexity | Lower (fewer steps) [5] | Higher (requires selection of compatible secondary antibodies) [5] [25] |
| Sensitivity | Lower (no signal amplification) [5] [8] | Higher (multiple secondary antibodies amplify the signal) [5] [4] [25] |
| Flexibility | Less flexible (limited availability of pre-conjugated primaries) [5] | Highly flexible (wide range of secondary antibodies available) [5] [25] |
| Species Cross-reactivity | Low [5] | Higher (can be mitigated with pre-adsorbed secondaries) [5] |
| Multiplexing Capability | Limited for antibodies from the same host species [8] | Excellent (primaries from different species enable multi-target imaging) [4] |
Table 2: Suitability for Embryo Imaging Applications
| Application Context | Recommended IF Method | Rationale |
|---|---|---|
| Detecting low-abundance targets | Indirect IF | Signal amplification is crucial for visualizing faint expression patterns [5] [4]. |
| Multiplexing (≥3 targets) | Indirect IF | Flexibility of pairing multiple primaries with species-specific secondaries enables complex phenotyping [4]. |
| Rapid screening protocols | Direct IF | Faster, simpler workflow increases throughput [5] [25]. |
| Minimizing background (e.g., endogenous Ig) | Direct IF | Avoids potential non-specific binding of secondary antibodies [5] [25]. |
| Budget-conscious projects | Indirect IF | Lower cost and ability to use one secondary for many primaries is more economical [5] [8]. |
Experimental Protocols: Techniques for High-Resolution Embryo Analysis
Protocol: Indirect Immunofluorescence for Fixed Drosophila Embryos
The following protocol, inspired by studies leveraging fixed Drosophila embryos, highlights steps critical for preserving resolution and minimizing background [26].
- Step 1: Fixation. Rapidly collect and fix embryos to preserve native protein localization and morphology. The choice of fixative (e.g., formaldehyde) and fixation time must be optimized to balance structural integrity with epitope preservation [4].
- Step 2: Permeabilization and Blocking. Treat fixed embryos with a permeabilization agent (e.g., Triton X-100) to allow antibody penetration. Follow with an extensive block using serum or BSA to prevent non-specific antibody binding, a key step for achieving a low background [4].
- Step 3: Primary Antibody Incubation. Incubate with unlabeled primary antibodies raised against the targets of interest. For multiplexing, use primary antibodies generated in different host species. Optimization of concentration and incubation time is essential for specific staining [4].
- Step 4: Secondary Antibody Incubation. Incubate with fluorophore-conjugated secondary antibodies specific to the host species of the primary antibodies. The signal amplification inherent in this step allows detection of low-abundance proteins [5] [4].
- Step 5: Mounting and Imaging. Mount embryos in an anti-fade mounting medium. For high-resolution 3D imaging, use spinning disk confocal microscopy equipped with high-numerical aperture (NA) objectives to minimize the PSF volume and maximize light collection [27].
Protocol: Deep Learning-Based Time Inference from Fixed Embryos
A major challenge in fixed-embryo imaging is the lack of temporal resolution. A recent deep learning approach bypasses this limitation by inferring developmental time from static snapshots [26].
- Experimental Setup. Acquire a reference time-lapse dataset of live transgenic Drosophila embryos expressing a nuclear histone label (e.g., H2A-RFP) during the desired developmental window (e.g., nuclear cycles 11-14) with high temporal resolution (e.g., 1-minute intervals) [26].
- Model Training. Train an ensemble of convolutional neural network (CNN) models on the live-imaging dataset. The models are designed to regress absolute developmental time by extracting comprehensive, time-dependent features from nuclear morphology (size, shape, spatial distribution) across multiple spatial scales [26].
- Application to Fixed Samples. Apply the trained models to images of fixed, wild-type embryos stained with a standard DNA dye (e.g., DAPI). An image-rescaling step is incorporated to correct for fixation-induced embryo shrinkage, which is critical for accurate time inference [26].
- Output. The framework infers the absolute developmental time of each fixed embryo with a resolution of approximately 1 minute, enabling the precise temporal alignment of multiple fixed samples to reconstruct dynamic gene expression patterns [26].
Advanced Workflows: Integrating Imaging and Computation
Modern approaches to overcoming optical limits increasingly rely on integrated workflows that combine robust experimental IF with sophisticated computational pipelines. These methods address both the spectral multiplexing limit (the number of simultaneous colors) and the extraction of dynamic information from static images.
The following diagram illustrates two such advanced workflows that push the boundaries of what is possible in embryo imaging.
Workflow A, Extensible Immunofluorescence (ExIF), demonstrates a computational integration strategy. It uses multiple standard 4-plex IF panels (e.g., from different wells of a multi-well plate), each containing a mix of recurring "anchor" channels and unique "variable" channels. A generative deep learning model, trained on these anchors, performs virtual labeling to integrate all variable channels into a unified, high-plexity dataset across all cells [28]. This method effectively breaks the experimental multiplexing limit without specialized hardware.
Workflow B, cycleHCR, is an experimental multiplexing technique for highly multiplexed RNA and protein imaging. It involves repeated cycles of barcode probe hybridization, signal amplification via HCR, and fast confocal imaging. Each cycle images a few targets, and computational reconstruction assembles data from dozens of cycles to map hundreds or thousands of genes in thick specimens like whole mouse embryos with subcellular resolution [27]. This method is particularly powerful for whole-embryo transcriptomics and mapping cell fate.
Table 3: Key Research Reagent Solutions for High-Resolution Embryo IF
| Item | Function/Description | Application Note |
|---|---|---|
| High-Specificity Primary Antibodies | Unlabeled antibodies that bind specifically to the target antigen. | Critical for indirect IF; require validation for IF/IHC in the relevant embryo model [4]. |
| Cross-Adsorbed Secondary Antibodies | Fluorophore-conjugated antibodies raised against the primary antibody's host species, pre-adsorbed to minimize cross-reactivity. | Reduces background and enables clean multiplexing [5] [4]. |
| Organic DNA Dyes (e.g., DAPI) | Fluorescent stains that label nuclear DNA. | Serves as a key morphological anchor for segmentation and time inference [26]. |
| Anti-fade Mounting Medium | A reagent that preserves fluorescence during storage and imaging. | Essential for preserving signal intensity, especially for low-abundance targets [4]. |
| Stable Fluorophores (e.g., Alexa Fluor dyes) | Bright, photostable fluorescent molecules conjugated to antibodies. | Their brightness and stability are crucial for successful deep-tissue and super-resolution imaging [27]. |
| Hybridization Chain Reaction (HCR) Probes | DNA probes that enable signal amplification for RNA and protein detection via an isothermal amplification reaction. | Key component of cycleHCR, enabling high-resolution transcriptomics in thick tissues [27]. |
The journey to overcome optical limits in embryo imaging is no longer solely dependent on perfecting lenses and hardware. As evidenced by the comparisons above, the strategic choice of immunofluorescence method lays a critical foundation. Direct IF offers simplicity for straightforward, rapid assays, while indirect IF provides the necessary sensitivity and multiplexability for dissecting complex molecular interactions. The most significant advances, however, are emerging from the synergistic combination of these robust biochemical techniques with powerful computational frameworks. Methods like deep learning-based time inference and ExIF for virtual multiplexing are computationally extending the resolution boundaries of standard microscopy, while techniques like cycleHCR are experimentally smashing the color barrier. Together, this integrated approach is providing researchers with an unprecedentedly clear and dynamic view of the molecular choreography that guides embryonic development.
Optimized Protocols for Embryo Staining: From Fixation to Imaging
The integrity of embryological research data is fundamentally contingent on the initial steps of sample preparation. For studies employing immunofluorescence (IF) to analyze embryonic structures, the choice between direct and indirect IF methods is profoundly influenced by the quality of fixation, permeabilization, and sectioning. These preparatory steps are especially critical when working with delicate embryonic tissues, where preserving antigenicity while maintaining optimal morphology presents a unique challenge. Optimal protocols must stabilize cellular components without destroying the antigenic sites targeted by antibodies, ensure uniform antibody penetration throughout the tissue, and produce sections of consistent thickness that permit high-resolution imaging. Within the context of a broader thesis comparing direct versus indirect immunofluorescence for embryo research, superior sample preparation becomes the foundational element that enables accurate performance comparison between these detection methodologies. This guide objectively compares established and emerging techniques, providing supporting experimental data to inform protocol selection for embryonic research applications.
Comparative Analysis of Fixation Methods for Embryos
Fixation serves as the most critical step in embryo sample preparation, aiming to preserve tissue architecture and immobilize antigens while maintaining accessibility for antibody binding. The choice of fixative and protocol directly impacts the success of subsequent immunofluorescence staining, influencing signal intensity, background noise, and morphological preservation.
Systematic Comparison of Common Fixatives
A comprehensive evaluation of six commonly used fixatives for zebrafish embryos and larvae provides valuable experimental data applicable to other model organisms [29]. The performance was assessed based on morphological preservation, antigenicity retention, and compatibility with sectioning.
Table 1: Comparison of Fixation Protocols for Embryonic Tissues
| Fixative | Formulation | Optimal Conditions | Key Advantages | Key Limitations |
|---|---|---|---|---|
| 10% Neutral Buffered Formalin (NBF) | 4% Formaldehyde, phosphate buffer, methanol [29] | 24 hours at 21°C [29] | Excellent morphological preservation; standard for histology [29] | Potential epitope masking requiring antigen retrieval |
| Bouin's Solution | Picric acid, formaldehyde, acetic acid [29] | 24 hours at 21°C [29] | Enhanced nuclear detail due to picric acid | Tissue brittleness; requires extensive washing to remove picric acid crystals |
| Zamboni's | 2% Paraformaldehyde, saturated picric acid [29] | 24 hours at 4°C [29] | Good for small peptides and neural tissues | Potential fluorescence background if not thoroughly washed |
| Zenker's | Mercuric chloride, potassium dichromate, acetic acid [29] | 24 hours at 4°C [29] | Superior cytoplasmic preservation | Highly toxic; requires iodine treatment to remove mercury deposits |
| Zinc-Formalin | 3.7% Formalin, zinc sulfate [29] | 6 hours at 4°C [29] | Preserves many labile antigens; milder than NBF | Less consistent for some embryonic tissues |
| Formaldehyde/Glutaraldehyde | 2% Formaldehyde, 1% Glutaraldehyde [29] | Not specified | Excellent ultrastructural preservation | High autofluorescence; often requires quenching |
Optimized Fixation Protocol for Embryos
Based on comparative analysis, the following protocol for 10% NBF demonstrates robust performance for embryonic tissues [29]:
- Euthanasia and Dissection: Perform euthanasia humanely using appropriate methods (e.g., tricaine overdose for zebrafish). For larger embryos, make a ventral midline incision from the anal pore to the pectoral fin base to enhance fixative penetration. Handle tissues gently with gloved fingers instead of forceps to minimize damage [29].
- Fixation Immersion: Immediately immerse embryos in at least 20 times the tissue volume of 10% Neutral Buffered Formalin. Use flat-bottomed glass vials to ensure specimens remain straight during fixation, preventing bending [29].
- Fixation Duration and Temperature: Fix for 24 hours at room temperature (21°C). Agitation (e.g., gentle stirring) showed no detectable effect on fixation quality and is optional [29].
- Post-Fixation Rinse: Rinse tissues twice with phosphate-buffered saline (PBS) or the chosen buffer to remove residual fixative before proceeding to decalcification or embedding.
Figure 1: Embryo Fixation and Pre-Embedding Workflow. This flowchart outlines the critical decision points following embryo fixation, particularly the need for decalcification in older embryos containing bone [29].
Embedding and Sectioning Techniques for Embryonic Tissues
Following fixation, embryos must be embedded in a supportive medium to enable thin sectioning. Paraffin embedding remains the most common method, though optimal sectioning of embryonic tissues requires specific adaptations to prevent tissue discontinuity, twisting, and malorientation.
Specialized Embedding for Serial Sectioning
For consistent section plane alignment, particularly with larval arrays, specialized molds have been developed. These molds are designed based on the outside contours of larvae derived from 3D microCT images, significantly improving alignment compared to traditional rectangular or triangular wells [29]. This advancement is crucial for comparative analysis across multiple specimens.
Decalcification Protocol for Older Embryos
The presence of bone in older embryos (e.g., from 21 days post-fertilization in zebrafish onward) necessitates decalcification prior to sectioning. An effective protocol uses 0.35 M EDTA, which provides satisfactory decalcification while minimizing potential interference with subsequent molecular analyses [29]. The duration depends on the size and extent of calcification.
Sectioning and Staining Optimization
To minimize tissue discontinuity—a common barrier to quality zebrafish embryo sections—specific technical adjustments are required:
- Embedding Media: Process and embed formalin-fixed embryos in plasticized forms of paraffin wax [29].
- Sectioning Technique: Periodically hydrate the block surface in ice water between sets of sections to improve section integrity [29].
- Staining: Refinements to standard Hematoxylin and Eosin (H&E) staining protocols are necessary to achieve optimal nuclear and cytoplasmic contrast in embryonic tissues [29].
Performance Comparison: Direct vs. Indirect Immunofluorescence in Embryos
The choice between direct and indirect immunofluorescence is pivotal in embryo research, with each method offering distinct advantages and limitations in sensitivity, multiplexing capability, and convenience.
Methodological Principles and Experimental Data
Indirect Immunofluorescence (IIF) employs a primary antibody specific to the target antigen, followed by a fluorescently-labeled secondary antibody that recognizes the primary. This amplification step typically provides higher sensitivity compared to direct methods. Performance data from standardized evaluations show that IIF can achieve an analytic sensitivity of 94.8% and specificity of 98.5% under optimal conditions when indeterminate results are classified as correct [30]. However, performance can vary based on the laboratory type and commercial test kit used [30].
Direct Immunofluorescence (DIF) utilizes a primary antibody directly conjugated to a fluorophore, eliminating the secondary incubation step. This simplifies the protocol, reduces potential background from secondary antibody non-specific binding, and facilitates multiplexing with antibodies from the same host species. However, it generally offers lower signal intensity due to the lack of amplification.
Table 2: Performance Comparison of Immunofluorescence Detection Methods
| Parameter | Direct Immunofluorescence | Indirect Immunofluorescence | Source |
|---|---|---|---|
| Sensitivity | Lower (no signal amplification) | Higher (signal amplification via secondary Ab) | [30] |
| Specificity | High (reduced non-specific secondary binding) | Moderate (potential for secondary Ab background) | [30] |
| Protocol Time | Shorter (fewer incubation steps) | Longer (additional incubation and wash) | - |
| Multiplexing Flexibility | High (no host species constraints) | Lower (requires host species matching) | - |
| Antigen Availability | Critical (lower signal amplification) | Less Critical (signal amplification helps) | - |
| Cost | Higher (conjugated primaries for each target) | Lower (one secondary for many primaries) | - |
Standardized Immunofluorescence Protocol
A generalized protocol for indirect immunofluorescence, adaptable for embryonic tissues, is outlined below. This protocol assumes previous completion of fixation, permeabilization, and sectioning steps.
- Deparaffinization and Rehydration: If using paraffin-embedded sections, de-wax in xylene and rehydrate through a graded ethanol series (100%, 95%, 70%) to PBS.
- Antigen Retrieval: Perform heat-induced epitope retrieval by incubating slides in citrate buffer (pH 6.0) or EDTA buffer (pH 8.0) in a water bath or pressure cooker as required for the target antigen.
- Blocking: Incubate sections for 1 hour at room temperature in a blocking buffer (e.g., 5% normal serum from the secondary antibody host species, 1% BSA in PBS).
- Primary Antibody Incubation: Apply diluted primary antibody in blocking buffer and incubate overnight at 4°C in a humidified chamber.
- Washing: Wash slides 3 times for 5 minutes each in PBS with 0.025% Triton X-100 (PBS-T).
- Secondary Antibody Incubation: Apply fluorophore-conjugated secondary antibody diluted in blocking buffer. Incubate for 1-2 hours at room temperature, protected from light.
- Washing and Counterstaining: Wash slides 3 times for 5 minutes in PBS-T. Apply nuclear counterstain (e.g., DAPI) if desired, followed by a final PBS wash.
- Mounting and Imaging: Mount sections with an antifading mounting medium and image using an appropriate fluorescence microscope.
Figure 2: Immunofluorescence Staining Workflow. This diagram illustrates the core steps for indirect immunofluorescence, with the red dashed line indicating the simplified pathway when using directly conjugated primary antibodies (Direct IF).
The Scientist's Toolkit: Essential Reagents for Embryo IF
Table 3: Key Research Reagent Solutions for Embryo Immunofluorescence
| Reagent/Material | Function/Purpose | Example/Note |
|---|---|---|
| 10% NBF | Cross-linking fixative for morphological preservation | Standard fixative; optimal for many embryos [29] |
| EDTA (0.35 M) | Decalcifying agent | Removes calcium from bone in older embryos [29] |
| Paraffin Wax | Tissue embedding medium | Provides support for microtomy; plasticized forms improve sectioning [29] |
| Citrate Buffer (pH 6.0) | Antigen retrieval solution | Unmasks epitopes masked by formalin fixation |
| Normal Serum | Blocking agent | Reduces non-specific antibody binding (e.g., from host species of secondary Ab) |
| Primary Antibody | Binds specifically to target antigen | Unconjugated for IIF; fluorophore-conjugated for DIF |
| Fluorophore-conjugated Secondary Antibody | Binds to primary antibody for detection (IIF) | Provides signal amplification; choice of fluorophore depends on microscope filters |
| Triton X-100 | Detergent for permeabilization | Allows antibody penetration into cells and tissues |
| DAPI | Nuclear counterstain | Labels DNA to visualize all nuclei in a sample |
| Antifade Mountant | Preserves fluorescence | Reduces photobleaching during storage and imaging |
The journey from a live embryo to a quantitatively analyzable image hinges on a meticulously optimized pipeline of fixation, embedding, sectioning, and staining. For embryo research, 10% NBF fixation followed by careful paraffin embedding using advanced alignment molds provides a robust foundation for both direct and indirect immunofluorescence [29]. The choice between these detection methods involves a fundamental trade-off: indirect immunofluorescence offers superior sensitivity through signal amplification [30], while direct immunofluorescence provides greater multiplexing flexibility and simpler protocols. The experimental data and comparative protocols presented herein provide a framework for researchers to make informed decisions tailored to their specific embryological models and research objectives, ensuring that sample preparation supports rather than compromises the integrity of scientific discovery.
For researchers studying embryogenesis, immunohistochemistry (IHC) on embryonic tissues is an indispensable tool for visualizing spatial protein expression during critical developmental stages. However, the formalin fixation process essential for preserving delicate embryonic morphology creates a significant analytical challenge by masking epitopes through protein cross-linking, thereby hindering antibody binding. This issue is particularly pronounced in embryonic tissues, where antigen preservation must be balanced against maintaining pristine tissue architecture. Within the context of comparing direct versus indirect immunofluorescence for embryo research, optimal antigen retrieval becomes the foundational step that ensures reliable and reproducible results.
The development of antigen retrieval techniques, specifically Heat-Induced Epitope Retrieval (HIER) and Protease-Induced Epitope Retrieval (PIER), has dramatically improved our ability to detect antigens in formalin-fixed, archival tissues, including embryonic samples. While a 1978 study on human embryonic thymus utilized indirect immunofluorescence without modern retrieval methods, contemporary research relies heavily on these unmasking techniques to reveal critical antigens. This guide provides a comprehensive, objective comparison of HIER and PIER methods to empower researchers in selecting and optimizing the right approach for embryonic tissue applications.
Fundamental Principles: How HIER and PIER Work
Antigen retrieval is designed to reverse the effects of formalin fixation, which creates methylene bridges between proteins, thereby altering the three-dimensional structure of epitopes and masking them from antibody recognition. The two primary methods achieve this through distinct mechanisms:
HIER (Heat-Induced Epitope Retrieval): This physical method utilizes wet heat (typically 95-120°C) in specific buffer solutions to disrupt the formaldehyde-induced cross-links. The mechanism is believed to involve the unfolding of proteins, which restores the original conformation of antigenic epitopes, and may also involve the chelation of calcium ions from coordination complexes with proteins [31]. The process does not typically degrade the tissue but rather reverses the cross-links, making it a gentler option for fragile embryonic samples.
PIER (Protease-Induced Epitope Retrieval): This chemical method employs proteolytic enzymes such as proteinase K, trypsin, or pepsin to digest the protein cross-links physically masking the epitope. The enzymes cleave peptides, thereby breaking the cross-links and exposing the epitope for antibody binding [32] [33]. However, this enzymatic digestion is a harsher process that carries a greater risk of damaging the delicate morphology of embryonic tissues if not carefully controlled.
Direct Comparison: HIER vs. PIER for Embryonic Tissues
The choice between HIER and PIER involves balancing multiple factors, including signal intensity, tissue morphology preservation, and protocol robustness. The following table provides a structured comparison based on key performance metrics.
Table 1: Performance Comparison of HIER and PIER Methods for Embryonic Tissues
| Feature | HIER (Heat-Induced Epitope Retrieval) | PIER (Protease-Induced Epitope Retrieval) |
|---|---|---|
| Fundamental Mechanism | Physical unfolding of proteins using heat [32] | Enzymatic digestion of protein cross-links [32] |
| Primary Advantage | Superior preservation of tissue morphology [34] | Can be effective for epitopes resistant to heat retrieval [35] |
| Key Limitation | Requires optimization of buffer pH and heating time [35] | Higher risk of tissue damage and epitope destruction [34] |
| Typical Conditions | 10-30 minutes at 95-120°C [34] | 10-40 minutes at 37°C [35] |
| Reproducibility | High, once protocol is standardized [34] | Moderate, enzymatic activity can vary between lots [34] |
| Optimization Complexity | Higher (multiple variables: buffer, pH, time, temperature) [31] | Lower (primary variable: digestion time) [35] |
For embryonic tissue research, where preserving intricate tissue architecture is paramount, HIER is generally recommended as the first-line method [33] [35]. Its controlled conditions and milder approach are less likely to damage the delicate structures of developing embryos. PIER is typically reserved for specific, heat-resistant antigens, though its harsher nature necessitates extreme caution to avoid morphological artifacts [34].
Experimental Protocols and Optimization Strategies
Standardized HIER Protocol for Embryonic Tissues
This protocol is adapted from established laboratory methods and serves as an excellent starting point for embryonic samples [31] [34].
- Dewaxing and Rehydration: Process formalin-fixed, paraffin-embedded (FFPE) embryonic tissue sections through xylene and a graded alcohol series to water.
- Buffer Selection: Prepare a retrieval buffer. For initial testing, use a neutral citrate buffer (pH 6.0) or an alkaline Tris-EDTA buffer (pH 9.0) [34] [35].
- Heating: Place the slides in a preheated buffer and heat using one of these common methods:
- Cooling: After heating, remove the container from the heat source and allow the slides to cool in the buffer for 35 minutes at room temperature [34].
- Washing: Rinse the slides gently with distilled water.
- Immunostaining: Proceed with the standard immunofluorescence protocol.
Standardized PIER Protocol for Embryonic Tissues
Use this protocol if HIER fails or for targets known to require enzymatic retrieval [35].
- Dewaxing and Rehydration: As described in the HIER protocol.
- Enzyme Preparation: Prepare a working solution of the chosen protease. Common choices include:
- Digestion: Cover the tissue section with the enzyme solution and incubate in a humidified chamber at 37°C. The incubation time must be optimized but typically ranges from 10 to 40 minutes for trypsin, or around 20 minutes for proteinase K [35].
- Enzyme Inactivation: Rinse the slides thoroughly with distilled water to stop the enzymatic reaction.
- Immunostaining: Proceed with the standard immunofluorescence protocol.
Optimization Strategy for Embryonic Antigens
A systematic approach is critical for success, especially with the unique challenges of embryonic tissue.
- Start with HIER: Begin optimization using HIER with both low-pH (citrate, pH 6.0) and high-pH (Tris-EDTA, pH 9.0) buffers [34]. Compare the results against a control without any retrieval.
- Evaluate PIER if Needed: If HIER yields weak or no signal, test PIER using different enzymes (e.g., trypsin, proteinase K) [33]. Carefully monitor tissue morphology.
- Troubleshoot Based on Results:
- Weak Staining: This indicates under-retrieval. For HIER, try increasing the heating time or switching to a higher-pH retrieval solution. For PIER, carefully increase the digestion time [34].
- High Background: This can signal over-retrieval. For HIER, reduce the heating time. For PIER, reduce the digestion time or enzyme concentration [34].
- Tissue Damage: This is a major risk with PIER in embryonic tissues. If damage occurs, reduce the digestion time significantly or switch to a different enzyme. HIER is generally safer [34].
Workflow Visualization for Immunofluorescence in Embryo Research
The following diagram illustrates the key decision points in integrating HIER and PIER into a complete immunofluorescence workflow for embryonic tissues.
The Scientist's Toolkit: Essential Reagents for Antigen Retrieval
Successful antigen retrieval relies on a core set of reagents and equipment. The following table details the essential components of a laboratory toolkit.
Table 2: Essential Research Reagent Solutions for Antigen Retrieval
| Reagent / Equipment | Function / Purpose | Examples & Notes |
|---|---|---|
| Citrate Buffer (pH 6.0) | A low-pH retrieval solution for HIER; effective for many antigens [31] [34]. | 0.01 M concentration is standard; often a good starting point for optimization. |
| Tris-EDTA Buffer (pH 8.0-9.0) | A high-pH retrieval solution for HIER; can recover epitopes unresponsive to citrate buffer [31] [34]. | 0.05 M Tris with 0.01 M EDTA; may enhance tissue damage compared to citrate. |
| Trypsin | A proteolytic enzyme used in PIER; breaks down peptide chains [35]. | Working concentration: 0.05-0.1%; requires pH 7.6-7.8 buffer; incubation at 37°C. |
| Proteinase K | A broad-spectrum serine protease used in PIER [35]. | Working concentration: ~20 µg/mL; incubation at 37°C. |
| Heating Device | Apparatus to achieve and maintain high temperatures required for HIER [31]. | Water baths, pressure cookers, microwaves, or specialized commercial antigen retrievers. |
| Humidified Chamber | Essential for PIER to prevent evaporation of the enzyme solution during incubation. | A sealed container with a moistened paper towel. |
In the context of embryonic research utilizing immunofluorescence, the choice between HIER and PIER is not merely a technical step but a critical determinant of experimental success. HIER, with its superior preservation of tissue morphology and high reproducibility, stands as the recommended primary method for most applications. PIER serves as a specialized alternative for retrieving particularly challenging epitopes. A systematic, optimized antigen retrieval protocol is the indispensable foundation upon which reliable and interpretable data on protein expression during embryogenesis is built, directly impacting the validity of conclusions in developmental biology research.
Immunofluorescence (IF) staining is a foundational technique for detecting and visualizing the subcellular localization of proteins in fixed biological samples, including embryos [36]. For research on embryogenesis, selecting the appropriate method—direct or indirect immunofluorescence—is critical for experimental success.
- Direct Immunofluorescence: The primary antibody against the antigen of interest is directly conjugated to a fluorophore, enabling a simpler and faster one-step staining procedure [36]. This method minimizes potential cross-reactivity and non-specific binding, often resulting in lower background signals [37].
- Indirect Immunofluorescence: An unconjugated primary antibody is first applied, followed by a fluorophore-conjugated secondary antibody that recognizes the primary antibody [36]. This method provides signal amplification, increasing sensitivity, and offers flexibility as a single secondary antibody can be used with various primary antibodies from the same host species [36].
For embryo studies, where sample integrity and minimal background are paramount, direct IF offers distinct advantages in speed and simplicity. This guide provides a detailed protocol for direct IF on embryos and an objective comparison with the indirect method.
Direct Immunofluorescence Protocol for Embryos
The following protocol is adapted from established methods for handling embryos [38] and tissue sections [36] [39], with steps specifically optimized for embryonic samples.
Materials and Reagent Solutions
| Research Reagent Solution | Function in the Protocol |
|---|---|
| Phosphate-Buffered Saline (PBS) | A physiological washing and dilution buffer that maintains pH and osmolarity [36] [39]. |
| 4% Paraformaldehyde (PFA) | A cross-linking fixative that preserves tissue and cellular morphology by immobilizing antigens [38] [36]. |
| Triton X-100 | A detergent used to permeabilize cell membranes, allowing antibodies to access intracellular antigens [38] [37]. |
| Bovine Serum Albumin (BSA) | A blocking agent that reduces non-specific antibody binding by occupying hydrophobic sites on the tissue and slide [38] [36]. |
| Normal Donkey Serum | Used in the blocking step to further minimize non-specific background staining [38]. |
| Fluorophore-Conjugated Primary Antibody | The key reagent for direct IF; an antibody specific to the target antigen that is directly tagged with a fluorescent dye [36]. |
| Hoechst 34580 | A cell-permeant nuclear counterstain that binds to DNA, allowing visualization of all nuclei in the sample [38]. |
| Mounting Medium | A solution used to preserve fluorescence and prepare the sample for microscopy under a coverslip. |
Step-by-Step Methodology
Step 1: Sample Fixation Collect embryos at the desired developmental stage and fix immediately in 4% Paraformaldehyde (PFA) [38]. The fixation duration must be optimized based on embryo size and age; over-fixation can mask epitopes and reduce signal intensity [37]. After fixation, wash the embryos thoroughly in PBS to remove residual PFA [38].
Step 2: Permeabilization To allow antibody access, permeabilize the embryos by incubating them in acetone at -20°C for 20 minutes [38]. Alternatively, a solution containing a detergent like Triton X-100 (e.g., 0.1%) can be used [38] [37]. Inadequate permeabilization is a common cause of weak or absent staining [37].
Step 3: Blocking Incubate the embryos in a blocking solution to prevent non-specific antibody binding. A common and effective blocking solution is 10% normal donkey serum prepared in PBDT (PBS with 1% BSA, 1% DMSO, and 0.1% Triton X-100) [38]. Blocking should be performed for a sufficient duration, typically at room temperature.
Step 4: Primary Antibody Incubation Incubate the embryos with the fluorophore-conjugated primary antibody, diluted in an appropriate buffer (e.g., PBDT or a 1% BSA solution) [38] [36]. This incubation is typically performed overnight at 4°C to ensure adequate binding. Protect samples from light from this step onward to prevent fluorophore photobleaching.
Step 5: Washes After incubation, perform multiple thorough washes using a buffer like PBDT or PBST (PBS with Tween-20) to remove any unbound antibody [38]. Inadequate washing is a major contributor to high background staining [37].
Step 6: Nuclear Counterstain (Optional) If needed, incubate the embryos with a nuclear stain such as Hoechst 34580 (diluted 1:2500) to visualize all cell nuclei [38].
Step 7: Mounting and Imaging Prepare the embryos for microscopy by mounting them on slides with a suitable anti-fade mounting medium. Image the stained embryos using a confocal microscope (e.g., Zeiss LSM 800 with a 40x/1.1 W objective) [38]. Acquire images as z-stacks for three-dimensional analysis.
Objective Comparison: Direct vs. Indirect Immunofluorescence
To provide a quantitative comparison, we summarize key performance metrics from the literature and experimental data for both techniques in the context of embryo staining.
Performance and Experimental Data Comparison
Table: Quantitative Comparison of Direct and Indirect Immunofluorescence
| Parameter | Direct IF | Indirect IF | Experimental Context & Notes |
|---|---|---|---|
| Total Protocol Time | ~24 hours [38] | ~48 hours [36] [39] | Indirect IF requires additional overnight incubation step for the secondary antibody [36]. |
| Number of Incubation Steps | 1 primary incubation [36] | 2 primary + secondary incubations [36] | Fewer steps in direct IF reduce hands-on time and potential for error. |
| Signal Amplification | No (1 fluorophore per antibody) | Yes (Multiple secondary antibodies bind to a single primary) [36] | Amplification in indirect IF increases sensitivity, beneficial for low-abundance targets. |
| Background Signal | Generally lower [37] | Potentially higher [37] | Indirect method uses more reagents, increasing risk of non-specific binding. |
| Antibody Flexibility | Low (Requires conjugated primary) | High (Multiple primaries with one secondary) [36] | Direct IF requires a specific, often more expensive, conjugated antibody for each target. |
| Multiplexing Potential | High (Minimal species cross-reactivity) | Complex (Requires host species optimization) | Direct IF allows easier co-staining with antibodies from the same host species [37]. |
| Resource Requirements | Higher per primary antibody | Lower per primary antibody | A single vial of secondary antibody can be used for many different primary antibodies [36]. |
Experimental Workflow Comparison
Troubleshooting Common Issues in Embryo Staining
Even with optimized protocols, researchers may encounter challenges. The table below outlines common issues in embryo IF and their solutions, with a focus on the direct method.
Table: Troubleshooting Guide for Direct Immunofluorescence on Embryos
| Problem | Potential Causes | Recommended Solutions |
|---|---|---|
| Weak or No Staining | - Epitope masked by over-fixation [37]- Inadequate permeabilization [37]- Primary antibody concentration too low [37]- Fluorophore bleached [37] | - Optimize fixation time; consider antigen retrieval [37]- Ensure proper permeabilization with Triton X-100 or acetone [38] [37]- Titrate antibody to find optimal concentration [37]- Protect samples from light; use fresh aliquots [37] |
| High Background | - Non-specific antibody binding [37]- Insufficient blocking [37]- Inadequate washing [37] | - Increase blocking serum concentration and duration [38] [37]- Include a detergent like Triton X-100 in wash buffers [38]- Perform more frequent or longer washes between steps [37] |
| Non-Specific Staining | - Antibody concentration too high [37]- Antibody aggregates | - Titrate down the antibody concentration [37]- Centrifuge antibody solution before use to remove aggregates [37] |
Both direct and indirect immunofluorescence are powerful techniques for visualizing protein localization in embryos. The choice between them depends on the specific experimental requirements.
- Direct Immunofluorescence is the preferred method when speed, simplicity, and minimal background are the highest priorities. It is ideal for detecting relatively abundant antigens and for multi-color experiments requiring antibodies from the same host species.
- Indirect Immunofluorescence should be selected when maximum sensitivity and signal amplification are needed for detecting low-abundance targets. It is also more cost-effective for laboratories that frequently test new primary antibodies.
For research on embryogenesis, where sample integrity and clear visualization of complex structures are critical, the direct method offers a streamlined and reliable approach. However, researchers working with novel or low-expression targets may find the enhanced sensitivity of the indirect method indispensable.
Immunofluorescence (IF) is a pivotal technique for visualizing protein localization and expression within the complex three-dimensional structure of embryos. Choosing between direct and indirect immunofluorescence is a critical decision that impacts the sensitivity, multiplexing capability, and cost of experiments. This guide provides a detailed protocol for indirect immunofluorescence staining of whole-mount embryos, objectively comparing its performance against the direct method to inform researchers and drug development professionals.
Direct IF uses a primary antibody that is directly conjugated to a fluorophore. In contrast, Indirect IF employs an unlabeled primary antibody, which is then detected by a fluorophore-conjugated secondary antibody. This fundamental difference leads to distinct practical advantages and limitations, which are quantified in the subsequent sections, guiding the selection of the optimal method for embryonic studies.
Method Comparison: Direct vs. Indirect Immunofluorescence
The choice between direct and indirect immunofluorescence methods has significant implications for experimental design, sensitivity, and cost. The table below provides a structured comparison of the two techniques.
Table 1: Comprehensive comparison of direct and indirect immunofluorescence methods.
| Feature | Direct Immunofluorescence | Indirect Immunofluorescence |
|---|---|---|
| Core Principle | Primary antibody is directly conjugated to a fluorophore [2]. | Unlabeled primary antibody is detected by a fluorescent secondary antibody [2]. |
| Steps | Single incubation step [2]. | Two incubation steps (primary + secondary antibody) [2]. |
| Typical Duration | Shorter (≈1-2 hours) [2]. | Longer (≈4 hours to overnight + 1-2 hours) [2]. |
| Sensitivity | Lower; one fluorophore per primary antibody [40]. | Higher; multiple secondary antibodies bind to a single primary, amplifying signal [40] [2]. |
| Signal Amplification | No amplification [2]. | Yes; inherent signal amplification [40]. |
| Flexibility | Low; requires conjugated primary for every target. | High; same secondary antibody can be used with various primaries from the same host species [2]. |
| Multiplexing | Easier for co-localization; minimal cross-species reactivity issues. | Possible with careful planning; requires primary antibodies from different species [41]. |
| Background | Potentially lower due to fewer procedural steps. | Can be higher; requires rigorous blocking and controls [41]. |
| Cost | Conjugated primary antibodies are more expensive [40]. | More cost-effective; unconjugated primaries are cheaper, and secondaries are reusable for different targets [40]. |
| Key Advantage | Speed, simplicity, minimal cross-reactivity. | Sensitivity, signal amplification, and cost-effectiveness [40] [2]. |
For embryo research, where target antigens may be expressed at low levels and the thick tissue requires strong signals for clear visualization, the superior sensitivity and cost-effectiveness of the indirect method often make it the preferred choice.
Step-by-Step Indirect Immunofluorescence Protocol for Embryos
This protocol is adapted for whole-mount embryos, preserving their 3D architecture for comprehensive spatial analysis [42]. Key adaptations from standard cell culture protocols include significantly extended incubation and washing times to ensure adequate penetration of reagents throughout the tissue [42].
Stage 1: Fixation and Preparation
Goal: To preserve tissue morphology and antigenicity while preparing the embryo for staining.
- Dissection and Fixation: Dissect embryos in cold phosphate-buffered saline (PBS). The recommended fixative is 4% Paraformaldehyde (PFA) in PBS [42].
- Incubation: Due to the thickness of the sample, fixation requires a prolonged period. Incubate at 4°C overnight or at room temperature for 30 minutes to several hours, with optimal conditions determined empirically [42].
- Alternative Fixative: If PFA masks the epitope of interest, methanol can be used as an alternative, as it avoids protein cross-linking [42].
- Permeabilization: Permeabilize the fixed embryos to allow antibody access to intracellular targets. Incubate with a detergent solution, such as PBS containing 0.5% Triton X-100 (or 0.2-0.5% Tween-20 for milder permeabilization), for several hours to overnight at 4°C [41] [42].
- Washing: Wash the embryos 3-5 times in PBS over 1-2 hours to remove residual fixative and permeabilization detergent [42].
Stage 2: Blocking and Staining
Goal: To reduce non-specific background staining and specifically label the target antigen.
- Blocking: Incubate embryos in a blocking buffer for 6 hours to overnight at 4°C [42]. A standard buffer is PBS containing 1-5% Bovine Serum Albumin (BSA) or 2-10% serum from the host species of the secondary antibody, often with 0.1% Triton X-100 [41] [42] [2].
- Primary Antibody Incubation:
- Prepare the primary antibody diluted in the blocking buffer.
- Incubate embryos in the antibody solution for 24-48 hours at 4°C to ensure full penetration [42].
- Wash extensively with PBS containing 0.1% Tween-20 (PBS-T) over 12-24 hours, with multiple buffer changes, to remove unbound antibody.
- Secondary Antibody Incubation:
- Prepare the fluorophore-conjugated secondary antibody (e.g., Donkey anti-Rabbit Alexa Fluor 488) diluted in blocking buffer.
- Incubate embryos for 24 hours at 4°C in the dark.
- Wash extensively with PBS-T in the dark over 12-24 hours to remove unbound secondary antibody.
Stage 3: Mounting and Imaging
Goal: To prepare the specimen for high-resolution microscopy.
- Counterstaining and Mounting:
- Imaging: Image using a fluorescence or confocal microscope. Confocal microscopy is highly recommended for thick embryo samples to reduce out-of-focus light and obtain clear optical sections [42].
The following workflow diagram summarizes the key steps of the indirect immunofluorescence protocol for embryos and highlights the core difference between the direct and indirect methods.
Experimental Data and Performance Comparison
Supporting data from controlled studies demonstrates the measurable performance differences between direct and indirect immunofluorescence.
Table 2: Experimental performance metrics for direct and indirect immunofluorescence.
| Parameter | Direct IF | Indirect IF | Experimental Context |
|---|---|---|---|
| Sensitivity | Lower | ~1.5-2x higher signal at low target concentrations [40]. | Detection of somatic cells in buffer model solutions [40]. |
| Detection Limit | 2.0 x 10⁴ cells [40]. | 3.0 x 10⁴ cells [40]. | Calibration curves for somatic cells [40]. |
| Specificity | Excellent (98%) [43]. | Excellent (96.5-100%) [43]. | Diagnosis of bullous pemphigoid [43]. |
The superior sensitivity of the indirect method is attributed to signal amplification. In the direct method, one fluorophore is attached to each primary antibody. In the indirect method, multiple secondary antibodies can bind to a single primary antibody, resulting in more fluorophores per antigen and a brighter signal [40] [2]. This is particularly beneficial in embryo studies where antigen abundance may be low.
The Scientist's Toolkit: Essential Research Reagent Solutions
Successful indirect immunofluorescence staining relies on a set of core reagents, each with a specific function.
Table 3: Key reagents for indirect immunofluorescence staining of embryos.
| Reagent | Function | Protocol Example & Notes |
|---|---|---|
| Paraformaldehyde (PFA) | Cross-linking fixative that preserves tissue structure and antigenicity [42] [2]. | 4% solution is standard; requires long incubation for embryo permeation [42]. |
| Triton X-100 / Tween-20 | Detergent that permeabilizes cell membranes, allowing antibodies to enter cells [41]. | Concentration (0.1-1%) and type (harsh vs. mild) require optimization [44]. |
| Bovine Serum Albumin (BSA) | Blocking agent that adsorbs to non-specific sites, reducing background signal [41]. | Used at 1-5% in blocking buffer [45]. |
| Normal Serum | Blocking agent containing antibodies to bind Fc receptors, minimizing non-specific antibody binding [2]. | Should be from the species of the secondary antibody (e.g., Goat serum) [2]. |
| Primary Antibody | Unconjugated antibody that provides specificity by binding the target antigen. | Must be raised in a specific host (e.g., rabbit, mouse); dilution needs optimization [41]. |
| Fluorophore-conjugated Secondary Antibody | Antibody that binds the primary antibody, providing a detectable signal [41]. | Must be raised against the host species of the primary antibody (e.g., Donkey anti-Rabbit) [41]. |
| DAPI | Fluorescent nuclear counterstain that labels DNA, marking individual cells [41]. | Used for 10 min - 2 hours, typically at the end of the staining procedure [45] [41]. |
| Anti-fade Mounting Medium | Preserves fluorescence by reducing photobleaching and provides a stable refractive index for microscopy [41]. | Critical for long-term storage and high-quality imaging. |
For embryo research, the decision to use direct or indirect immunofluorescence hinges on the experimental priorities. The indirect method is generally recommended for most applications due to its enhanced sensitivity, which is crucial for detecting low-abundance targets within thick tissue, and its cost-effectiveness, which is beneficial for screening multiple targets [40] [2].
The direct method is preferable when speed is the primary concern or for multiplexing experiments where the risk of cross-reactivity between multiple secondary antibodies must be eliminated. However, the extended incubation times required for whole-mount embryos can diminish the speed advantage of direct IF.
In conclusion, this protocol and performance comparison provides a framework for implementing indirect immunofluorescence in embryonic studies. The significant signal amplification offered by this method makes it a powerful tool for uncovering detailed protein expression patterns within the complex and valuable context of the intact embryo.
The selection of an appropriate microscopy technique is a critical determinant of success in embryo research. The choice hinges on a balance between image quality, acquisition speed, and most importantly, the physiological health of the precious embryo sample. Within the broader context of comparing direct and indirect immunofluorescence methods, the imaging modality can significantly influence the clarity of results, the signal-to-noise ratio, and the validity of the biological conclusions drawn. This guide provides an objective, data-driven comparison of three core optical imaging techniques—widefield, confocal, and light-sheet fluorescence microscopy (LSFM)—for the study of both live and fixed embryos. We focus on their performance characteristics, supported by recent experimental data, to inform researchers and drug development professionals in their experimental design.
At its core, the difference between these techniques lies in their illumination and detection strategies. Widefield microscopy illuminates the entire sample volume and detects the resulting fluorescence, leading to significant out-of-focus blur. Laser Scanning Confocal microscopy uses a pinpoint laser to scan the sample, and a pinhole to physically block out-of-focus light, providing optical sectioning at the cost of speed and increased light exposure. Light-sheet microscopy (also called Selective Plane Illumination Microscopy, or SPIM) illuminates the sample with only a thin sheet of light, matching the focal plane of the detection objective. This geometry is inherently sectioning, fast, and gentle [46] [47].
The table below summarizes the key characteristics of each technique relevant to embryo imaging.
Table 1: Core Characteristics of Fluorescence Microscopy Techniques for Embryo Imaging
| Feature | Widefield | Confocal | Light-Sheet (LSFM) |
|---|---|---|---|
| Illumination Principle | Full sample volume | Point scanning | Thin sheet of light |
| Optical Sectioning | No | Yes (via pinhole) | Yes (via illumination geometry) |
| Acquisition Speed | Fast | Slow | Very Fast |
| Phototoxicity & Photobleaching | High (full volume illumination) | High (point scanning) | Low (illumination only of imaged plane) [46] [48] |
| Signal-to-Noise Ratio (SNR) | Low (high background) | Medium | High (low background, camera-based detection) [47] |
| Suitability for Long-Term Live Imaging | Poor | Moderate | Excellent [47] [49] |
| Multiview Imaging | Difficult | Difficult | Straightforward (sample rotation) [47] |
| Best For | Fixed samples, high-throughput | Fixed samples, high-resolution static imaging | Live embryo development, long-term time-lapses, sensitive samples |
Quantitative comparisons further underscore these differences. A 2024 study directly comparing light-sheet and confocal microscopy for imaging live mammalian embryos provides compelling data on their performance and impact on embryo health [46].
Table 2: Quantitative Comparison of Confocal vs. Light-Sheet Microscopy on Mammalian Embryos [46]
| Parameter | Confocal Microscopy | Light-Sheet Microscopy |
|---|---|---|
| Volumetric Acquisition Time | ~30 minutes | ~3 minutes (10-fold reduction) |
| Signal-to-Noise Ratio (SNR) | 15.75 ± 1.90 | 15.45 ± 3.45 (matched for comparison) |
| DNA Damage (γH2AX assay) | Significantly higher | Not significantly different from non-imaged controls |
| Photobleaching Rate | Higher | Reduced |
This data confirms that at an equivalent SNR, light-sheet microscopy is dramatically faster and safer for live embryos, causing no measurable DNA damage under standard imaging conditions, whereas confocal imaging induces significant DNA damage [46].
Experimental Protocols for Embryo Imaging
The following protocols are synthesized from established methodologies in the field and can be adapted for both direct and indirect immunofluorescence applications.
Sample Preparation and Mounting for Light-Sheet Microscopy
Mounting the embryo correctly is paramount for successful light-sheet imaging, especially for long-term live studies.
Protocol: Mounting Mouse Embryos in Hollow Agarose Cylinders [49]
- Function: This method is ideal for delicate, growing post-implantation mouse embryos, providing physical support while accommodating expansion.
- Materials: Low-melting point agarose (1-2%), culture medium, 1 ml syringe, cotton swab, dissection tools.
- Steps:
- Fill a 1 ml syringe with liquid, low-gelling temperature agarose.
- Immediately insert the tip of a cotton swab into the center of the agarose-filled syringe.
- Allow the agarose to solidify, then use the plunger to extrude the agarose cylinder.
- Carefully remove the cotton swab, creating a hollow cylinder. Cut the cylinder to the desired length.
- Submerge the cylinder in culture medium. Using fine forceps, gently guide the live embryo through the open end and into the hollow chamber.
- Re-insert the cotton swab end to seal the chamber. The swab now acts as a handle to mount the sample in the microscope.
Protocol: General Agarose Embedding for Zebrafish and Preimplantation Embryos [47]
- Function: Immobilizes the embryo for multi-angle imaging, which is crucial for achieving isotropic resolution.
- Materials: Low-melting point agarose (0.7-1.5%), glass capillaries or sample holder, fluorescent beads (for registration).
- Steps:
- Embed the embryo (fixed or live) in a small volume of low-melting point agarose within a glass capillary or a dedicated sample holder.
- For multiview imaging and subsequent registration, include a dilute solution of fluorescent beads (e.g., 500 nm diameter) in the agarose [47].
- After the agarose sets, extrude the agarose column containing the sample and mount it vertically in the microscope chamber filled with culture medium or PBS.
Imaging Autofluorescence with DNA Damage Assessment
This protocol is derived from a study that used DNA damage as a sensitive metric for phototoxicity [46].
- Application: Label-free imaging of metabolic co-factors (e.g., NAD(P)H, FAD) in live blastocyst-stage embryos.
- Imaging Parameters:
- Excitation Wavelength: 405 nm.
- Modalities: Compare Light-Sheet and Confocal microscopes.
- Standardization: Match the Signal-to-Noise Ratio (SNR) between the two systems (e.g., SNR ~15).
- Post-Imaging Analysis:
- Fix the imaged embryos and control (non-imaged) embryos.
- Perform immunohistochemistry for γH2AX, a phosphorylated histone variant that is a sensitive marker for DNA double-strand breaks [46].
- Image the stained embryos using a gentle, low-light technique (e.g., widefield) and quantify the fluorescence intensity of the γH2AX signal to compare levels of DNA damage between the experimental groups.
The Scientist's Toolkit: Essential Research Reagents
The table below lists key materials and reagents used in advanced embryo imaging protocols.
Table 3: Essential Reagents for Embryo Imaging Experiments
| Reagent / Material | Function | Example Application |
|---|---|---|
| Hollow Agarose Cylinders [49] | Sample mounting that supports growth | Long-term live imaging of post-implantation mouse embryos. |
| Fluorescent Beads [47] | Fiducial markers for image registration | Aligning and fusing multiview datasets in light-sheet microscopy. |
| Anti-γH2AX Antibody [46] | Immunohistochemical detection of DNA damage | Quantifying phototoxicity induced by microscopy imaging. |
| Low-Melting Point Agarose [47] [49] | Non-toxic embedding medium | Immobilizing live or fixed embryos for light-sheet or confocal imaging. |
Technical Diagrams and Workflows
Light-Sheet Microscopy Principle
The following diagram illustrates the core optical path and advantages of the light-sheet microscopy setup.
Diagram 1: Light-sheet microscopy setup.
Phototoxicity Assessment Workflow
This workflow charts the experimental procedure for comparing the biological safety of different imaging techniques.
Diagram 2: Phototoxicity assessment workflow.
The choice between widefield, confocal, and light-sheet microscopy for embryo research is not merely a technical one but a biological one. Data clearly demonstrates that while confocal microscopy provides excellent optical sectioning, its slower speed and higher phototoxicity make it less suitable for sensitive, long-term live imaging of embryos [46]. Light-sheet fluorescence microscopy emerges as the superior technique for these applications, offering unparalleled speed and minimal impact on embryo health, as evidenced by the absence of induced DNA damage. When designing experiments, particularly those involving live embryos and immunofluorescence, researchers should prioritize light-sheet microscopy to ensure that the process of observation does not alter the very biological processes under investigation.
Solving Common Challenges in Embryo Immunofluorescence
In the context of embryo research, where sample availability is often limited and developmental processes are delicate, controlling for specificity in immunofluorescence (IF) experiments is not merely a best practice—it is an absolute necessity. The choice between direct and indirect immunofluorescence significantly influences which controls are most critical for validating experimental findings. While direct IF uses a single fluorescently-labeled primary antibody, indirect IF employs a primary antibody followed by a fluorescent secondary antibody, amplifying signal but potentially increasing background [5]. Within this framework, negative controls, isotype controls, and no-primary antibody controls form the foundation of rigorous experimental design, ensuring that observed staining patterns reflect true biological signals rather than methodological artifacts.
The Three Essential Controls: Mechanisms and Applications
No-Primary Antibody Control
Purpose and Mechanism: The no-primary antibody control is designed to detect non-specific binding of the secondary antibody or endogenous background fluorescence (autofluorescence). In this control, the primary antibody is omitted entirely from the staining procedure, and the sample is incubated only with the secondary antibody and subsequent detection reagents [50] [51].
Interpretation and Problem Identification: A clean no-primary control indicates that the secondary antibody does not bind non-specifically to the embryo tissue and that background fluorescence is minimal. Signal in the experimental sample that exceeds this control is likely specific. However, if significant fluorescence appears in the control, it suggests issues with secondary antibody aggregation, cross-reactivity, or endogenous fluorescence from the tissue itself. Tissues rich in elastin, collagen, and lipofuscin (such as some embryonic structures) are particularly prone to autofluorescence [51].
Protocol Specifics: For embryo experiments, after standard fixation and permeabilization, incubate the control sample with antibody dilution buffer alone (lacking the primary antibody) for the same duration as the experimental samples. Afterwards, process the control alongside experimental samples with the identical secondary antibody, concentration, and incubation conditions.
Isotype Control
Purpose and Mechanism: The isotype control identifies non-specific binding caused by the primary antibody itself. This control uses a non-immune antibody of the same isotype (e.g., IgG1, IgG2A) and from the same host species as the primary antibody, applied at the same concentration [50] [51].
Interpretation and Problem Identification: This control is particularly crucial when working with monoclonal antibodies. It assesses whether the Fc region of the primary antibody or other non-specific interactions are causing binding to tissue components unrelated to the target antigen. Any background staining observed with the isotype control should be minimal and distinctly different from the specific staining pattern in the experimental sample [50].
Protocol Specifics: For the isotype control, replace the specific primary antibody with the non-immune isotype-matched antibody. All other steps in the protocol, including secondary antibody incubation and detection, remain identical to the experimental sample.
Negative Tissue Control
Purpose and Mechanism: A negative tissue control utilizes a tissue or cell sample known not to express the target antigen. This control verifies that the antibody staining is specific to the target protein and not an artifact of the detection system or tissue properties [50].
Interpretation and Problem Identification: In embryo research, this might involve using tissue from a different developmental stage where the protein is not expressed, or a specific embryonic region known to lack the antigen. The ideal scenario is a complete absence of staining in this control. Persistent signal may indicate cross-reactivity with other proteins or insufficient antibody specificity.
Protocol Specifics: Process the negative tissue control sample in parallel with the experimental embryo samples, using the same primary and secondary antibodies, concentrations, and incubation conditions.
Experimental Design and Controls for Direct vs. Indirect IF
The fundamental differences between direct and indirect IF methodologies necessitate slightly different control prioritization, particularly for embryo applications where phototoxicity and sample viability are concerns.
Control Implications in Direct and Indirect IF
| Control Type | Direct IF Application | Indirect IF Application | Key Rationale |
|---|---|---|---|
| No-Primary Control | Not applicable | Critical | Identifies secondary antibody non-specific binding [51]. |
| Isotype Control | Recommended | Recommended | Checks for non-specific Fc-mediated binding of the primary antibody [50]. |
| Negative Tissue Control | Essential | Essential | Confirms antibody specificity for the target antigen [50]. |
| Absorption Control | Highly recommended | Highly recommended | Demonstrates specificity by pre-absorbing antibody with immunogen [51]. |
Optimized Workflow for Embryo Immunofluorescence
The following diagram illustrates the logical sequence for implementing these essential controls in an embryo immunofluorescence experiment, incorporating decision points based on control results:
Advanced Considerations for Embryo Research
Multiplex Immunofluorescence Controls
With the emergence of multiplex immunohistochemistry and immunofluorescence (mIHC/IF) technologies capable of detecting 5-60 markers simultaneously, control requirements become increasingly complex [52]. For embryo studies where spatial relationships between multiple cell lineages are critical, each antibody in the panel requires validation with appropriate controls. Furthermore, specialized image analysis steps including color deconvolution and spectral unmixing necessitate additional quality control measures to ensure accurate signal assignment [52].
Embryo-Specific Methodological Controls
Live imaging of preimplantation embryos presents unique challenges. Studies optimizing nuclear DNA labeling via mRNA electroporation for human blastocyst imaging implemented critical controls including:
- Non-electroporated controls to assess developmental impact of the electroporation process itself.
- Lineage marker analysis (e.g., CDX2, NANOG) post-electroporation to ensure normal cell fate specification [10].
- Comparison of development rates between imaged and non-imaged embryos to control for phototoxicity effects [10].
Research Reagent Solutions for Embryo Immunofluorescence
The table below details essential reagents and their specific functions in controlled embryo immunofluorescence experiments:
| Reagent Category | Specific Examples | Function in Embryo Experiments |
|---|---|---|
| Validated Primary Antibodies | Anti-CDX2, Anti-NANOG, Anti-SOX2 | Lineage specification markers; require validation on embryonic tissues [10]. |
| Pre-adsorbed Secondary Antibodies | Species-specific IgG conjugates | Reduced cross-reactivity with embryonic tissues; decreases background [51]. |
| Isotype Controls | Mouse IgG1, IgG2a, Rabbit IgG | Matched to primary antibody for accurate non-specific binding assessment [50]. |
| Nuclear Labels | H2B-mCherry mRNA, SPY650-DNA | Enable cell tracking in live embryo imaging; electroporation optimized [10]. |
| Mounting Media with DAPI | ProLong Diamond with DAPI | Counterstains nuclei; photostable for preserving embryo imaging data. |
| Blocking Reagents | BSA, serum, commercial blockers | Reduce non-specific antibody binding; critical for embryonic tissues with high lipid content. |
In embryo research, where developmental mechanisms are being elucidated at increasingly precise levels, implementing robust controls for immunofluorescence is fundamental to experimental integrity. The no-primary antibody, isotype, and negative tissue controls provide complementary information that collectively validates staining specificity. When integrated within the context of either direct or indirect IF methodologies, and combined with embryo-specific optimization, these controls transform qualitative observations into reliable, interpretable data, ultimately strengthening conclusions about the complex processes governing embryonic development.
Minimizing Background Noise and Autofluorescence in Embryonic Tissues
In embryonic development research, high-quality fluorescence imaging is crucial for visualizing intricate structural and molecular changes. A significant challenge in this field is tissue autofluorescence (AF), which creates background noise that can obscure specific signals and reduce the clarity of images. In embryonic tissues, AF arises from endogenous molecules such as lipofuscin and can be exacerbated by aldehyde-based fixation, leading to fluorescent crosslinks. This background interference is particularly problematic when using sensitive immunofluorescence (IF) techniques, as it lowers the signal-to-noise ratio and can mask the detection of low-abundance targets. Addressing AF is therefore essential for achieving accurate and reliable data in developmental biology studies. This guide objectively compares the performance of various AF quenching agents and provides detailed protocols for their application, specifically within the context of choosing between direct and indirect immunofluorescence for embryo research.
Autofluorescence Quenching Agents: A Comparative Analysis
Several chemical agents have been developed to mitigate autofluorescence. The effectiveness of these quenchers depends on the tissue type, the fixation method, and the primary sources of AF. The following table summarizes the key characteristics and performance data of commonly used quenching agents, providing a basis for objective comparison.
Table 1: Comparison of Autofluorescence Quenching Agents
| Quenching Agent | Recommended Concentration | Incubation Time | Mechanism of Action | Effectiveness (Quantitative Reduction) | Tissue Compatibility | Impact on Cell Viability |
|---|---|---|---|---|---|---|
| Copper Sulfate (CS) | 0.05 - 0.1 M [53] | 10 - 20 minutes [53] | Alters electronic states of chromophores [53] | Highly effective; most effective agent across blue and green channels [53] | Plant-derived scaffolds, post-fixation imaging; scaffold-specific effects on viability [53] | Reduced endothelial cell viability in some scaffolds (e.g., leatherleaf, parsley); not suitable for live-cell applications [53] |
| Sudan Black B | 0.1 - 0.3% w/v [54] | 30 minutes [54] | Quenches signals from lipids and lipofuscin [54] | Effectively reduces background in liver tissue; may trend toward reduced imaging depth in cleared tissues [54] [55] | Liver, brain, and other lipofuscin-rich tissues; compatible with thick vibratome sections (100-200 µm) [54] | Well-tolerated in fixed tissues; suitable for preserving structure in 3D analysis [54] |
| Ammonium Chloride (AC) | 0.1 - 0.2 M [53] | 10 - 20 minutes [53] | Reduces aldehyde-based fluorescence from formalin fixation [53] | Less effective than copper sulfate [53] | General use, especially in formalin-fixed tissues [53] | Preferable when preserving cell viability is a priority [53] |
| Sodium Borohydride (SB) | 0.5 - 1.0 M [53] | 10 - 20 minutes [53] | Chemically reduces aldehydes and ketones to less reactive forms [53] | Less effective than copper sulfate [53] | General use for reducing fixative-induced background [53] | Preferable for viability; requires careful handling due to release of flammable gas [53] |
| TrueVIEW | As per manufacturer | As per manufacturer | Not specified in detail | Did not significantly impact SNR in myocardial tissue; showed potential for improved SNR/depth [55] | Myocardial tissue [55] | Data not specified |
Abbreviations: SNR (Signal-to-Noise Ratio), w/v (weight/volume).
Direct vs. Indirect Immunofluorescence in Embryo Research
The choice between direct and indirect immunofluorescence is a fundamental decision that influences the sensitivity, multiplexing capability, and overall success of an experiment in embryonic tissues.
Table 2: Direct vs. Indirect Immunofluorescence for Embryo Research
| Parameter | Direct Immunofluorescence | Indirect Immunofluorescence |
|---|---|---|
| Principle | Fluorophore is conjugated directly to the primary antibody [5] | A fluorophore-conjugated secondary antibody binds to the primary antibody [5] |
| Number of Antibodies | One [5] | Two (or more) [5] |
| Process Time | Lesser time, single labeling step [5] | More time-consuming, additional operational steps [5] |
| Cost | More expensive (conjugated primary antibodies are costly) [5] | Less expensive (secondary antibodies are cheaper) [5] |
| Sensitivity | Weaker sensitivity [5] | High sensitivity due to signal amplification from multiple secondary antibodies binding to a single primary [5] [2] |
| Multiplexing | Limited [5] | Excellent; allows detection of multiple targets using secondary antibodies from different hosts [5] [2] |
| Flexibility | Less flexible; limited by availability of pre-conjugated primaries [5] | Highly flexible; many conjugated secondary antibodies available [5] |
| Recommended Context | Detecting highly expressed proteins; when simplicity and speed are priorities [5] | Detecting low-abundance proteins; multiplexing experiments; standard choice for most research applications [5] [2] |
For complex embryonic studies that often require visualizing multiple structures or low-abundance proteins, the indirect method is generally preferred due to its superior sensitivity and multiplexing capabilities [5] [2]. The signal amplification is critical for overcoming some of the inherent light-scattering properties of embryonic tissue.
Experimental Protocols for Autofluorescence Reduction
Protocol 1: Chemical Quenching for Embryonic Tissues
This protocol is adapted from methods successfully used in mouse embryos and other sensitive tissues [56] [54] [55].
- Sample Preparation: Fix embryonic tissues following standard procedures (e.g., with 4% Paraformaldehyde). After fixation, wash tissues thoroughly with phosphate-buffered saline (PBS) [2].
- Quenching Solution Preparation:
- Quenching Incubation: Incubate the embryonic tissues in the quenching solution for 20-30 minutes at room temperature, protected from light. The optimal time and concentration should be determined empirically for specific tissues and ages [53] [54].
- Washing: Rinse the tissues extensively with PBS (3 x 5 minutes) to remove any residual quenching agent [53].
- Proceed with Staining: After quenching and washing, the tissues are ready for standard immunofluorescence staining procedures [2].
Protocol 2: Oxidation-Mediated Autofluorescence Reduction for Whole-Mount Embryos
This specialized protocol is designed for whole-mount RNA FISH in mouse embryos and is highly effective for reducing background [56].
- Fixation and Permeabilization: Fix and permeabilize mouse embryos using standard protocols for whole-mount studies.
- Oxidation Treatment: Treat the embryos with an oxidizing agent (e.g., periodic acid) to modify autofluorescent molecules.
- Fluorophore Quenching: Following oxidation, incubate the embryos in a quenching solution suitable for the specific fluorophores being used in the subsequent FISH or IF protocol.
- Hybridization/Staining: Perform the standard RNA FISH hybridization or immunofluorescence staining. This method has been shown to preserve RNA integrity and significantly enhance the signal-to-noise ratio for sensitive detection [56].
The following workflow diagram integrates autofluorescence quenching into a standard immunofluorescence protocol, highlighting the parallel steps for direct and indirect methods.
The Scientist's Toolkit: Essential Reagents for Autofluorescence Management
Successful reduction of background noise requires a combination of quenching agents and specialized buffers. The following table lists key reagents and their functions.
Table 3: Essential Research Reagents for Autofluorescence Reduction
| Reagent / Solution | Function / Purpose | Key Considerations |
|---|---|---|
| Sudan Black B | A lipophilic dye that effectively quenches autofluorescence from lipids and lipofuscin [54]. | Particularly useful for tissues with high lipid content; requires dissolution in organic solvent (e.g., 70% ethanol) [54]. |
| Copper Sulfate | Quenches a broad spectrum of AF by altering the electronic states of chromophores [53]. | Highly effective but can be toxic to live cells; optimal for post-fixation imaging [53]. |
| Ammonium Chloride | Reduces aldehyde-induced fluorescence caused by formalin/PFA fixation [53]. | A good general-purpose quencher for fixed tissues with lower toxicity concerns [53]. |
| Blocking Buffer (BSA/Serum) | Reduces non-specific antibody binding, lowering background noise [2]. | Serum should be from the same species as the secondary antibody host for best results [2]. |
| Antigen Retrieval Buffers | Reverses cross-links from fixation, unmasking epitopes and improving specific signal [2]. | Heat-Induced Epitope Retrieval (HIER) is common; buffer pH (citrate vs. Tris-EDTA) requires optimization [2]. |
| Antifade Mounting Medium | Slows photobleaching of fluorophores during imaging, preserving signal intensity [2]. | Essential for long imaging sessions; many commercial varieties are available with DAPI for nuclear counterstaining. |
Minimizing background noise is not a one-size-fits-all process but a critical step that requires optimization. For embryonic tissue research, the data indicates that Sudan Black B is a robust and generally well-tolerated quenching agent, particularly for fixed tissues. In the context of direct versus indirect immunofluorescence, the enhanced signal amplification of the indirect method makes it the dominant choice for most embryonic applications, especially when combined with effective autofluorescence quenching protocols. By systematically applying these compared agents and detailed protocols, researchers can significantly improve image quality, thereby enabling more precise and reliable analysis of embryonic development.
A critical challenge in embryo research is the detection of low-abundance proteins, where weak fluorescent signals can compromise data reliability. This guide compares the performance of direct and indirect immunofluorescence (IF) and details how signal amplification strategies, particularly biotin-streptavidin systems, can provide robust solutions.
Core Principles of Immunofluorescence and Signal Amplification
Immunofluorescence (IF) is a cornerstone technique for localizing proteins in cells and tissues, including embryonic samples. It relies on fluorescently labeled antibodies to detect specific antigens. The fundamental choice between direct and indirect methods significantly impacts the sensitivity, flexibility, and cost of an experiment [5] [57].
Direct IF uses a primary antibody that is directly conjugated to a fluorophore. This method is simple and rapid, with fewer incubation and washing steps. It also minimizes the potential for non-specific background signal or species cross-reactivity, as no secondary antibody is involved. However, its major limitation is lower sensitivity, making it less suitable for detecting low-abundance targets. It is also less flexible and can be more costly, as a uniquely conjugated primary antibody is required for each target [5] [8].
Indirect IF uses an unlabeled primary antibody, which is then detected by a fluorophore-conjugated secondary antibody that recognizes the primary. The key advantage here is inherent signal amplification. Because multiple secondary antibodies can bind to a single primary antibody, the amount of fluorophore localized at the antigen site is greatly increased [5] [57]. This results in higher sensitivity, which is crucial for detecting weakly expressed proteins in embryos. It is also more flexible and cost-effective, as the same labeled secondary antibody can be used with various primary antibodies from the same host species [5] [8]. The trade-off is a longer protocol and a potentially higher background if not carefully optimized.
To overcome the sensitivity limits of standard indirect IF, especially for critical low-abundance targets, the biotin-streptavidin system is employed for further amplification. This strategy leverages the exceptionally strong, non-covalent interaction (Kd ≈ 10⁻¹⁵ M) between biotin (a small vitamin) and streptavidin (a tetravalent protein) [58] [59]. A single biotinylated antibody can bind multiple streptavidin molecules, each of which can itself be conjugated to multiple fluorophores or enzymes, leading to a powerful multiplicative effect on the signal [59].
The following workflow diagram illustrates how these methods are integrated into an experimental setup for embryo staining to achieve maximum signal detection.
Comparative Performance Analysis of Amplification Methods
The theoretical advantages of amplification strategies translate into measurable performance improvements. The following table summarizes the key characteristics of each method, providing a clear basis for selection.
Table 1: Comparison of Key Characteristics in Immunofluorescence Methods
| Feature | Direct IF | Standard Indirect IF | Biotin-Streptavidin IF |
|---|---|---|---|
| Number of Antibodies | One (labeled primary) | Two (unlabeled primary + labeled secondary) | Two or more (unlabeled primary + biotinylated secondary + streptavidin conjugate) [59] |
| Process Time | Shorter (fewer steps) [8] | Longer [8] | Longest (additional incubation step) |
| Relative Sensitivity | Low (1x) [5] | Medium-High (~5-10x amplification) [57] | Very High (~8x or more vs. standard indirect) [59] |
| Signal Amplification | No | Yes, moderate [57] | Yes, high [59] |
| Flexibility | Low | High | Moderate |
| Cost | Higher (conjugated primaries) [5] [8] | Lower (versatile secondaries) [5] [8] | Moderate |
| Best For | Highly expressed antigens, multiplexing with antibodies from the same species | Routine detection of most targets, balancing sensitivity and workflow | Low-abundance targets, situations demanding maximum signal intensity |
Beyond these general characteristics, quantitative data from experimental studies highlights the performance gains achievable with advanced amplification. For instance, the Labeled Streptavidin-Biotin (LSAB) method has been reported to improve detection sensitivity by as much as 8-fold compared to standard indirect methods [59]. Furthermore, innovative probe designs utilizing internal fluorophore configurations have demonstrated a ~6-fold increase in fluorescent signal intensity compared to previous external labeling methods [60].
Table 2: Summary of Quantitative Performance Data from Experimental Studies
| Amplification Method / Strategy | Reported Performance Gain | Key Experimental Context |
|---|---|---|
| Labeled Streptavidin-Biotin (LSAB) | Up to ~8x increase in sensitivity [59] | Immunohistochemistry (IHC) detection |
| Internal Fluorophore Modification | ~6x signal intensity increase [60] | Oligo-labeled antibodies in flow cytometry |
| Controlled Binding Probe (CBP) | Multiple signal amplification steps via streptavidin-fluorophore binding [58] | Detection of peroxynitrite at the cell surface |
Detailed Experimental Protocols
To ensure reproducibility, below are detailed protocols for the core methodologies discussed.
This protocol is a foundation for staining fixed embryo samples.
Cell Preparation and Fixation:
- Seed cells or mount tissue/embryo on a coverslip or appropriate dish.
- Wash samples with Phosphate Buffered Saline (PBS).
- Fix with 4% paraformaldehyde (PAF) in PBS for 20 minutes at room temperature (RT).
Permeabilization and Blocking:
- Permeabilize cells with 0.15% Triton X-100 in PBS for 5 minutes at RT.
- Block non-specific binding by incubating with 10% Normal Goat Serum (NGS) in PBS for 20 minutes.
Primary Antibody Incubation:
- Dilute the primary antibody in 10% NGS.
- Apply the solution to the sample and incubate for 4 hours at RT or overnight at 4°C.
Secondary Antibody Incubation:
- Wash the sample three times for 5 minutes with PBS or 10% NGS.
- Stain with the fluorophore-labeled secondary antibody (diluted in 10% NGS) for 1 hour at RT in the dark.
Counterstaining and Mounting:
- Wash once with PBS.
- Stain with DAPI (1 µg/ml) for 15 minutes at RT in the dark to label DNA.
- Perform final washes with PBS.
- Mount coverslips with an anti-fade mounting medium for visualization.
This protocol modifies the standard indirect IF after the primary antibody step to incorporate signal amplification.
Primary Antibody Incubation:
- Follow Steps 1 and 2 from the Standard Indirect IF protocol.
- Incubate the sample with the unlabeled primary antibody. Typical incubation times vary from 1 hour at ambient temperature to overnight at 4°C.
Biotinylated Secondary Antibody Incubation:
- Wash the sample to remove unbound primary antibody.
- Incubate with a biotinylated secondary antibody (specific to the host species of the primary antibody) for 1 hour at room temperature.
Streptavidin-Fluorophore Conjugate Incubation:
- Wash the sample thoroughly.
- Incubate with enzyme- or fluorophore-conjugated streptavidin (or NeutrAvidin) for 30-60 minutes at room temperature in the dark. This allows the tetravalent streptavidin to bind multiple biotins on the secondary antibody.
Detection:
- Perform final washes.
- If an enzyme-conjugate (e.g., HRP) was used, add a chromogenic or fluorescent substrate to generate the signal.
- For fluorescent conjugates, proceed to counterstaining (e.g., DAPI) and mounting as in Step 5 of the Standard Indirect IF protocol.
The Scientist's Toolkit: Essential Research Reagents
Successful implementation of these sensitive techniques relies on high-quality reagents. The following table lists essential materials and their functions.
Table 3: Key Research Reagent Solutions for Signal Amplification
| Reagent / Material | Function and Importance |
|---|---|
| Streptavidin | A tetrameric protein from Streptomyces avidinii that binds biotin with extremely high affinity (Kd ~10⁻¹⁵ M). Recombinant forms with near-neutral pI offer low non-specific binding [59]. |
| NeutrAvidin | A deglycosylated form of avidin with a near-neutral pI. It offers even lower non-specific binding than streptavidin, making it ideal for reducing background in complex samples like embryos [59]. |
| Biotinylation Kits | Reagents for covalently linking biotin to primary or secondary antibodies. The valeric acid side chain of biotin is derivatized to create reactive groups for efficient conjugation [59]. |
| Biotinylated Secondary Antibodies | Secondary antibodies pre-conjugated with biotin. They are the key link between the primary antibody and the streptavidin amplification complex in the LSAB method [59]. |
| Fluorophore-Conjugated Streptavidin | Streptavidin coupled to bright, photostable fluorophores (e.g., Alexa Fluor dyes). This is the final detection reagent in the amplified fluorescent workflow. |
| Normal Serum | Serum from a non-related species (e.g., NGS) used for blocking. It reduces background by saturating non-specific protein-binding sites [57]. |
| Enzyme-Conjugated Streptavidin (HRP/AP) | Streptavidin coupled to enzymes like Horseradish Peroxidase (HRP) for use with chromogenic or tyramide signal amplification (TSA) substrates, enabling very high signal amplification [59]. |
Technical Considerations for Optimization
Achieving maximum signal-to-noise ratio requires attention to technical details beyond the choice of amplification method.
- Microscope Configuration: For thicker specimens like whole embryos, confocal microscopy is essential. It uses a spatial pinhole to eliminate out-of-focus light, providing clear optical sections [57] [61]. The choice of confocal technology matters; for rapid live imaging of embryos, spinning-disk confocal or resonant scanning confocal systems offer superior speed, while standard laser scanning confocal (CLSM) provides high resolution for fixed samples [61].
- Minimizing Non-Specific Binding: The basic pI of native avidin (pI ~10.5) can lead to high non-specific binding to negatively charged cellular structures. Using recombinant streptavidin (pI ~6.8-7.5) or NeutrAvidin (pI ~6.3) is critical to minimize this background [59].
- Endogenous Biotin Blocking: Some tissues, including embryos, may have endogenous biotin. This can be blocked by incubating the sample with free streptavidin to bind endogenous biotin, followed by free biotin to block streptavidin's remaining binding sites, before the application of the biotinylated secondary antibody [59].
The analysis of embryonic development presents a unique set of challenges, where understanding the simultaneous expression and spatial localization of multiple biomarkers is crucial for unraveling complex biological processes. From studying the intricate pathways of cellular differentiation to identifying the root causes of developmental disorders and infertility, researchers require techniques that can provide a comprehensive view from a single, often limited, sample. Multiplex immunofluorescence (mIF) has emerged as a powerful solution, enabling the simultaneous detection of several targets on a single tissue section. This capability preserves the precious embryo specimen and provides invaluable data on the co-localization and interaction of key proteins within the delicate tissue architecture. The choice between direct and indirect immunofluorescence methods forms a foundational decision in this process, directly impacting the assay's sensitivity, specificity, and overall success in minimizing cross-reactivity. This guide provides an objective comparison of these techniques, supported by experimental data and detailed protocols, to empower researchers in selecting the optimal path for their embryonic research.
Direct vs. Indirect Immunofluorescence: A Technical Comparison
Immunofluorescence (IF) is a technique built on immunology, biochemistry, and microscopy, using fluorescently labeled antibodies to localize and qualitatively analyze specific antigens in tissues or cells. The core difference between direct and indirect methods lies in the number of antibodies used and the fluorophore conjugation strategy [5].
Direct Immunofluorescence involves a single incubation step where the primary antibody is directly conjugated to a fluorescent dye [5] [8]. This method is simple, rapid, and involves fewer steps, making it less prone to certain types of non-specific binding and species cross-reactivity [5].
Indirect Immunofluorescence uses an unlabeled primary antibody specific to the target antigen, which is then detected by a fluorescently-labeled secondary antibody that recognizes the primary antibody [5] [8]. This two-step process is more time-consuming but offers significant advantages in signal amplification, as multiple secondary antibodies can bind to a single primary antibody [5].
The table below summarizes the critical differences between the two approaches, essential for planning embryo studies.
| Feature | Direct Immunofluorescence | Indirect Immunofluorescence |
|---|---|---|
| Antibody Conjugation | Primary antibody directly conjugated to fluorophore [5] | Primary antibody unlabeled; fluorophore on secondary antibody [5] |
| Number of Antibodies | One [5] | Two (or more) [5] |
| Process Time | Shorter (single labeling step) [5] [8] | Longer (additional operational steps) [5] [8] |
| Cost | More expensive (costly conjugated primary antibodies) [5] [8] | Less expensive (cheaper secondary antibodies) [5] [8] |
| Sensitivity | Lower (no signal amplification) [5] [8] | Higher (signal amplification via multiple secondaries) [5] [8] |
| Flexibility | Less flexible (limited pre-conjugated options) [5] | Highly flexible (wide range of conjugated secondaries) [5] |
| Species Cross-reactivity | Low [5] | Higher (can be mitigated with pre-adsorbed secondaries) [5] |
| Multiplexing Capability | Limited for antibodies from same host species [8] | Excellent with careful host species selection [5] |
Experimental Protocols for Validated Multiplexing
The transition from a standard IF protocol to a validated multiplex assay requires meticulous optimization and validation to ensure specificity and minimal cross-reactivity. The following workflow, adapted from robust mIF development studies, provides a reliable framework for embryo research.
Multiplex Immunofluorescence Workflow
Detailed Methodology
The following protocol is based on validated mIF panels using tyramide signal amplification (TSA), a method proven to be accurate and reproducible for FFPE tissues when performed carefully [62] [63].
Tissue Preparation and Staining:
- Specimens: Use formalin-fixed and paraffin-embedded (FFPE) embryo sections (4 µm thick) mounted on slides [62].
- Deparaffinization and Rehydration: Bake slides at 65°C for 30 minutes, then place in xylene. Rehydrate through a series of decreasing graded alcohols [63].
- Antigen Retrieval: Perform heat-induced epitope retrieval (HIER) using a high-pH buffer (e.g., Tris-EDTA, pH 9) at 110°C for 10-15 minutes in a decloaking chamber. Cool slides on the benchtop in TBST before staining [62] [63].
Sequential Multiplex Staining (for each target):
- Blocking: Incubate slides with a protein block (e.g., Tris-HCl buffer with 0.1% Tween) for 10 minutes at room temperature to stabilize proteins and reduce background [62].
- Primary Antibody Incubation: Apply the optimized primary antibody and incubate for 30 minutes to 2 hours at room temperature [62]. Each antibody in the panel must be rigorously validated for specificity, including verification with known knockout controls and assessment of correct subcellular localization [64].
- Signal Amplification: Incubate with a horseradish peroxidase (HRP)-conjugated secondary antibody for 10 minutes, followed by incubation with a fluorophore-conjugated tyramide (Opal dye) for 10 minutes. This TSA step provides strong, amplified signal [62] [63].
- Antibody Stripping: After each round of staining, a microwave treatment is applied to strip the primary and secondary antibodies while leaving the deposited fluorophore intact. This prevents cross-reactivity in subsequent cycles [62] [63].
Final Steps:
- Counterstaining and Mounting: After all markers are stained, counterstain with DAPI for 5 minutes to label nuclei, then mount with a hard-set mounting medium [62].
- Imaging and Analysis: Image slides using a multispectral microscope (e.g., Vectra 3.0). Use spectral libraries generated from single-stained controls to "unmix" the multiplex image and accurately assign signals to each marker [62] [63]. Analyze with software like HALO or inForm to quantify marker expression and co-localization.
Supporting Data and Validation
The reliability of mIF for critical analysis has been demonstrated in multiple studies. One key validation compared mIF against traditional immunohistochemistry (IHC) and single-plex IF for profiling the tumor microenvironment. The results showed highly significant positive correlations for cell densities of markers like CD8, CD68, and PD-L1 between mIF and both IHC (Spearman’s rho = 0.927 to 0.750, p < 0.0001) and single-plex IF (Spearman’s rho >0.9, p < 0.0001) [63]. Furthermore, replicates of the mIF staining itself showed a high degree of reproducibility (Spearman’s rho >0.940, p < 0.0001) [63]. This rigorous validation underscores that mIF is a reliable and accurate method for complex tissue analysis, a standard to which embryo studies should aspire.
The Scientist's Toolkit: Essential Research Reagent Solutions
Successful multiplexing in embryos depends on a suite of carefully selected reagents and tools. The following table details key solutions for developing a robust mIF assay.
| Research Reagent Solution | Function in Multiplex IF | Exemplars & Notes |
|---|---|---|
| Validated Primary Antibodies | Bind specifically to target antigens of interest in the embryo. | Antibodies must be validated for IF in embryo tissue [64]. Specificity confirmed via knockout controls [64]. |
| Tyramide Signal Amplification (TSA) Kits | Enable high-sensitivity signal detection and plexing beyond 3-4 targets with antibody stripping. | Opal 7-Color Kits (Akoya Biosciences) [62] [63]. Allows 6-plex staining on a single section. |
| Multispectral Imaging Systems | Capture the full emission spectrum at each pixel; essential for unmixing overlapping fluorophores. | Vectra Imaging Systems (Akoya Biosciences) [62] [63]. |
| Spectral Analysis Software | "Unmix" the composite image using reference spectra to generate specific images for each marker. | inForm (Akoya Biosciences) [62], HALO (Indica Labs) [63]. |
| Automated Slide Stainers | Standardize staining protocols, reduce human error, and improve batch-to-batch reproducibility. | intelliPATH Autostainer (Biocare Medical) [63]. |
Multiplex immunofluorescence represents a transformative approach for embryo research, enabling a systems-level understanding of development and disease. The choice between direct and indirect immunofluorescence is not a matter of which is universally better, but which is better suited to the specific experimental question and constraints. Direct IF offers simplicity and lower cross-reactivity for simpler assays, while indirect IF, particularly when incorporated into a TSA-based multiplex protocol, provides the sensitivity, flexibility, and multiplexing capacity required for deep immune-profiling of precious embryonic tissues. By adhering to rigorous validation protocols and leveraging the specialized tools outlined in this guide, researchers can confidently deploy these powerful techniques to detect multiple targets with minimal cross-reactivity, driving forward our understanding of life's earliest stages.
Mitigating Photobleaching and Phototoxicity for Live Embryo Imaging
Live-cell imaging of embryos presents a significant challenge in developmental biology research. The very light used for observation can induce photobleaching, the irreversible loss of fluorescence, and phototoxicity, which causes physical damage to cellular components, ultimately perturbing the delicate processes of embryogenesis [65] [66]. These effects are primarily driven by the generation of reactive oxygen species (ROS), which can oxidize proteins, lipids, and DNA, disrupting redox homeostasis and signaling pathways [65] [67]. For researchers employing immunofluorescence (IF) techniques—whether direct or indirect—in embryo studies, mitigating these effects is not merely an optimization step but a necessity to ensure biological fidelity and accurate interpretation. This guide provides a comparative overview of strategies and technologies to minimize these detrimental effects, framed within the context of choosing between direct and indirect IF methodologies.
Photobleaching and Phototoxicity: Core Concepts and Impacts on Embryos
Photobleaching is a photochemical process where fluorophores are permanently destroyed upon repeated excitation, leading to a loss of signal and a reduction in image quality over time [68] [66]. This process is often linked to the generation of triplet states in fluorophores, which can react with molecular oxygen to produce destructive ROS [68].
Phototoxicity encompasses the detrimental effects of light on living samples. A major mechanism involves one- or multi-photon absorption by endogenous molecules (e.g., NAD(P)H, flavins) or exogenous fluorescent labels, leading to the production of ROS [65] [67]. These ROS can then cause widespread cellular damage, including:
- DNA damage: Such as double-strand breaks, quantified by γH2AX assays [46].
- Disruption of mitochondrial function: Leading to loss of membrane potential [65] [69].
- Alteration of cell division and morphology: Delays in mitotic progression and induction of membrane blebbing are sensitive indicators of photodamage [65].
The consequences for embryos are particularly severe, as phototoxicity can compromise development, reduce viability, and lead to erroneous biological conclusions [65] [46].
Direct vs. Indirect Immunofluorescence: A Strategic Choice for Embryo Imaging
The choice between direct and indirect IF has profound implications for signal strength, experimental flexibility, and, crucially, the potential for photobleaching and phototoxicity. The table below summarizes the core differences.
Table 1: Comparison of Direct and Indirect Immunofluorescence Techniques
| Feature | Direct Immunofluorescence | Indirect Immunofluorescence |
|---|---|---|
| Antibody Conjugation | Primary antibody is directly conjugated to a fluorophore [5] [8] | Primary antibody is unlabeled; a fluorescently-labeled secondary antibody is used for detection [5] [8] |
| Number of Antibodies | One [5] | Two (or more) [5] |
| Sensitivity | Lower (one fluorophore per primary antibody) [5] [8] | Higher (multiple fluorophores can bind to a single primary antibody, amplifying signal) [5] [8] |
| Experimental Time | Shorter (fewer incubation steps) [5] | Longer (requires additional incubation and washing steps) [5] |
| Cost | Generally higher (conjugated primary antibodies are expensive) [5] | Generally lower (versatile secondary antibodies can be used with many primary antibodies) [5] |
| Flexibility | Low (limited availability of pre-conjugated primaries) [5] | High (easy to change fluorophores by switching secondaries) [5] |
| Multiplexing Potential | Challenging (requires primary antibodies from different species) [5] | Simplified (can use primaries from the same species with sequential staining) [5] |
| Species Cross-Reactivity | Low [5] | Potentially higher, but can be mitigated with pre-adsorbed secondary antibodies [5] |
For live embryo imaging, the high sensitivity of indirect IF is a double-edged sword. While it allows for the use of lower concentrations of primary antibody and lower excitation light intensity to detect low-abundance targets, the multiple labeling steps can increase total sample preparation time and potential stress on the embryo. Direct IF, with its simpler and faster protocol, minimizes hands-on time but may require higher light intensity to detect weaker signals, potentially increasing photobleaching and phototoxicity for targets with low expression.
Figure 1: A decision pathway for selecting between direct and indirect immunofluorescence for live embryo imaging applications, incorporating key considerations for minimizing photodamage.
Quantitative Comparison of Imaging Modalities for Embryo Studies
The choice of microscopy platform is equally critical. Different imaging modalities expose the embryo to varying degrees of light stress. A recent 2024 study quantitatively compared DNA damage in mammalian embryos following light sheet and confocal microscopy.
Table 2: Quantitative Comparison of Confocal and Light Sheet Microscopy for Embryo Imaging [46]
| Parameter | Confocal Microscopy | Light Sheet Microscopy |
|---|---|---|
| Image Acquisition Time | ~30 minutes for a single blastocyst | ~3 minutes for a single blastocyst |
| Signal-to-Noise Ratio (SNR) | 15.75 ± 1.90 | 15.45 ± 3.45 |
| DNA Damage (γH2AX) | Significantly higher than non-imaged controls | No significant increase vs. non-imaged controls |
| Photobleaching Rate | Higher | Lower |
| Illumination Geometry | Full volume illuminated per z-plane | Only the imaged z-plane is illuminated |
| General Phototoxicity | Higher | Lower |
This data demonstrates that at an equivalent SNR, light sheet microscopy is dramatically faster and induces significantly less DNA damage and photobleaching than confocal microscopy [46]. The fundamental reason is the illumination geometry: confocal microscopy illuminates the entire sample volume for each z-plane, while light sheet microscopy illuminates only the thin plane being imaged, drastically reducing the total light dose [46].
Two-photon (multiphoton) microscopy is another valuable modality for deep tissue and embryo imaging. It uses long-wavelength (infrared) pulsed lasers for excitation, which is less damaging to cells and provides better depth penetration [67] [70]. Critically, excitation is confined to the focal plane, which also reduces out-of-focus photobleaching and phototoxicity [70].
Experimental Protocols for Assessing and Mitigating Photodamage
Protocol 1: Assessing Phototoxicity Using Cell Division as a Readout
Cell division is a highly sensitive process that is easily disrupted by phototoxicity [65]. This protocol can be used to compare the safety of different imaging settings or IF labels.
- Sample Preparation: Culture embryos or dividing cells under physiological conditions.
- Imaging: Subject the samples to the intended imaging regimen (e.g., specific light intensity, exposure time, and wavelength).
- Data Collection:
- Continuous Measurement: Use transmitted light (label-free) imaging to continuously monitor and record the time between mitotic events [65].
- Endpoint Measurement: Fix the samples after a set period (e.g., 20-24 hours post-illumination) and count the number of cell divisions or assess colony formation ability [65].
- Analysis: Compare the mitotic timing and success rates between imaged and non-imaged control embryos. A significant delay or failure in cell division indicates phototoxicity.
Protocol 2: Quantifying DNA Damage Post-Imaging
This protocol uses DNA double-strand breaks as a sensitive indicator of photodamage [46].
- Sample Preparation and Imaging: Image live embryos using the modalities to be compared (e.g., confocal vs. light sheet).
- Fixation and Staining: Immediately after imaging, fix the embryos and perform immunohistochemistry for γH2AX, a phosphorylated histone variant that marks sites of DNA double-strand breaks [46].
- Image Acquisition and Quantification: Acquire high-resolution images of the stained embryos and control (non-imaged) embryos. Quantify the fluorescence intensity or the number of γH2AX foci per nucleus.
- Statistical Analysis: Perform statistical tests to determine if the levels of DNA damage in imaged embryos are significantly higher than in controls [46].
The Scientist's Toolkit: Essential Reagents and Technologies
Table 3: Key Research Reagent Solutions for Mitigating Photodamage
| Item | Function | Application Note |
|---|---|---|
| Antifade Mounting Media | Contains ROS scavengers (e.g., ascorbic acid, n-Propyl gallate) to slow photobleaching by neutralizing reactive oxygen species [68] [71]. | Primarily for fixed samples. Compatibility with live embryos must be verified. |
| Oxygen Scavenging Systems | Enzymatic systems (e.g., Glucose Oxidase/Catalase - GOC) that deplete molecular oxygen, reducing the generation of ROS [68]. | More effective for anaerobic organisms; can negatively impact mammalian cell physiology [68]. |
| Specialized Imaging Media | Media like Brainphys Imaging Medium are formulated with rich antioxidant profiles and omit reactive components like riboflavin to actively curtail ROS production [69]. | Shown to support neuron viability and function under phototoxic stress, and is likely beneficial for embryos [69]. |
| Red-Shifted Fluorophores | Fluorophores excited by longer wavelengths (e.g., red, far-red). These photons carry less energy, causing less direct cellular damage and penetrating tissue more effectively [65] [66]. | Highly recommended for all live-cell and embryo imaging. Newer fluorophores also offer greater photostability [71]. |
| Light Sheet Microscope | Imaging system that uses a thin sheet of light to illuminate only the focal plane, drastically reducing total light dose and enabling rapid volumetric imaging [46]. | Superior for long-term, high-resolution imaging of live embryos with minimal photodamage [46]. |
| Two-Photon Microscope | Uses pulsed infrared light for non-linear excitation confined to the focal point, reducing out-of-focus absorption and phototoxicity while improving penetration [67] [70]. | Ideal for imaging thick samples like later-stage embryos or tissues within an egg or uterus. |
Mitigating photobleaching and phototoxicity in live embryo imaging requires a holistic strategy. The choice between direct and indirect immunofluorescence involves a trade-off between simplicity and sensitivity, which must be balanced against the potential for light-induced damage. Furthermore, the selection of the imaging modality is paramount; modern techniques like light sheet and two-photon microscopy offer significant advantages over traditional confocal microscopy by design. By integrating careful methodological choices—from antibody selection and fluorophore properties to the core imaging technology and sample environment—researchers can unlock the full potential of live, dynamic imaging of embryonic development without compromising the very biological processes they seek to understand.
Choosing Your Method: A Data-Driven Comparison for Embryo Research
In embryonic development research, precise protein localization is paramount for understanding fundamental processes like cell differentiation, tissue patterning, and morphogenesis. Immunofluorescence (IF) stands as a cornerstone technique for achieving this spatial resolution, with researchers primarily choosing between two methodological pathways: direct and indirect immunofluorescence. The core distinction lies in the antibody configuration—direct IF uses a single fluorophore-conjugated primary antibody, while indirect IF employs an unlabeled primary antibody followed by a fluorophore-tagged secondary antibody [2] [72]. This choice profoundly impacts experimental outcomes, particularly sensitivity and capacity for signal amplification, which are often critical when working with precious or low-abundance embryonic antigens. This guide provides an objective, data-driven comparison of these techniques and advanced amplification methods to inform experimental design in developmental biology.
Core Principles and Direct Comparison
Direct Immunofluorescence simplifies the staining process to a single step, where the fluorophore is directly conjugated to the antibody that recognizes the target antigen. This streamlined workflow reduces experimental time and minimizes potential background from secondary antibody cross-reactivity [72] [73]. However, its major limitation is fixed sensitivity, as the signal is constrained by the finite number of fluorophores that can be attached to each primary antibody [74]. This makes it less suitable for detecting low-abundance targets.
Indirect Immunofluorescence, a two-step method, separates the antigen-binding event from the fluorescence detection. The primary antibody binds the target, and subsequently, a fluorophore-conjugated secondary antibody—raised against the species of the primary antibody—binds to the primary. This configuration provides inherent signal amplification because multiple secondary antibodies can bind to a single primary antibody [2] [72]. This significantly enhances sensitivity, making it the preferred choice for detecting scarce antigens. The extensive commercial availability of secondary antibodies also offers greater flexibility and often reduces costs [72] [74]. The trade-off is a longer protocol and an increased risk of non-specific background from secondary antibody cross-reactivity, which must be carefully controlled with blocking steps [73].
Table 1: Head-to-Head Comparison of Direct and Indirect Immunofluorescence
| Feature | Direct Immunofluorescence | Indirect Immunofluorescence |
|---|---|---|
| Protocol Steps | Single incubation step [73] | Two incubation steps (primary then secondary) [73] |
| Total Experimental Time | Shorter, simpler workflow [72] [74] | Longer, more complex workflow [72] |
| Sensitivity & Signal Amplification | Lower sensitivity; no signal amplification [74] | Higher sensitivity; multiple secondaries amplify signal [2] [72] [74] |
| Flexibility | Limited; requires conjugated primary for each target [72] | High; same secondary can pair with many primaries from same host species [74] |
| Species Cross-Reactivity | Lower potential for cross-reactivity [72] | Higher potential; requires primaries from different species for multiplexing [72] [74] |
| Cost & Reagents | Often more expensive (conjugated primaries) [72] | Generally more cost-effective [72] [74] |
| Best Suited For | High-abundance antigens, multiplexing with same-host-species primaries [74] | Low-abundance antigens, general-purpose use, maximizing flexibility [72] |
Advanced Signal Amplification Strategies
For challenging targets in embryo research, such as sparsely expressed transcription factors or proteins on single extracellular vesicles, the intrinsic amplification of indirect IF may be insufficient. In these cases, specialized signal amplification technologies are required.
Tyramide Signal Amplification (TSA)
TSA is a powerful enzyme-mediated method that can be coupled with standard indirect IF. Following the primary and secondary antibody steps (where the secondary is conjugated to Horseradish Peroxidase, HRP), the sample is incubated with a reactive tyramide-fluorophore probe. The HRP enzyme catalyzes the activation of tyramide, causing it to form covalent bonds with tyrosine residues at the site of the antigen-antibody complex [75] [76]. A single HRP molecule can activate hundreds of tyramide molecules, leading to a dramatic deposition of fluorophores and signal amplification that exceeds conventional indirect IF [75].
Key Advantages for Embryo Research:
- High Sensitivity: Enables detection of very low-abundance targets that are otherwise undetectable [75] [76].
- Signal Stability: The covalent bond formation creates a highly stable signal that resists photobleaching [75].
- Multiplexing Compatibility: The HRP activity can be quenched after each TSA round, allowing sequential staining with multiple targets on the same sample [75] [76].
Experimental Workflow for TSA: The method builds upon the standard indirect IF protocol with additional steps for amplification and, if needed, multiplexing [75] [76]:
- Sample Preparation: Fix and permeabilize embryo tissue sections.
- Antigen Retrieval: Use Heat-Induced Epitope Retrieval (HIER) to unmask antigens [2].
- Blocking: Incubate with serum or protein block to reduce non-specific binding.
- Primary Antibody Incubation: Apply unlabeled primary antibody specific to the target.
- HRP-Conjugated Secondary Antibody Incubation: Apply antibody against the primary's host species.
- Tyramide Signal Amplification: Incubate with fluorescently-labeled tyramide reagent and a low concentration of H₂O₂.
- Signal Detection: Visualize with fluorescence microscopy.
- Multiplexing (Optional): Quench HRP activity with a buffer containing sodium azide and repeat steps from primary antibody incubation for the next target [75].
Alternative Amplification Methods
Other sophisticated methods are emerging or used in specific contexts:
- Biotin-Streptavidin Amplification: Uses a biotinylated secondary antibody followed by fluorophore-conjugated streptavidin. Since streptavidin has multiple binding sites for biotin, this also results in signal amplification, though it may require additional steps to block endogenous biotin [2] [74].
- Amplification by Cyclic Extension (ACE): A cutting-edge method that uses DNA-conjugated antibodies. Through thermal cycling and polymerase-driven extension, long DNA concatemers are created on the antibody. These concatemers are then hybridized with hundreds of metal- or fluorophore-labeled detector oligonucleotides, achieving over 500-fold signal amplification. This method is particularly valuable for highly multiplexed imaging and mass cytometry [77].
Table 2: Comparison of Advanced Signal Amplification Techniques
| Technique | Mechanism of Amplification | Key Advantage | Reported Signal Increase | Consideration for Embryo Research |
|---|---|---|---|---|
| Indirect IF | Multiple fluorescent secondary antibodies bind to a single primary antibody [74]. | Simplicity and wide availability. | ~5-10x over direct IF (inferred) | Good balance of sensitivity and ease for many targets. |
| Tyramide Signal Amplification (TSA) | HRP enzyme activates multiple tyramide-fluorophores for covalent deposition [75] [76]. | Extremely high sensitivity for low-abundance targets. | >6x higher intensity than conventional IF [75]. | Enables multiplexing; requires optimization of tyramide concentration. |
| Biotin-Streptavidin | Multiple fluorophore-streptavidin complexes bind to a single biotinylated secondary antibody [2] [74]. | Significant signal boost with common reagents. | Not quantified in results | May require blocking of endogenous biotin. |
| Amplification by Cyclic Extension (ACE) | DNA-conjugated antibodies are extended to create concatemers that bind hundreds of detectors [77]. | Extreme amplification with high multiplexing potential. | >500-fold [77]. | Technically complex; may require specialized reagents. |
The Scientist's Toolkit: Essential Reagents for Immunofluorescence in Embryo Research
Successful immunofluorescence, especially in delicate embryo samples, relies on a carefully selected set of reagents. The following table details key solutions and their critical functions in the experimental workflow [2] [78].
Table 3: Key Research Reagent Solutions for Immunofluorescence
| Reagent / Solution | Function / Purpose | Example |
|---|---|---|
| Fixatives | Preserves cellular architecture and immobilizes antigens while maintaining antigenicity [2]. | Formaldehyde (cross-linking), Methanol (precipitating) [2]. |
| Permeabilization Agents | Creates pores in cell membranes to allow antibodies access to intracellular targets. | Detergents (Triton X-100, Saponin) or organic solvents (methanol, acetone) [2]. |
| Blocking Buffers | Reduces non-specific antibody binding to minimize background signal [2]. | Protein solutions (BSA, non-fat dry milk), normal serum, or commercial protein-free blocks [2]. |
| Antigen Retrieval Buffers | Reverses protein cross-links from fixation to unmask epitopes and restore antibody binding [2]. | Citrate buffer (pH 6.0), Tris/EDTA buffer (pH 9.0) for Heat-Induced Epitope Retrieval (HIER) [2]. |
| Primary Antibodies | Binds specifically to the protein or antigen of interest. | Monoclonal or polyclonal antibodies from various host species (e.g., mouse, rabbit, goat). |
| Fluorophore-Conjugated Secondaries | Binds to the primary antibody to provide a detectable signal; the source of amplification in indirect IF. | Alexa Fluor dyes, FITC, TRITC; raised against the host species of the primary (e.g., goat anti-mouse) [2] [72] [74]. |
| Mounting Media with Antifade | Preserves the sample and reduces photobleaching during microscopy [2]. | ProLong Gold Antifade Mountant [72]. |
| Tyramide Reagents | The fluorescent probe for TSA that is activated by HRP and deposited at the target site [75]. | Alexa Fluor Tyramide Reagents (e.g., TSA-AF488, TSA-AF594) [75]. |
Visualizing Immunofluorescence and Amplification Pathways
The following diagrams illustrate the core methodologies and logical decision process for selecting an immunofluorescence technique.
This guide provides an objective comparison between direct and indirect immunofluorescence (IF) methods, focusing on the critical trade-offs between reagent expenses and experimental time. For researchers in embryology and drug development, the choice between these techniques significantly impacts budget, workflow efficiency, and data quality. The analysis below, supported by quantitative data and experimental protocols, demonstrates that indirect immunofluorescence is generally more cost-effective and sensitive, making it suitable for most research applications, including studies on low-abundance targets in embryos. In contrast, direct immunofluorescence offers superior speed and reduced complexity, advantageous for multiplexing or when cross-reactivity is a concern. The current market trend favors indirect methods, which held approximately 65.6% market share in 2024 [79], reflecting their broader adoption in research and clinical diagnostics.
Quantitative Comparison: Direct vs. Indirect Immunofluorescence
The table below summarizes the core cost and performance characteristics of each method, providing a basis for objective comparison.
Table 1: Direct vs. Indirect Immunofluorescence - Cost and Performance Profile
| Parameter | Direct Immunofluorescence | Indirect Immunofluorescence |
|---|---|---|
| Assay Time | Shorter protocol (fewer steps) [5] [72] | Longer protocol (additional incubation steps) [5] [80] |
| Reagent Cost | Higher (fluorophore-conjugated primary antibodies are more expensive) [5] [72] | Lower (unconjugated primary antibodies plus labeled secondary antibodies are less expensive) [5] [72] |
| Sensitivity | Lower (no signal amplification) [72] [80] | Higher (signal amplification via multiple secondary antibodies binding to a single primary) [72] [80] [81] |
| Complexity & Flexibility | Lower flexibility; limited choices of pre-conjugated primaries [5] [81] | Higher flexibility; wide array of labeled secondary antibodies available [5] [81] |
| Antibody Cross-Reactivity | Lower species cross-reactivity [5] [72] | Higher potential for cross-reactivity; can be mitigated with pre-adsorbed secondaries [5] [72] |
| Best Suited For | Detecting medium to highly expressed targets; multiplex experiments [5] [80] | Detecting low-abundance proteins; general-purpose research due to cost-effectiveness [5] [80] |
Methodological Workflows and Decision Pathways
Experimental Protocols for Embryo Research
The following core protocols are adapted for embryo staining, emphasizing steps critical for preserving delicate embryonic structures.
Protocol A: Direct Immunofluorescence Staining
- Sample Preparation and Fixation: Isolate and wash embryos in a physiological buffer. Fixation is critical for preserving morphology and antigenicity. Common fixatives for embryos include 4% paraformaldehyde (PFA) in PBS. The fixation time must be empirically determined based on embryo size and stage to avoid over-fixation, which can mask epitopes [2].
- Permeabilization: Treat embryos with a permeabilizing agent (e.g., 0.1% Triton X-100, 0.5% Tween-20, or cold methanol) to allow antibody access to intracellular targets. The concentration and duration are embryo-specific and require optimization [2] [82].
- Blocking: Incubate embryos in a blocking buffer (e.g., 1-5% BSA or serum from the host species of the secondary antibody) for 1-2 hours at room temperature to reduce non-specific antibody binding [2].
- Primary Antibody Incubation: Incubate with the fluorophore-conjugated primary antibody diluted in blocking buffer. This single incubation step typically lasts 1-2 hours at room temperature or overnight at 4°C for high-affinity binding [5] [2].
- Washing: Wash the embryos thoroughly with PBS or a similar buffer, 3-5 times for 15-30 minutes each, to remove unbound antibody.
- Mounting and Imaging: Mount embryos on a glass slide using an anti-fade mounting medium. Proceed with imaging using an epifluorescence or confocal microscope [72].
Protocol B: Indirect Immunofluorescence Staining
- Sample Preparation, Fixation, and Permeabilization: Identical to Protocol A [2].
- Blocking: Identical to Protocol A [2].
- Primary Antibody Incubation: Incubate with an unconjugated primary antibody diluted in blocking buffer. This step typically requires a longer incubation time (overnight at 4°C is common) to ensure sufficient binding to the target antigen [2].
- Washing: Wash thoroughly 3-5 times for 15-30 minutes each.
- Secondary Antibody Incubation: Incubate with a fluorophore-conjugated secondary antibody (e.g., Goat anti-Mouse IgG Alexa Fluor 488) diluted in blocking buffer. Protect from light. Incubate for 1-2 hours at room temperature [2] [81].
- Washing and Mounting: Perform a final series of washes before mounting and imaging, as in Protocol A.
Diagram 1: Immunofluorescence method selection guide.
The Scientist's Toolkit: Essential Reagents for Immunofluorescence
Successful immunofluorescence experiments in embryo research depend on a suite of high-quality reagents. The table below details the essential materials and their functions.
Table 2: Essential Research Reagent Solutions for Immunofluorescence
| Reagent / Material | Function / Purpose | Key Considerations |
|---|---|---|
| Fixatives (e.g., Paraformaldehyde) | Preserves cellular architecture and immobilizes antigens by forming cross-links [2]. | Over-fixation can mask epitopes; concentration and time must be optimized for different embryo stages [2]. |
| Permeabilization Agents (e.g., Triton X-100, Tween-20, Methanol) | Disrupts cell membranes to allow antibodies access to intracellular targets [2] [82]. | Concentration is critical; too high can damage morphology, too low can prevent antibody penetration. |
| Blocking Serum (e.g., BSA, normal serum) | Occupies non-specific binding sites to reduce background noise [2]. | Should be from the same species as the secondary antibody host for indirect IF. |
| Primary Antibodies | Provides specificity by binding to the target antigen of interest [81]. | Must be validated for IF. Conjugated for direct IF; unconjugated for indirect IF. Species host is critical for multiplexing. |
| Fluorophore-Conjugated Secondary Antibodies | Binds to the primary antibody for detection in indirect IF; provides signal amplification [81]. | Must be raised against the host species of the primary antibody. Pre-adsorbed secondaries minimize cross-reactivity. |
| Fluorophores (e.g., Alexa Fluor dyes) | Emits detectable light upon excitation; the "signal" in fluorescence [72] [2]. | Must be matched to microscope filter sets and be photostable. Brighter dyes (e.g., BV421, BV480) are better for low-abundance targets [72]. |
| Mounting Medium with Antifade | Preserves the sample on the slide and reduces photobleaching during imaging [72]. | Can contain DAPI for nuclear counterstaining. |
Diagram 2: Direct vs. Indirect IF workflow comparison.
Market Context and Technical Data
The immunofluorescence assay market, valued at $3.34 billion in 2024, is projected to grow to $5.32 billion by 2029 [83]. This growth is driven by the rising prevalence of chronic diseases and increased demand for personalized medicine. Within this market, the segment for reagents and kits led with over 62% revenue share in 2024 [79], underscoring the direct material costs faced by researchers. The dominance of indirect immunofluorescence, with 65.6% market share in 2024 [79], is a strong indicator of its perceived cost-benefit advantage for a wide range of applications. However, direct methods are gaining traction in precision medicine, particularly in oncology, where their rapid, single-step staining is valuable for intraoperative decisions [79].
Evaluating Flexibility and Multiplexing Capabilities
Immunofluorescence (IF) is a cornerstone technique in biological research, enabling the visualization of specific proteins and other molecules within cells and tissues. By using antibodies conjugated to fluorescent dyes, researchers can illuminate the precise localization of their target antigens. Within the specific and sensitive context of embryo research, where sample availability is often limited and the simultaneous detection of multiple markers is crucial, choosing the right IF method is paramount. The core distinction lies between two principal techniques: direct and indirect immunofluorescence. This guide provides an objective comparison of these methods, with a focused evaluation of their flexibility and multiplexing capabilities, to inform the experimental design of researchers and scientists working with embryonic models.
Direct vs. Indirect Immunofluorescence: A Core Comparison
The fundamental difference between direct and indirect immunofluorescence lies in the number of antibody layers used and the point at which the fluorophore is introduced [5] [13] [4].
Direct Immunofluorescence is a single-step process where the primary antibody targeting the antigen of interest is directly conjugated to a fluorophore [5] [72]. This direct conjugation means the technique is simpler and faster to perform. However, a significant limitation is its lower sensitivity, as there is no mechanism for signal amplification. Each primary antibody contributes only one fluorophore to the signal [13].
Indirect Immunofluorescence employs two antibodies [5] [4]. An unlabeled primary antibody first binds to the target antigen. Then, a fluorophore-conjugated secondary antibody, which is raised against the species of the primary antibody, is applied. This method provides signal amplification because multiple secondary antibodies can bind to a single primary antibody, significantly enhancing the fluorescent signal and making it ideal for detecting low-abundance targets [13] [84].
The following workflow diagrams illustrate the procedural and mechanistic differences between these two methods:
Experimental Workflow
Antibody Binding Mechanism
Quantitative Comparison of Key Parameters
The choice between direct and indirect IF involves balancing multiple experimental factors. The table below summarizes the critical differences, with a specific emphasis on flexibility and multiplexing:
| Feature | Direct Immunofluorescence | Indirect Immunofluorescence |
|---|---|---|
| Antibody Configuration | Fluorophore-conjugated primary antibody [5] | Unlabeled primary + fluorophore-conjugated secondary antibody [5] |
| Signal Amplification | Limited or none [13] | High (multiple secondaries bind per primary) [5] [84] |
| Sensitivity | Lower [8] [72] | Higher [5] [8] |
| Multiplexing Flexibility | Less flexible; limited by availability of directly conjugated primaries [5] | Highly flexible; one secondary can be used with many primaries from the same host [5] [4] |
| Experimental Complexity | Simpler, fewer steps [5] | More complex, additional incubation and wash steps [5] |
| Process Time | Shorter [5] [8] | Longer [5] |
| Cost | More expensive (costly conjugated primaries) [5] [8] | Less expensive (cheaper secondaries) [5] [8] |
| Species Cross-Reactivity | Low [5] | Higher; can be mitigated with pre-adsorbed secondaries [5] |
As the data shows, indirect immunofluorescence holds a definitive advantage in flexibility and multiplexing capabilities. The ability to use a single, well-validated fluorescent secondary antibody to detect any primary antibody raised in the same species dramatically increases experimental flexibility and simplifies the process of multiplexing [5] [4]. In contrast, for direct IF, a unique conjugated primary antibody is required for each target, which are often more expensive and less readily available, making complex multiplexing experiments challenging [5].
Advanced Multiplexing Techniques in Immunofluorescence
Multiplexing, or the simultaneous detection of multiple antigens in a single sample, is a powerful application of immunofluorescence that is particularly valuable for characterizing complex systems like embryonic development. While standard multiplex IF typically allows for the visualization of 4-5 markers simultaneously using a standard fluorescence microscope, several advanced techniques have been developed to push these boundaries further [85].
| Technique | Principle | Maximum Markers | Key Advantages | Key Limitations |
|---|---|---|---|---|
| Tyramide Signal Amplification (TSA) | Enzyme-based deposition of fluorophores [85] | 8+ (with spectral imaging) [85] | High sensitivity, works on standard platforms [85] | Potential signal interference, requires optimization [85] |
| Cyclic Immunofluorescence | Iterative staining, imaging, and dye inactivation [86] | 30-60 [85] [86] | Very high plexing from conventional microscopes [85] | Lengthy process, complex data analysis [85] |
| Mass Cytometry (IMC/MIBI) | Metal-tagged antibodies detected by mass spectrometry [85] [86] | 40+ [85] [86] | No spectral overlap, highly quantitative [85] | Extremely costly instrumentation, no real-time imaging [85] |
| Digital Spatial Profiling (DSP) | UV-cleavable DNA barcodes on antibodies [85] [87] | 40-50+ (theoretically ~800) [85] | Extremely high plexing, combines protein and RNA data [85] | No direct image output, analyzes pre-selected regions [85] |
Experimental Protocols for Embryo Research
The following protocol, adapted for embryo research, highlights how the indirect IF method can be optimized for challenging samples like mouse embryonic stem cells (mESCs), which share key characteristics with embryonic tissue, such as 3D architecture and specific culture requirements [20].
Detailed Protocol for Indirect Immunofluorescence in mESCs
This protocol is designed to be cost-effective while preserving the 3D structure of cell colonies, making it suitable for embryo-related studies [20].
Before You Begin:
- Cell Culture: Naïve mESCs are grown in 2i/LIF media. Plate cells on either 0.1% gelatin (to maintain 3D organization) or laminin (for 2D, easier imaging) in glass-bottom multi-well plates [20].
- Solutions Preparation: Prepare fixative, permeabilization, and blocking buffers in advance. A recommended blocking buffer is 5% goat serum and 1% BSA in PBS [20] [72].
Staining Procedure:
- Fixation: Fix cells with a formaldehyde solution (e.g., 4% in PBS) for 15 minutes at room temperature.
- Permeabilization: Permeabilize cells with a solution such as 0.1% Triton X-100 in PBS for 10 minutes.
- Blocking: Incubate samples with blocking buffer for 1 hour at room temperature to prevent non-specific antibody binding.
- Primary Antibody Incubation: Apply the unlabeled primary antibody diluted in blocking buffer. Incubate for 1-2 hours at room temperature or overnight at 4°C.
- Wash: Wash the sample 3 times for 5 minutes each with PBS to remove unbound primary antibody.
- Secondary Antibody Incubation: Apply the fluorophore-conjugated secondary antibody (e.g., Alexa Fluor 488 donkey anti-rabbit), diluted in blocking buffer. Incubate for 1 hour at room temperature, protected from light.
- Wash and Counterstain: Wash 3 times for 5 minutes with PBS. Incubate with a nuclear stain like Hoechst 33342 (1 µg/mL) for 10 minutes [20].
- Mounting and Imaging: Mount samples with an anti-fade mounting medium and image using epifluorescence or confocal microscopy [20] [72].
Protocol for Direct Immunofluorescence
The direct IF protocol is a truncated version of the above.
- After fixation and permeabilization, proceed directly to incubation with the fluorophore-conjugated primary antibody.
- Follow with washes, counterstaining, and mounting as described [13].
This simplified workflow underscores the primary advantage of direct IF: speed. However, it forfeits the signal amplification and flexibility of the indirect method.
Essential Research Reagent Solutions
The success of any immunofluorescence experiment, especially in sensitive embryonic systems, depends on the quality and appropriateness of the reagents used.
| Reagent | Function & Importance | Key Considerations |
|---|---|---|
| Primary Antibodies | Bind specifically to the target antigen [13]. | For embryo research, select antibodies validated for IF and the specific sample type (e.g., frozen tissue). Recombinant antibodies offer high specificity and batch-to-batch consistency [13] [4]. |
| Fluorophore-Conjugated Secondary Antibodies | Bind to the primary antibody for detection and signal amplification in indirect IF [13]. | Choose secondaries targeted against the host species of the primary antibody. Select fluorophores with bright, photostable signals (e.g., Alexa Fluor dyes, Brilliant Violet dyes) and non-overlapping spectra for multiplexing [72]. |
| Mounting Medium with Antifade | Preserves the sample and protects fluorophores from photobleaching during imaging [20] [72]. | Essential for acquiring high-quality, stable images, especially during long confocal microscopy sessions. |
| Counterstains (e.g., DAPI, Hoechst) | Label DNA to visualize cell nuclei, providing spatial context [20] [13]. | A fundamental step for identifying cells and confirming nuclear localization of other targets. |
| Blocking Serum | Reduces non-specific binding of antibodies to the sample, lowering background noise [13] [4]. | Should be derived from the same species as the secondary antibody (e.g., use goat serum if using goat-anti-rabbit secondary) for best results. |
For researchers in embryo biology and drug development, the choice between direct and indirect immunofluorescence is strategic. Direct IF offers a rapid, simple solution for straightforward detection of highly expressed antigens. However, its limitations in sensitivity and, most critically, in flexibility and multiplexing, are significant.
Indirect IF is the unequivocally superior technique for complex experimental questions requiring the simultaneous visualization of multiple proteins. Its unparalleled flexibility, cost-effectiveness, and powerful signal amplification make it the backbone of advanced multiplexing studies. As the field moves toward highly multiplexed techniques like cyclic IF and spatial profiling, the principles of the indirect method remain fundamental. Therefore, for most investigative work aimed at unraveling the complex signaling and cellular interactions within embryos, indirect immunofluorescence provides the necessary toolkit for robust, reliable, and informative data.
In the study of developmental biology, particularly in precious samples like embryos, the choice of immunofluorescence (IF) technique is critical for visualizing key signaling pathways. The Transforming Growth Factor-Beta (TGF-β) pathway and its phosphorylated SMAD (p-SMAD) proteins serve as central regulators of embryogenesis, controlling cell proliferation, differentiation, and patterning [88] [89]. Detecting these signaling events requires highly specific and sensitive methods that preserve limited sample material. This guide provides an objective comparison between direct and indirect immunofluorescence techniques, framing the analysis within the context of detecting TGF-β/p-SMAD signaling in embryonic development, supported by experimental data and detailed protocols.
Technical Comparison: Direct vs. Indirect Immunofluorescence
Immunofluorescence techniques are built on the principle of using fluorescently labeled antibodies to localize specific antigens in tissues or cells [5]. The fundamental difference between direct and indirect IF lies in the number of antibodies used and the fluorophore conjugation strategy.
- Direct IF involves primary antibodies directly conjugated to fluorescent dyes. This method is simpler and faster, with reduced non-specific binding and low species cross-reactivity [5] [8].
- Indirect IF uses an unlabeled primary antibody specific to the target antigen, which is then detected by a fluorescently-labeled secondary antibody. This method offers enhanced signal amplification and flexibility, though it may involve more complex procedures and potential for higher background [5] [8].
The table below summarizes the core differences between these two techniques, which must be considered for application in embryonic signaling research.
| Parameter | Direct Immunofluorescence | Indirect Immunofluorescence |
|---|---|---|
| Antibody Conjugation | Primary antibody directly conjugated to fluorophore [5] | Primary antibody unlabeled; fluorophore on secondary antibody [5] |
| Number of Antibody Steps | One [5] | Two (or more) [5] |
| Process Time | Shorter (fewer steps) [5] [8] | Longer (additional incubation steps) [5] [8] |
| Cost | Generally higher (costly labeled primary antibodies) [5] | Generally lower (versatile labeled secondary antibodies) [5] |
| Sensitivity | Lower (less signal amplification) [5] [8] | Higher (multiple secondary antibodies bind to each primary) [5] [8] |
| Flexibility | Lower (limited by availability of pre-conjugated primaries) [5] | Higher (many secondary options available for a given primary) [5] |
| Species Cross-Reactivity | Low [5] | Potentially higher, but manageable with pre-adsorbed antibodies [5] |
| Multiplexing Capability | Limited | Excellent for detecting multiple targets simultaneously [5] |
TGF-β/SMAD Signaling Pathway in Development
The TGF-β signaling pathway is a conserved mechanism that regulates a vast array of cellular processes during embryonic development, including cell fate specification, differentiation, and tissue patterning [88] [89]. The canonical pathway is initiated when a TGF-β superfamily ligand (e.g., TGF-β, Nodal, BMP) binds to a type II receptor serine/threonine kinase dimer on the cell surface. This complex then recruits and phosphorylates a type I receptor dimer. The activated type I receptor subsequently phosphorylates receptor-regulated SMADs (R-Smads) – Smad2/3 for TGF-β/Nodal pathways and Smad1/5/9 for BMP pathways [88] [89] [90].
Once phosphorylated, these R-Smads form a complex with the common mediator Smad4 (co-Smad). This complex translocates into the nucleus, where it acts as a transcription factor to regulate the expression of target genes, thereby directing developmental outcomes [88] [89]. The phosphorylation of R-Smads is the critical, rate-limiting step in this signaling cascade, making p-SMAD proteins the definitive readout for pathway activity [91]. The diagram below illustrates this key pathway.
Experimental Data & Protocol for Detecting p-SMAD in Embryos
Key Experimental Findings
Recent studies utilizing advanced immunofluorescence techniques have provided quantitative insights into TGF-β signaling activity in complex tissues. One study employed multiplex fluorescent immunohistochemistry (IHC) to analyze eight key proteins in the TGF-β pathway in colorectal cancer tissues, a approach conceptually similar to what can be applied in developmental models [92].
Quantitative Data from Multiplex Fluorescent IHC Analysis [92]:
| Protein Target | Expression in Cancer vs. Normal Tissue | Statistical Significance (P<0.05) | Subcellular Localization |
|---|---|---|---|
| TGF-β1 | Significantly Increased [92] | Yes [92] | Extracellular Component [92] |
| TGFBRI | Significantly Increased [92] | Yes [92] | Cellular Membrane [92] |
| TGFBRII | Significantly Increased [92] | Yes [92] | Cellular Membrane [92] |
| SMAD4 | Significantly Increased [92] | Yes [92] | Cytoplasm [92] |
| p-SMAD2/3 | Significantly Increased [92] | Yes [92] | Cytoplasm and Nucleus [92] |
| SMAD1/5/9 | Significantly Increased [92] | Yes [92] | Cytoplasm [92] |
| p-SMAD1/5/9 | Increased (Not Significant) [92] | No [92] | Cytoplasm and Nucleus [92] |
| SMAD2/3 | Increased (Not Significant) [92] | No [92] | Cytoplasm [92] |
This data demonstrates that hyperactive TGF-β signaling can be robustly quantified using multiplex IF, revealing not only abundance but also clinically relevant correlations [92]. In the context of development, such precise quantification is equally valuable for understanding spatial patterning of signaling activity.
Detailed Protocol for p-SMAD Detection in Human Blastocysts
The following protocol is adapted from a specialized method for detecting phosphorylated SMAD proteins in human pre-implantation embryos, highlighting the application of indirect immunofluorescence in a challenging and sample-limited context [93].
Workflow for Immunofluorescence Detection in Embryos:
Experimental Steps [93]:
- Antigen Retrieval: Perform antigen retrieval on fixed human blastocyst samples to expose epitopes for antibody binding. This is a critical step for detecting phosphorylated proteins like p-SMAD, which can be masked by fixation.
- Blocking: Incubate samples with a blocking solution (e.g., containing serum or BSA) to reduce non-specific binding of antibodies.
- Primary Antibody Incubation: Apply unlabeled primary antibodies specific to the targets of interest (e.g., anti-p-SMAD2/3) and other transcription factors. Incubate for a specified duration, then wash.
- Secondary Antibody Incubation: Apply fluorescently-labeled secondary antibodies that are specific to the host species of the primary antibodies. This indirect method provides signal amplification, which is crucial for detecting low-abundance phospho-proteins in small embryonic cells. Incubate and wash.
- Mounting and Imaging: Mount the samples with an anti-fade mounting medium and acquire z-stack images using a fluorescence microscope.
- Nuclear Segmentation: Use the Fiji plugin StarDist for accurate segmentation of individual nuclei within the blastocyst structure. This allows for single-cell resolution of signaling activity.
- Fluorescence Quantification: Use CellProfiler software to track nuclei through the z-stack and measure the immunofluorescence intensity within each nucleus. This quantitative data reflects the level of p-SMAD signaling activity on a cell-by-cell basis.
The Scientist's Toolkit: Essential Research Reagents
Successful detection of developmental signaling pathways relies on a suite of specific reagents and tools. The following table details key solutions used in the featured experiments and the broader field.
| Research Reagent | Function / Explanation |
|---|---|
| Phospho-Specific SMAD Antibodies | Primary antibodies that specifically recognize the phosphorylated (active) form of R-SMADS (e.g., p-SMAD2/3, p-SMAD1/5/9). These are critical for directly visualizing active pathway signaling [93] [92]. |
| Fluorophore-Conjugated Secondary Antibodies | Antibodies that bind to the primary antibody and carry the fluorescent signal. Their high quality is essential for sensitivity and multiplexing in indirect IF [5]. |
| Multiplex IHC Kits | Commercial kits designed for simultaneous staining of multiple proteins on a single tissue section, enabling the co-detection of pathway components (e.g., TGF-β1, receptors, and p-SMADs) [92]. |
| SARA Protein | A scaffold protein (Smad anchor for receptor activation) that recruits R-Smads to the activated receptor complex, facilitating their phosphorylation. It is a key component of the core signaling mechanism [88] [89]. |
| I-SMADs (Smad6/7) | Inhibitory Smads that act as negative feedback regulators of the pathway. Smad7, for instance, competes with R-Smads for binding to the activated receptor complex [88] [89]. |
| Nuclear Segmentation Software (e.g., StarDist) | A specialized tool within Fiji/ImageJ used for accurately identifying and outlining individual nuclei in dense tissues like blastocysts, which is a prerequisite for single-cell quantification of nuclear p-SMAD [93]. |
| Image Analysis Pipeline (e.g., CellProfiler, InForm) | Software platforms that automate the quantification of fluorescence intensity across segmented cells and z-stacks, transforming images into robust, quantifiable data for statistical analysis [93] [92]. |
The choice between direct and indirect immunofluorescence for studying developmental signaling pathways like TGF-β/p-SMAD is not a matter of one technique being universally superior. Instead, it is a strategic decision based on experimental priorities. Direct IF offers simplicity and speed for straightforward detection of well-defined targets, while Indirect IF provides the necessary sensitivity, amplification, and multiplexing capability for detailed mapping and quantification of signaling activity in complex, sample-limited systems like embryos.
The experimental data and protocol highlighted in this guide demonstrate that indirect immunofluorescence, combined with advanced image analysis, is a powerful approach for quantifying the spatial and temporal dynamics of TGF-β signaling during critical developmental stages. This enables researchers to move beyond simple detection to achieving a quantitative, cell-resolved understanding of how signaling gradients direct the intricate process of embryonic development.
The study of early human development, particularly at the blastocyst stage, represents one of the most technically challenging yet scientifically rewarding frontiers in developmental biology and reproductive medicine. Researchers face the dual challenge of obtaining rare human embryo specimens while employing methodologies sensitive enough to capture delicate cellular processes without disrupting normal development. Among the most critical techniques in this field are direct and indirect immunofluorescence (IF), which enable the visualization and quantification of key developmental events, including the chromosome segregation errors that frequently cause developmental failure and miscarriage.
This case study examines how these immunofluorescence techniques are applied in cutting-edge research to track chromosome dynamics and mitotic errors in human blastocysts. We evaluate their performance based on recent experimental findings, providing a comparative analysis of their strengths and limitations within the specific context of human embryo research. The insights gained from such studies are revolutionizing our understanding of early human development and have significant implications for improving in vitro fertilization (IVF) outcomes and preimplantation genetic testing.
Technical Showdown: Direct vs. Indirect Immunofluorescence
Immunofluorescence techniques serve as fundamental tools for visualizing subcellular structures and processes in embryo research. The choice between direct and indirect IF significantly impacts experimental outcomes, requiring careful consideration of their distinct characteristics.
Table 1: Core Characteristics of Direct and Indirect Immunofluorescence
| Feature | Direct Immunofluorescence | Indirect Immunofluorescence |
|---|---|---|
| Antibody Configuration | Primary antibody directly conjugated to fluorophore | Primary antibody unlabeled; fluorescent secondary antibody |
| Number of Steps | Single incubation step | Two incubation steps (primary then secondary antibody) |
| Experimental Time | Shorter process | Longer due to additional steps |
| Sensitivity | Lower signal amplification | Higher due to multiple secondary antibodies binding to each primary |
| Flexibility | Limited to available conjugated primaries | High; same secondary can be used with various primaries |
| Cost Considerations | Typically more expensive (conjugated primaries) | Generally more cost-effective |
| Species Cross-Reactivity | Lower potential for cross-reactivity | Higher potential; requires careful secondary antibody selection |
| Multiplexing Capacity | Limited by spectral overlap of direct conjugates | Enhanced through careful secondary antibody selection [5] |
The fundamental difference between these techniques lies in their antibody configuration. Direct immunofluorescence utilizes a primary antibody directly conjugated to a fluorophore, creating a simpler, one-step staining process. This simplicity minimizes incubation time and reduces potential background noise, but comes at the cost of signal strength and flexibility, as researchers are limited to commercially available conjugated primary antibodies [5].
In contrast, indirect immunofluorescence employs an unlabeled primary antibody followed by a fluorophore-conjugated secondary antibody that recognizes the primary. The additional step increases procedural time but provides significant advantages through signal amplification—multiple secondary antibodies can bind to a single primary antibody, dramatically enhancing detection sensitivity for low-abundance targets. This method also offers greater flexibility and cost-effectiveness, as a single conjugated secondary antibody can be paired with multiple primary antibodies from the same host species [5].
Experimental Protocols for Embryo Imaging
Advanced Imaging Workflows for Live Embryo Analysis
Recent groundbreaking studies have developed sophisticated protocols for visualizing chromosome dynamics in human blastocysts. These methodologies often combine live imaging with subsequent immunofluorescence analysis to correlate dynamic processes with static molecular signatures.
Protocol for Live-Imaging of Chromosome Segregation Errors (adapted from SciAdv & Nature Biotechnology):
- Embryo Preparation: Thaw cryopreserved human blastocysts (5-7 days post-fertilization) and culture under conditions that minimize phototoxicity and maintain viability [94] [10].
- Nuclear Labeling: Electroporate embryos with mRNA encoding fluorescent histone proteins (e.g., H2B-mCherry) to label chromatin. This approach has been optimized to achieve approximately 41% efficiency in human blastocysts without significant developmental impact, superior to DNA dyes which can cause artifacts [10].
- Live Imaging: Utilize light-sheet fluorescence microscopy for long-term imaging (up to 46 hours) with temporal resolutions of 2-30 minutes between frames. This modality minimizes photodamage compared to confocal microscopy while enabling optical sectioning [94] [10].
- Computational Tracking: Apply semi-automated segmentation and deep learning models to track individual nuclei through divisions, quantifying parameters such as mitotic duration, chromosome alignment, and segregation errors [10].
- Error Classification: Identify and categorize mitotic errors including lagging chromosomes, multipolar spindles, chromosome misalignment, and mitotic slippage based on chromatin dynamics [94] [10].
Protocol for Immunofluorescence Detection in Fixed Blastocysts (adapted from STAR Protocols):
- Fixation and Permeabilization: Fix human blastocysts in paraformaldehyde followed by permeabilization with Triton X-100 to allow antibody penetration while preserving cellular architecture.
- Antigen Retrieval: For detecting phosphorylated signaling proteins (e.g., pSMADs), employ specific antigen retrieval steps to expose epitopes [93].
- Antibody Incubation: Incubate with primary antibodies (e.g., anti-pSMAD, anti-CD×2, anti-NANOG) overnight at 4°C, followed by appropriate species-specific secondary antibodies conjugated to fluorophores [93] [95].
- Nuclear Staining: Counterstain with DAPI or similar DNA dye to visualize all nuclei.
- Image Acquisition and Quantification: Acquire z-stack images using confocal microscopy. Segment nuclei using computational tools (e.g., StarDist Fiji plugin) and quantify immunofluorescence intensity per nucleus using software such as CellProfiler [93].
Technical Workflow Visualization
The following diagram illustrates the key decision points and procedural differences between direct and indirect immunofluorescence techniques:
Comparative Experimental Data: Performance in Embryo Research
Quantitative Performance Assessment
Recent studies applying these techniques to human blastocyst research have yielded critical quantitative data on their performance and the biological processes they reveal.
Table 2: Experimental Outcomes from Recent Blastocyst Studies
| Study Focus | Technique Applied | Key Quantitative Findings | Biological Insight |
|---|---|---|---|
| Mitotic Error Dynamics [94] | Live imaging + computational segmentation | • Mean mitotic duration: 91 ± 30 minutes• 31.7 ± 12 minutes for metaphase-to-anaphase transition with errors | Real-time capture of lagging chromosomes, multipolar spindles, and abnormal cytokinetic furrowing |
| De Novo Segregation Errors [10] | Light-sheet imaging + mRNA electroporation | • Mitotic duration: 51.09 ± 11.11 min (mural), 52.64 ± 9.13 min (polar)• Interphase: 18.10 ± 3.82h (human) vs 11.33 ± 3.14h (mouse) | Species-specific cell cycle timing; visualization of micronuclei formation and passive inheritance |
| Rescuing Arrested Embryos [95] | Indirect IF + gene expression | • Arrest rate decrease: 47.5% (ITS), 82.5% (CHIR99021)• Significant SOX2 increase with CHIR99021 (p=0.01) | Confirmed NANOG protein expression in rescued blastocysts via indirect IF |
| Metabolic Imaging [96] | Light-sheet on-a-chip (label-free) | • 30x higher SNR than confocal (p<0.00001)• AUC 0.974 for blastocyst prediction | Demonstrated safe metabolic imaging via NAD(P)H autofluorescence |
Error Pattern Analysis in Human Blastocysts
The application of these techniques has revealed distinct categories of mitotic errors in human blastocysts:
Table 3: Classification of Mitotic Errors Identified in Human Blastocysts
| Error Type | Frequency | Functional Consequences | Detection Method |
|---|---|---|---|
| Lagging Chromosomes | Common | Micronuclei formation, chromosome missegregation | Live imaging; DNA staining [94] [10] |
| Multipolar Spindles | Less common | Severe chromosome missegregation, aneuploidy | Live imaging; spindle staining [10] |
| Cytokinetic Failure | Variable | Binucleated cells, aberrant cell organization | Live imaging; actin cortex staining [94] |
| Chromosome Slippage | Observed | Aneuploidy, mosaic chromosome content | Live imaging over multiple divisions [10] |
The Scientist's Toolkit: Essential Research Reagents
Successful investigation of chromosome dynamics in blastocysts requires a carefully selected suite of reagents and tools.
Table 4: Essential Research Reagents for Embryo Chromosome Dynamics
| Reagent Category | Specific Examples | Research Function |
|---|---|---|
| Live Cell Labels | SPY555-DNA, SPY650-FastAct, H2B-mCherry mRNA | Real-time tracking of chromosomes and actin cortex [94] [10] |
| Fixation & Staining | Paraformaldehyde, Triton X-100, DAPI, Phalloidin | Structural preservation and fluorescence labeling [94] [93] |
| Primary Antibodies | Anti-NANOG, anti-CD×2, anti-pSMAD, anti-α-Tubulin | Cell fate specification and signaling pathway analysis [93] [95] |
| Secondary Antibodies | Species-specific conjugates (Alexa Fluor series) | Signal amplification in indirect IF [5] [28] |
| Imaging Systems | Light-sheet microscopy, confocal systems | High-resolution, low-phototoxicity imaging [94] [96] [10] |
| Computational Tools | StarDist, CellProfiler, ResViT, custom segmentation | Automated tracking and quantitative analysis [93] [28] |
Discussion: Technique Selection for Embryo Research
Integrated Workflows and Future Directions
The most impactful recent studies have moved beyond relying on a single technique, instead creating integrated workflows that leverage the complementary strengths of both direct and indirect approaches. For instance, live imaging with fluorescent DNA labels can track dynamic mitotic errors in real time, followed by fixation and indirect immunofluorescence to correlate these errors with cell lineage markers and signaling pathway activity [94] [10] [93]. This powerful combination links dynamic cellular behaviors with molecular signatures in the same embryo.
Emerging technologies are further enhancing these capabilities. The Extensible Immunofluorescence (ExIF) framework uses computational integration of multiple standard 4-plex immunofluorescence panels to create unified datasets with theoretically unlimited marker plexity [28]. This approach, inspired by multi-omics integration strategies, enables more comprehensive analysis of complex processes like cell fate decisions during embryogenesis without requiring experimental multiplexing methods that remain challenging for most laboratories.
Advanced imaging modalities like light-sheet microscopy have proven particularly valuable for embryo research, enabling long-term imaging with minimal phototoxicity [96] [10]. When combined with optimized electroporation techniques for introducing fluorescent reporters, these approaches provide unprecedented views of previously inaccessible stages of human development.
Technical Decision Framework
The choice between direct and indirect immunofluorescence, or the decision to combine them with live imaging, should be guided by specific experimental requirements:
For rapid assessment of highly expressed antigens or when minimizing background is critical, direct immunofluorescence offers advantages in simplicity and specificity.
For detecting low-abundance targets, maximizing sensitivity, or when working with multiple primary antibodies from the same species, indirect immunofluorescence provides essential signal amplification and flexibility.
For correlating dynamic cellular behaviors with molecular signatures, integrated approaches combining live imaging with subsequent immunofluorescence create the most comprehensive datasets.
When analyzing multiple molecular markers simultaneously, emerging computational integration approaches like ExIF can extend the analytical power of standard immunofluorescence methods.
This case study demonstrates that both direct and indirect immunofluorescence, particularly when integrated with live imaging and computational analysis, provide powerful and complementary approaches for investigating the fundamental processes of human development at the blastocyst stage. The continued refinement of these techniques promises to further unravel the complexities of early human development and improve clinical outcomes in reproductive medicine.
Conclusion
The choice between direct and indirect immunofluorescence in embryo research is not one-size-fits-all but depends on the specific experimental goals. Direct IF offers simplicity and speed for detecting abundant targets, while indirect IF provides superior sensitivity and flexibility for low-abundance proteins or multiplexing. Successful application hinges on rigorous antibody validation, optimized embryo-specific protocols, and appropriate controls. As imaging technologies like light-sheet microscopy advance, enabling lower phototoxicity and long-term live imaging of human embryos, the potential for these techniques to unravel fundamental developmental processes and disease mechanisms will only grow, pushing the frontiers of developmental biology and clinical embryology.
References
- 1. Immunofluorescence [https://en.wikipedia.org/wiki/Immunofluorescence]
- 2. An introduction to Performing Immunofluorescence Staining [https://pmc.ncbi.nlm.nih.gov/articles/PMC6918834/]
- 3. Direct vs. Indirect Fluorescent Antibody Labeling [https://probes.bocsci.com/resources/direct-vs-indirect-fluorescent-antibody-labeling-which-is-right-for-your-research.html]
- 4. Antibodies 101: Introduction to Immunofluorescence [https://blog.addgene.org/introduction-to-immunofluorescence]
- 5. Direct vs Indirect Immunofluorescence: Which is the Better ... [https://www.creative-diagnostics.com/direct-vs-indirect-immunofluorescence-which-is-the-better-technique.htm]
- 6. Immunofluorescence Method for IHC Detection [https://www.thermofisher.com/us/en/home/life-science/protein-biology/protein-biology-learning-center/protein-biology-resource-library/pierce-protein-methods/immunofluorescence-method-ihc-detection.html]
- 7. Comparison of the developmental competence of in vitro- ... [https://pubmed.ncbi.nlm.nih.gov/39313714/]
- 8. Which one is better, indirect IF or dierect IF? [https://www.sinobiological.com/category/if-icc-faq-indirect-dierect-if]
- 9. Screening for novel factors involved in mouse early ... [https://pmc.ncbi.nlm.nih.gov/articles/PMC12575340/]
- 10. Live imaging of late-stage preimplantation human embryos ... [https://www.nature.com/articles/s41587-025-02851-1]
- 11. Extensible Immunofluorescence (ExIF) accessibly ... [https://www.nature.com/articles/s41467-025-59592-7]
- 12. Development of SNAP-Tag Based Nanobodies as ... [https://pmc.ncbi.nlm.nih.gov/articles/PMC12110209/]
- 13. Immunofluorescence staining: Visualizing cellular structures [https://www.abcam.com/en-us/knowledge-center/immunocytochemistry/immunofluorescence-staining]
- 14. Fluorescent Dyes | Learn & Share [https://www.leica-microsystems.com/science-lab/life-science/fluorescent-dyes/]
- 15. Fluorescence Fundamentals | Thermo Fisher Scientific - US [https://www.thermofisher.com/us/en/home/references/molecular-probes-the-handbook/introduction-to-fluorescence-techniques.html]
- 16. Fluorescence Microscopy: An Easy Guide for Biologists [https://bitesizebio.com/33529/fluorescence-microscopy-the-magic-of-fluorophores-and-filters/]
- 17. Red-Edge Excitation of Fluorescence and Dynamic Properties of... [https://pmc.ncbi.nlm.nih.gov/articles/PMC6906601/]
- 18. Fluorescence Sensitivity of SpectraMax Readers using Blue to Red... [https://www.moleculardevices.com/en/assets/app-note/br/fluorescence-sensitivity-spectramax-readers-using-blue-red-fluorophores]
- 19. Quantitative determination of fluorescence labeling ... [https://bmcbiol.biomedcentral.com/articles/10.1186/s12915-023-01685-0]
- 20. A quick, cheap, and reliable protocol for ... [https://pmc.ncbi.nlm.nih.gov/articles/PMC9876944/]
- 21. Comparison of Gold Nanoparticle and Fluorophore ... [https://pmc.ncbi.nlm.nih.gov/articles/PMC12187710/]
- 22. A beginner's guide to rigor and reproducibility in fluorescence ... [https://pmc.ncbi.nlm.nih.gov/articles/PMC6080651/]
- 23. Point spread function [https://en.wikipedia.org/wiki/Point_spread_function]
- 24. Fast fluorescence microscopy for imaging the dynamics of ... [https://pmc.ncbi.nlm.nih.gov/articles/PMC2645566/]
- 25. Understanding the difference between direct and indirect ... | Medium [https://medium.com/@lalpathlabssmo/understanding-the-difference-between-direct-and-indirect-immunofluorescence-9114c30e1161]
- 26. Deep learning-based high-resolution time inference for ... [https://www.nature.com/articles/s41467-025-61907-7]
- 27. Deep-tissue transcriptomics and subcellular imaging at high ... [https://pmc.ncbi.nlm.nih.gov/articles/PMC12005972/]
- 28. Extensible Immunofluorescence (ExIF) accessibly ... [https://pmc.ncbi.nlm.nih.gov/articles/PMC12085645/]
- 29. Comparative analysis of fixation and embedding techniques ... [https://pmc.ncbi.nlm.nih.gov/articles/PMC5936644/]
- 30. Indirect immunofluorescence test performance and ... [https://pmc.ncbi.nlm.nih.gov/articles/PMC268050/]
- 31. Heat-Induced Antigen Retrieval for Immunohistochemical ... [https://pmc.ncbi.nlm.nih.gov/articles/PMC7604828/]
- 32. IHC Epitope Retrieval (HIER vs. PIER) [https://www.novusbio.com/epitope-retrieval?srsltid=AfmBOooO9Of95G1KL6VfnvC0VoLnn8VRzQhPUiYpQGs2Fd0IOZbSFId9]
- 33. Antigen Retrieval-Should I do PIER or HIER? [https://www.sinobiological.com/category/antigen-retrieval-pier-or-hier]
- 34. Antigen Retrieval in IHC: Why It Matters and How to Get ... [https://www.atlasantibodies.com/knowledge-hub/blog/antigen-retrieval-in-ihc-why-it-matters-and-how-to-get-it-right/]
- 35. Optimizing Your Antigen Retrieval Method - HIER vs PIER [https://www.bosterbio.com/blog/post/optimizing-your-antigen-retrieval-method-hier-vs-pier?srsltid=AfmBOooQyQbtLv_2_pQkfNcRPVGELpeIsCqlcOPRDygVELUeK0rEKVh0]
- 36. Immunofluorescence Staining of Paraffin Sections Step by ... [https://www.frontiersin.org/journals/neuroanatomy/articles/10.3389/fnana.2020.582218/full]
- 37. Immunofluorescence Troubleshooting | Tips & Tricks [https://www.stressmarq.com/support/technical-support/troubleshooting/immunofluorescence-troubleshooting/?srsltid=AfmBOor_LpjzIfGGFCiSOK4unjU43dr6chfSv0xcT6l1jKJHm_73WeLp]
- 38. 3.4 Immunofluorescence Staining [https://bio-protocol.org/exchange/minidetail?id=4582191&type=30]
- 39. Immunofluorescence Staining of Paraffin Sections Step by ... [https://pmc.ncbi.nlm.nih.gov/articles/PMC7680859/]
- 40. Comparison between direct and indirect ... [https://link.springer.com/article/10.1007/s11696-018-0445-3]
- 41. Immunofluorescence Staining | A Typical Workflow [https://ibidi.com/content/365-immunofluorescence-staining-a-typical-workflow]
- 42. IHC staining protocol for whole mount samples [https://www.abcam.com/en-us/technical-resources/protocols/wholemount-staining-for-ihc]
- 43. Comparative Study of Direct and Indirect ... [https://pubmed.ncbi.nlm.nih.gov/23969034/]
- 44. Flow Cytometry Protocol | Abcam [https://www.abcam.com/en-us/technical-resources/protocols/flow-cytometry-for-intracellular-and-extracellular-targets]
- 45. 4i (iterative indirect immunofluorescence imaging ... [https://www.protocols.io/view/4i-iterative-indirect-immunofluorescence-imaging-p-hefbb3bip.html]
- 46. Quantifying DNA damage following light sheet and ... [https://www.nature.com/articles/s41598-024-71443-x]
- 47. Using Light Sheet Fluorescence Microscopy to Image ... [https://pmc.ncbi.nlm.nih.gov/articles/PMC4941907/]
- 48. Lattice Light Sheet Microscopy: Imaging Molecules to ... [https://pmc.ncbi.nlm.nih.gov/articles/PMC4336192/]
- 49. Quantitative imaging of cell dynamics in mouse embryos ... [https://pmc.ncbi.nlm.nih.gov/articles/PMC4302910/]
- 50. Controls in IHC [https://www.abcam.com/en-us/technical-resources/guides/ihc-guide/controls-in-ihc]
- 51. 5 Controls for Immunofluorescence: An Easy Guide [https://bitesizebio.com/44370/controls-for-immunofluorescence-a-beginners-guide/]
- 52. Society for Immunotherapy of Cancer - PubMed Central - NIH [https://pmc.ncbi.nlm.nih.gov/articles/PMC11749220/]
- 53. Autofluorescence Quenching in Decellularized Plant Scaffolds ... [https://pmc.ncbi.nlm.nih.gov/articles/PMC12399283/]
- 54. Optimized immunofluorescence for liver structure analysis [https://pubmed.ncbi.nlm.nih.gov/40241741/]
- 55. Immersion‐Based Clearing and Autofluorescence ... [https://pmc.ncbi.nlm.nih.gov/articles/PMC12589860/]
- 56. Optimized protocol for whole-mount RNA fluorescent in situ ... [https://www.sciencedirect.com/science/article/pii/S2666166723005701]
- 57. Immunofluorescence to Monitor the Cellular Uptake of ... [https://pmc.ncbi.nlm.nih.gov/articles/PMC4692635/]
- 58. Target-activated streptavidin–biotin controlled binding probe [https://pmc.ncbi.nlm.nih.gov/articles/PMC5872805/]
- 59. Strept(avidin)–Biotin Complex Method for IHC Detection [https://www.thermofisher.com/us/en/home/life-science/protein-biology/protein-biology-learning-center/protein-biology-resource-library/pierce-protein-methods/avidin-biotin-complex-method-ihc-detection.html]
- 60. Increasing Signal Intensity of Fluorescent Oligo-Labeled ... [https://pmc.ncbi.nlm.nih.gov/articles/PMC11262307/]
- 61. Any Way You Slice It—A Comparison of Confocal ... [https://pmc.ncbi.nlm.nih.gov/articles/PMC4365987/]
- 62. Validation of multiplex immunofluorescence panels using ... [https://www.nature.com/articles/s41598-017-13942-8]
- 63. Validation of an Accurate Automated Multiplex ... [https://pmc.ncbi.nlm.nih.gov/articles/PMC9160303/]
- 64. Antibody Validation for Immunofluorescence [https://www.cellsignal.com/about-us/our-approach-process/antibody-validation-immunofluorescence?srsltid=AfmBOooPyeQAicle23hIb7E-AiQydYr6oT85OcccChqFdEVtvoUHfRtj]
- 65. Between life and death: strategies to reduce phototoxicity in ... [https://pmc.ncbi.nlm.nih.gov/articles/PMC8114953/]
- 66. Overcoming Photobleaching and Phototoxicity in Imaging [https://www.oxinst.com/learning/view/article/how-to-overcome-photobleaching-and-phototoxicity-in-live-cell-imaging]
- 67. Mitigating Phototoxicity during Multiphoton Microscopy of ... [https://pmc.ncbi.nlm.nih.gov/articles/PMC4128758/]
- 68. How to Minimize Photobleaching [https://www.enzo.com/note/how-to-minimize-photobleaching/]
- 69. Optimizing the in vitro neuronal microenvironment to mitigate ... [https://stemcellres.biomedcentral.com/articles/10.1186/s13287-025-04591-0]
- 70. Advanced optical imaging in living embryos - PMC [https://pmc.ncbi.nlm.nih.gov/articles/PMC2943067/]
- 71. What strategies can I use to reduce photobleaching in live- ... [https://www.aatbio.com/resources/faq-frequently-asked-questions/what-strategies-can-i-use-to-reduce-photobleaching-in-live-cell-imaging]
- 72. Immunofluorescence | Immunostaining [https://www.bdbiosciences.com/en-us/learn/applications/immunofluorescence]
- 73. An Overview of Immunofluorescence [https://www.news-medical.net/life-sciences/Immunofluorescence-An-Overview.aspx]
- 74. Immunolabeling | Thermo Fisher Scientific - UK [https://www.thermofisher.com/uk/en/home/life-science/cell-analysis/cell-analysis-learning-center/molecular-probes-school-of-fluorescence/imaging-basics/labeling-your-samples/immunolabeling.html]
- 75. Signal Amplification for Fluorescent Staining of Single ... [https://pmc.ncbi.nlm.nih.gov/articles/PMC12508258/]
- 76. Tyramide signal coupled with multiple immunolabeling... amplification [https://pmc.ncbi.nlm.nih.gov/articles/PMC9178390/]
- 77. Signal amplification by cyclic extension enables high ... [https://www.nature.com/articles/s41587-024-02316-x]
- 78. An Immunofluorescence Method to Analyze the Proliferation ... [https://pmc.ncbi.nlm.nih.gov/articles/PMC3425951/]
- 79. immunofluorescence assay market size & share analysis [https://www.mordorintelligence.com/industry-reports/immunofluorescence-assay-market]
- 80. Direct vs indirect assays [https://www.abcam.com/en-us/technical-resources/guides/conjugation-guide/direct-vs-indirect-assays]
- 81. Immunolabeling | Thermo Fisher Scientific - US [https://www.thermofisher.com/us/en/home/life-science/cell-analysis/cell-analysis-learning-center/molecular-probes-school-of-fluorescence/imaging-basics/labeling-your-samples/immunolabeling.html]
- 82. Flow Cytometry Compared with Indirect ... [https://pmc.ncbi.nlm.nih.gov/articles/PMC88405/]
- 83. Immunofluorescence Assay Global Market Report 2025 [https://www.thebusinessresearchcompany.com/report/immunofluorescence-assay-global-market-report]
- 84. Comparison between direct and indirect ... [https://ui.adsabs.harvard.edu/abs/2018ChPap..72.1861B/abstract]
- 85. Multiplexing Techniques for IHC and IF | CST Blog [https://blog.cellsignal.com/pros-and-cons-of-different-multiplexing-techniques]
- 86. Overview of multiplex immunohistochemistry ... [https://pmc.ncbi.nlm.nih.gov/articles/PMC7170662/]
- 87. A Practical Update for Pathologists [https://www.sciencedirect.com/science/article/pii/S0893395223001023]
- 88. TGF-β Signaling from Receptors to Smads - PMC [https://pmc.ncbi.nlm.nih.gov/articles/PMC5008074/]
- 89. TGF beta signaling pathway [https://en.wikipedia.org/wiki/TGF_beta_signaling_pathway]
- 90. Functional Characterization of Transforming Growth Factor ... [https://www.sciencedirect.com/science/article/pii/S0021925819404262]
- 91. Phospho-control of TGF-β superfamily signaling [https://www.nature.com/articles/cr2008327]
- 92. Multispectral imaging reveals hyper active TGF-β signaling ... [https://pmc.ncbi.nlm.nih.gov/articles/PMC5790339/]
- 93. Protocol for immunofluorescence detection and ... [https://www.sciencedirect.com/science/article/pii/S2666166725002552]
- 94. Capturing aberrant cell behaviors producing defects in human ... [https://pmc.ncbi.nlm.nih.gov/articles/PMC12629204/]
- 95. The effects of insulin–transferrin–selenium (ITS) and ... [https://www.nature.com/articles/s41598-025-89460-9]
- 96. Novel application of metabolic imaging of early embryos ... [https://pmc.ncbi.nlm.nih.gov/articles/PMC11700888/]