Whole Mount Immunofluorescence Staining: A Complete Guide to 3D Tissue Imaging
This article provides a comprehensive overview of whole-mount immunofluorescence (WM-IF) staining, a pivotal technique for visualizing protein localization and expression within intact three-dimensional biological specimens like organoids and tissues.
Whole Mount Immunofluorescence Staining: A Complete Guide to 3D Tissue Imaging
Abstract
This article provides a comprehensive overview of whole-mount immunofluorescence (WM-IF) staining, a pivotal technique for visualizing protein localization and expression within intact three-dimensional biological specimens like organoids and tissues. Tailored for researchers and drug development professionals, the content spans from foundational principles and step-by-step protocols to advanced troubleshooting, optimization strategies, and validation frameworks. It explores the method's critical applications in characterizing complex cellular environments, its advantages over traditional sectioning, and emerging computational innovations that enhance its analytical power, offering a complete resource for implementing robust and reproducible 3D imaging.
Understanding Whole-Mount IF: Principles and Core Advantages for 3D Biology
Defining Whole-Mount Immunofluorescence Staining and Its Purpose
Whole-mount immunofluorescence (WMIF) staining is an advanced immunochemical technique that enables three-dimensional visualization of antigen distribution within intact biological specimens. Unlike conventional methods that require tissue sectioning, WMIF preserves the native spatial architecture of tissues and organs, providing unparalleled insights into structural relationships and cellular interactions within their physiological context. This technique has become indispensable in developmental biology, neurobiology, vascular research, and oncology, allowing researchers to examine complex biological systems without disrupting their structural integrity. This whitepaper comprehensively defines WMIF methodology, outlines its fundamental principles, details standardized protocols, and examines its diverse applications in biomedical research and drug development.
Whole-mount immunofluorescence represents a specialized adaptation of traditional immunofluorescence techniques designed for examining intact tissue specimens without the need for sectioning. The core principle involves permeabilizing and staining entire tissue samples with antigen-specific antibodies conjugated to fluorophores, followed by three-dimensional visualization using confocal or light-sheet microscopy [1]. This approach maintains the complete tissue architecture, allowing researchers to study biological structures in their unaltered three-dimensional context [2].
The fundamental advantage of WMIF lies in its capacity to preserve spatial relationships between cells and tissue components that are inevitably disrupted by traditional sectioning methods. Whereas conventional immunohistochemistry provides two-dimensional information from thin sections, WMIF captures the volumetric organization of biological systems, enabling more accurate assessment of cellular networks, vascular patterns, and organ-level structures [1]. This technical advancement has proven particularly valuable for studying intricate biological systems such as the cardiac conduction system [1], neuromuscular junctions [2], and vascular networks [3], where three-dimensional arrangement is critical to function.
Key Advantages and Technical Considerations
Comparative Benefits Over Traditional Methods
Table 1: Comparison of Whole-Mount Immunofluorescence vs. Traditional Sectioning Methods
| Feature | Whole-Mount Immunofluorescence | Traditional Sectioning Methods |
|---|---|---|
| Tissue Architecture | Preserves complete 3D structure | Disrupts 3D architecture through sectioning |
| Spatial Relationships | Maintains native cellular and tissue interactions | Limited to 2D analysis with reconstructed 3D |
| NMJ Analysis | Visualizes complete neuromuscular innervation pattern [2] | Often transects NMJs due to section thickness [2] |
| Artifact Introduction | Minimizes sectioning artifacts | Potential for compression, folding, and sectioning artifacts |
| Protocol Complexity | Simplified processing without embedding/cryosectioning [2] | Requires embedding and skilled sectioning techniques |
| Antibody Penetration | Challenging in dense tissues; requires optimization [2] | Generally excellent antibody access to antigens |
| Imaging Requirements | Requires advanced microscopy (confocal, light-sheet) | Compatible with standard fluorescence microscopy |
| Specimen Size Limitations | Limited by antibody penetration and imaging depth | Virtually unlimited through serial sectioning |
| Data Complexity | Rich 3D datasets requiring specialized analysis | Simplified 2D data analysis |
Technical Challenges and Solutions
Despite its significant advantages, WMIF presents unique technical challenges that require careful optimization. Antibody penetration represents the primary limitation, particularly in denser tissues or larger specimens [2]. This challenge can be mitigated through several approaches: extended incubation times [4], optimized detergent concentrations [3], and careful tissue selection [2]. For example, small hind paw muscles (lumbricals and flexor digitorum brevis) are ideal for whole-mount analysis as their thin structure eliminates the requirement for cryosectioning that is necessary for larger muscles [2].
Another significant consideration is tissue autofluorescence, which can be minimized through the use of specific blocking reagents and careful fluorophore selection. Additionally, the imaging process requires specialized microscopy equipment capable of optical sectioning, such as confocal [3] [1] or light-sheet microscopes, to resolve three-dimensional structures within these typically opaque specimens.
Diagram 1: Whole-Mount Immunofluorescence Workflow and Critical Optimization Points. The process involves sequential steps from specimen selection through final analysis, with key optimization requirements for successful staining.
Standardized Protocol for Whole-Mount Immunofluorescence
Tissue Preparation and Fixation
The initial phase of WMIF is critical for preserving tissue morphology while maintaining antigen integrity. For murine tissues such as hind paw muscles, immediate dissection followed by fixation in 4% paraformaldehyde (PFA) in PBS is recommended [2]. Fixation time must be carefully optimized based on tissue size and density - typically ranging from 50 minutes for delicate structures like the eye [3] to several hours or overnight for denser tissues [4]. Following fixation, thorough washing with PBS is essential to remove residual fixative that might interfere with subsequent antibody binding [5].
For specialized applications such as staining Schlemm's canal in the murine eye, specific fixation conditions may be required depending on the target antigen. For instance, VE-cadherin staining necessitates different fixation parameters compared to CD31 or LYVE1 staining [3]. Similarly, for cardiac conduction system analysis, fixation with 4% PFA followed by cryoprotection in sucrose solutions (15% and 30%) is recommended to preserve tissue integrity during processing [1].
Permeabilization and Blocking
Effective permeabilization is essential for antibody penetration throughout the whole-mount specimen. The standard approach employs Triton X-100, typically at concentrations between 0.1% to 1% in PBS [3] [4]. The optimal concentration must be determined empirically based on tissue density and the cellular localization of the target antigen. For membrane-associated proteins, milder detergents like Tween-20 or saponin may be preferable to avoid excessive membrane disruption [5].
Blocking follows permeabilization and is crucial for reducing non-specific antibody binding. A typical blocking buffer contains 3-5% bovine serum albumin (BSA) or 10% fetal calf serum in PBS with 0.1% Triton X-100 [3] [4]. For challenging specimens, combination blockers such as 5% donkey serum with 3% BSA provide enhanced reduction of background staining [3]. Blocking is generally performed for 30 minutes to 1 hour at room temperature, though longer times may be beneficial for tissues with high endogenous immunoglobulin content.
Antibody Incubation and Washes
Table 2: Antibody Incubation Parameters for Whole-Mount Staining
| Parameter | Typical Conditions | Special Considerations |
|---|---|---|
| Primary Antibody Dilution | Manufacturer's recommendation (often 1:100-1:500) | May require lower dilution than sectioned samples |
| Primary Incubation Time | 1-4 days [4] | Longer incubations require sodium azide (0.02%) to prevent microbial growth [4] |
| Primary Incubation Temperature | 4°C with gentle rotation [4] | Room temperature may be suitable for shorter incubations |
| Washing After Primary | 3-6 washes over 3+ hours [4] | Extended washing crucial for reducing background |
| Secondary Antibody Dilution | Typically 1:200-1:500 | Must match host species of primary antibody |
| Secondary Incubation Time | 2-4 days [4] | Protect from light to prevent fluorophore bleaching |
| Secondary Incubation Temperature | 4°C with gentle rotation | Shorter room temperature incubations sometimes possible |
| Final Washes | Multiple changes over several hours | May include nuclear counterstain (DAPI) in final washes |
Primary antibody incubation represents the most variable aspect of WMIF protocols and requires careful optimization for each tissue type and antigen combination. Due to limited antibody penetration in whole tissues, incubation times are substantially longer than for sectioned material, typically ranging from 24 hours to 4 days [4]. These extended incubations necessitate the addition of antimicrobial agents such as 0.02% sodium azide to the antibody solution [4]. Similarly, secondary antibody incubation follows the same prolonged timeframe to ensure complete penetration and binding [4].
Thorough washing between incubation steps is crucial for reducing non-specific background fluorescence. Washes typically consist of multiple changes of PBS with detergent (0.1-1% Triton X-100) over several hours to days, with gentle agitation to facilitate diffusion of unbound antibodies from the tissue interior [4].
Mounting and Imaging
Following complete staining and washing, specimens are prepared for microscopy through careful mounting in media that preserves fluorescence and provides appropriate refractive index matching. Commercial mounting media such as Fluoromount-G [3] [2] are specifically formulated to reduce photobleaching and may include anti-fade compounds. For thick specimens that require physical stabilization, embedding in 50-75% glycerol provides clarity while allowing the tissue to sink to an optimal imaging position [4].
Imaging is performed using confocal microscopy systems capable of optical sectioning, such as the Nikon C2 confocal microscope [3]. These systems collect sequential z-plane images that can be reconstructed into three-dimensional representations using software platforms like NIS-Elements, ImageJ, or Imaris [3]. The imaging depth is ultimately limited by light penetration and objective working distance, but advanced techniques such as light-sheet microscopy can extend these limits for larger specimens.
Essential Reagents and Research Solutions
Table 3: Key Research Reagent Solutions for Whole-Mount Immunofluorescence
| Reagent Category | Specific Examples | Function and Application Notes |
|---|---|---|
| Fixatives | 4% Paraformaldehyde (PFA) [3] [2] | Cross-linking fixative preserving tissue architecture while maintaining antigenicity |
| Permeabilization Agents | Triton X-100 (0.1-1%) [3] [4], Tween-20 | Detergents that dissolve membrane lipids to enable antibody penetration |
| Blocking Reagents | Bovine Serum Albumin (3-5%) [3], Donkey Serum (5-10%) [3], Fetal Calf Serum (10%) [4] | Proteins that bind non-specific sites to reduce background staining |
| Wash Buffers | PBS with 0.1% Triton X-100 [3], PBS with 1% Triton X-100 [4] | Maintain tissue hydration while removing unbound antibodies |
| Primary Antibodies | CD31 (endothelial cells) [3], βIII-tubulin (neurons) [2], Synaptophysin (pre-synaptic terminals) [2] | Antigen-specific binding elements; host species depends on application |
| Secondary Antibodies | Species-specific antibodies conjugated to Alexa Fluor 488, 555, 594, 647 [3] [2] | Fluorophore-conjugated reagents for signal generation and amplification |
| Nuclear Stains | DAPI, Hoechst dyes | Counterstains for identifying cell nuclei and tissue orientation |
| Mounting Media | Fluoromount-G [3] [2], ibidi Mounting Medium [5] | Media that preserves fluorescence and provides appropriate refractive index |
The selection of appropriate reagents is crucial for successful WMIF experiments. Fixative choice significantly impacts both tissue preservation and antigen accessibility. While 4% PFA is the most common fixative [3] [2], some antigens may require alternative fixation methods such as methanol or acetone [5]. Similarly, detergent selection and concentration must be optimized for each tissue type, with Triton X-100 being the most widely used permeabilization agent at concentrations typically between 0.1-1% [3] [4].
Antibody quality is particularly critical in WMIF due to the extended incubation times and penetration challenges. Antibodies should be thoroughly validated for specificity and performance in whole-mount applications. For multiplexed experiments, careful selection of fluorophores with minimal spectral overlap is essential, with bright, photostable options such as Alexa Fluor dyes being preferred [5].
Applications in Biomedical Research and Drug Development
Neuromuscular Junction Analysis
WMIF has revolutionized the study of neuromuscular junctions (NMJs) by enabling complete visualization of the entire neuromuscular innervation pattern without sectioning artifacts [2]. Using small hind paw muscles (lumbricals and flexor digitorum brevis), researchers can perform whole-mount analysis across all postnatal ages, assessing axonal integrity (with anti-tubulin βIII), pre-synaptic components (with anti-synaptophysin), and post-synaptic architecture (with α-bungarotoxin) in three dimensions [2]. This approach has been particularly valuable in mouse models of neurological disorders such as amyotrophic lateral sclerosis (ALS), Charcot-Marie-Tooth disease, and spinal muscular atrophy, where NMJ denervation is a key pathological feature [2].
Vascular and Lymphatic Research
The three-dimensional complexity of vascular and lymphatic networks makes them ideally suited for WMIF analysis. Recent protocols have enabled detailed characterization of Schlemm's canal in the murine eye, a specialized vascular structure essential for aqueous humor drainage [3]. By co-staining markers such as CD31 (pan-endothelial), endomucin (blood vessels), and LYVE1 (lymphatic vessels), researchers can investigate the unique combined features of this structure and its dysfunction in glaucoma [3]. Similarly, WMIF has been applied to study angiogenesis, vascular permeability, and endothelial cell biology in various pathological contexts.
Cardiac Conduction System Imaging
The cardiac conduction system, particularly the sinoatrial node (SAN) and atrioventricular node (AVN), presents significant challenges for conventional histology due to its small size and integration within the working myocardium [1]. WMIF using markers such as HCN4 (pacemaker channels) and Cx43 (connexins) allows researchers to visualize these critical structures within their physiological 3D environment, preserving anatomical relationships with surrounding myocardium and neural elements [1]. This approach has advanced understanding of normal cardiac electrophysiology and arrhythmogenesis in disease states.
Cancer and Tissue Microenvironment Studies
In oncology research, WMIF enables comprehensive analysis of tumor architecture, immune cell infiltration, and stromal interactions within the tumor microenvironment. Advanced multiplexed approaches now permit simultaneous detection of 16-18 biomarkers in whole tissues, combining immunofluorescence with traditional H&E staining on the same section to integrate molecular data with established pathological features [6]. These high-plex methods facilitate discovery of image-based biomarkers predictive of disease progression and treatment response, with demonstrated applications in colorectal cancer where combined models of immune infiltration and tumor-intrinsic features achieved 10- to 20-fold discrimination between rapid and slow progression [6].
Whole-mount immunofluorescence staining has established itself as an indispensable technique in biomedical research, providing unique insights into tissue architecture and cellular relationships that are inaccessible through conventional sectioning approaches. As the field advances, several emerging trends are likely to shape its future development and application.
Technological innovations in microscopy, particularly light-sheet fluorescence microscopy and cleared tissue techniques, will expand the size limits of specimens amenable to WMIF analysis. Similarly, continued development of brighter, more photostable fluorophores and efficient antibody conjugation methods will enhance multiplexing capabilities, potentially enabling simultaneous visualization of dozens of biomarkers in intact tissues [6]. These advances, combined with sophisticated computational tools for 3D image analysis and quantification, will further solidify WMIF's role in both basic research and drug development.
For researchers and drug development professionals, WMIF offers a powerful approach for evaluating therapeutic efficacy, understanding disease mechanisms, and validating drug targets within physiologically relevant tissue contexts. Its ability to preserve spatial relationships makes it particularly valuable for assessing cell-based therapies, engineered tissues, and complex biological responses that depend on three-dimensional organization. As precision medicine increasingly relies on detailed tissue characterization, WMIF methodologies will continue to provide critical insights bridging cellular phenomena and organ-level function.
In conclusion, whole-mount immunofluorescence staining represents a sophisticated methodological platform that has fundamentally enhanced our ability to study biological systems in their native three-dimensional context. Through continued refinement and integration with complementary technologies, WMIF will remain at the forefront of spatial biology, driving discoveries in basic research and accelerating the development of novel therapeutics.
Whole-mount immunofluorescence (IF) staining is a powerful technique that allows for the visualization of antigen distribution within intact, three-dimensional tissue specimens. Unlike traditional methods that require tissue sectioning, whole-mount preservation maintains the natural architecture and spatial relationships of biological structures, providing panoramic views of complex systems. This approach is particularly valuable for researching intricate vascular networks, neuronal pathways, and developmental processes where contextual organization is critical. The core principle hinges on the specific molecular recognition between an antibody and its target antigen, coupled with fluorescent detection to render the interaction visible [7] [8].
The execution of this technique requires careful optimization at each step, from tissue harvesting and fixation to antibody staining and high-resolution imaging. When successfully applied, it facilitates understanding of biological formation and functionality at the cellular level, making it indispensable in fields such as neurobiology, ophthalmology, and regenerative medicine [7] [9].
Core Principle: The Antigen-Antibody Interaction
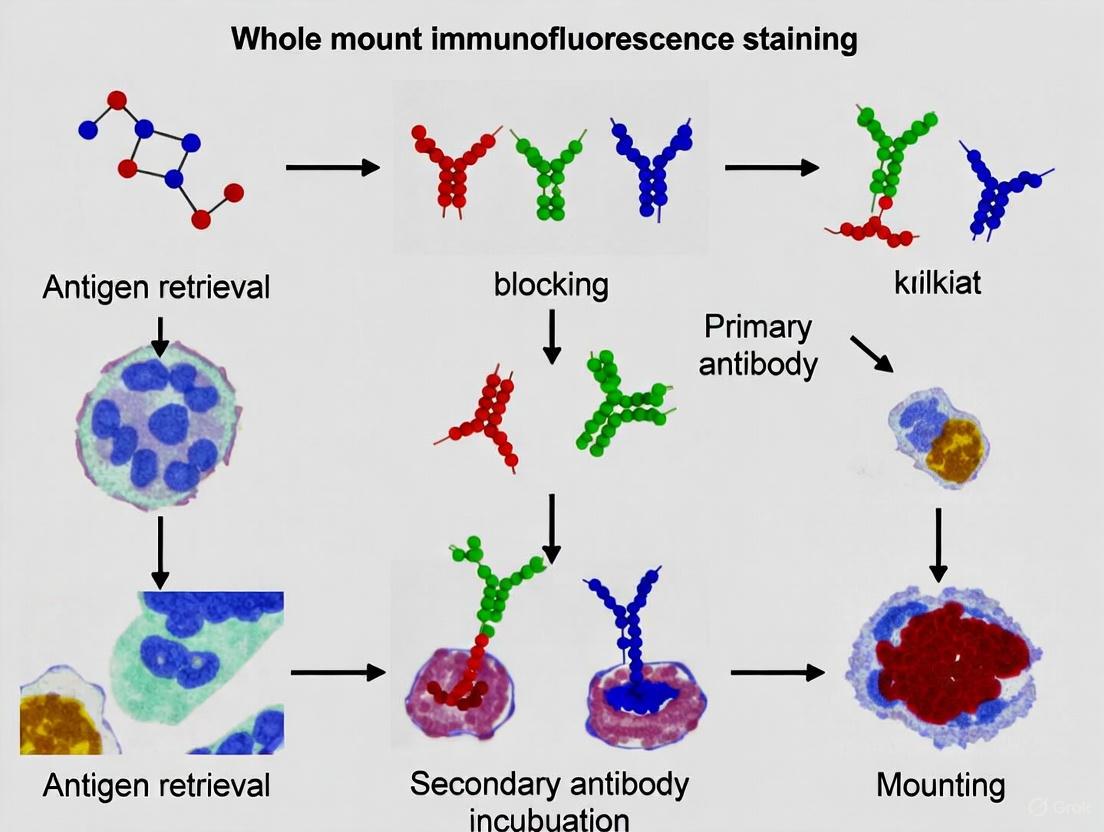
The foundation of immunofluorescence is the highly specific, non-covalent binding between an antibody and its cognate epitope on a target antigen. Antibodies are Y-shaped glycoproteins generated by the immune system, and their unique variable regions confer precise recognition for a single molecular structure. In immunofluorescence, this specificity is harnessed to localize targets within a biological sample; the detection of the bound antibody is achieved via a fluorophore attached directly or indirectly to the antibody [10].
The critical property of this interaction is its specificity, which allows researchers to target almost any cellular protein in a fixed and permeabilized sample. The choice of antibody is therefore one of the most important considerations in planning an IF experiment, as it is the primary determinant of success or failure [10].
Fluorescent Detection Methodologies
The visualization of antibody binding can be achieved through direct or indirect methods, each with distinct advantages and limitations related to sensitivity, flexibility, and complexity.
Direct Detection
The direct method utilizes a primary antibody that is directly conjugated to a fluorophore. This approach involves a single incubation step, resulting in a shorter, simpler workflow [11] [10]. It offers significant advantages for multicolor staining by eliminating concerns regarding cross-reactivity of secondary antibodies. However, a major disadvantage is potentially lower sensitivity, as the signal relies on the finite number of fluorophores that can be attached to a single antibody. This can limit detection to high-abundance targets. Furthermore, the workflow can be less flexible and more expensive, especially if commercially labeled direct conjugates are unavailable [11] [10].
Indirect Detection
Indirect detection, the more common approach, uses an unlabeled primary antibody followed by a fluorophore-conjugated secondary antibody that is raised against the immunoglobulin of the primary antibody's host species [11] [10]. This method provides greater sensitivity and generates a more intense signal due to signal amplification; multiple secondary antibodies can bind to a single primary antibody, dramatically increasing the number of fluorophores at the site of antigen binding [11] [10]. Commercially produced secondary antibodies are also relatively inexpensive and available in a wide spectrum of colors. The main disadvantage is the potential for cross-reactivity in multilabel experiments, which requires the use of primary antibodies raised in different species. Additional blocking steps are also needed to prevent non-specific binding of the secondary antibody, and there is a risk of higher background if the secondary antibody reacts with endogenous immunoglobulins in the tissue [11] [10].
Signal Amplification Systems
For targets of very low abundance, further signal amplification can be achieved using specialized systems:
- Biotin-Streptavidin Amplification: A biotinylated secondary antibody is used, followed by incubation with fluorophore-conjugated streptavidin. Since each streptavidin molecule can bind four biotins, this significantly increases the number of fluorophores per antibody molecule, boosting the signal [11] [10].
- Tyramide Signal Amplification (TSA): This method uses a secondary antibody conjugated to an enzyme (e.g., HRP). In the presence of hydrogen peroxide, the enzyme activates tyramide-fluorophore conjugates, depositing numerous labeled tyramide molecules at the antigen site. This provides extreme signal amplification but can sometimes lead to less specific labeling if the reactive fluorophores bind to the immediate area surrounding the epitope [10].
Table 1: Comparison of Fluorescent Detection Methods
| Feature | Direct Detection | Indirect Detection | Amplified Detection (e.g., Biotin-Streptavidin) |
|---|---|---|---|
| Sensitivity | Lower | High | Very High |
| Workflow Complexity | Simple; fewer steps | More complex; extra steps | Most complex; additional amplification steps |
| Multicolor Flexibility | High (best for same-species primaries) | Moderate (requires different host species) | Moderate (requires careful optimization) |
| Cost | Higher (per primary antibody) | Lower | Moderate to High |
| Risk of Cross-Reactivity | Low | Higher (must manage secondary specificity) | Higher (must block endogenous biotin) |
| Best Suited For | High-abundance targets, multiplexing with antibodies from the same species | General purpose use, low to medium abundance targets | Very low abundance targets, difficult-to-label tissues |
Experimental Protocol for Whole-Mount Immunofluorescence
The following detailed protocol is synthesized from methodologies used for staining mouse anterior eye cup [7], hind paw muscles [8], and general immunohistochemistry guidelines [12].
Tissue Harvesting and Fixation
- Dissection: Rapidly dissect the tissue of interest, minimizing ischemia time. For delicate structures like the corneal limbus or hind paw lumbrical muscles, careful micro-dissection is crucial to preserve morphology [7] [8].
- Fixation: Immerse the intact tissue in 4% paraformaldehyde (PFA) in PBS for 2–24 hours at 4°C. The fixation time must be determined empirically based on tissue size and density to ensure adequate penetration while preserving antigenicity [12].
Permeabilization and Blocking
- Washing: Rinse the fixed tissue several times in phosphate-buffered saline (PBS) to remove residual PFA.
- Permeabilization: Incubate the tissue in a wash buffer (PBS or TBS) containing a detergent such as 0.025% Triton X-100 for several hours to permeabilize cell membranes, allowing antibody penetration. The duration and detergent concentration may need optimization for different tissues [12].
- Blocking: Incubate the tissue in a blocking buffer for 1 to several hours at room temperature to block non-specific binding sites. A typical buffer is PBS containing 0.025% Triton X-100 and 2–5% normal serum from the species in which the secondary antibody was raised [12].
Antibody Staining
- Primary Antibody Incubation: Dilute the primary antibody in blocking buffer. Incubate the tissue with the primary antibody solution for 24–48 hours at 4°C with gentle agitation. The optimal antibody dilution must be determined by a titration series [7] [12].
- Washing: Wash the tissue extensively with wash buffer (3–5 changes over 6–24 hours) to remove unbound primary antibody.
- Secondary Antibody Incubation: Dilute the fluorophore-conjugated secondary antibody in blocking buffer. Incubate the tissue with this solution for 12–24 hours at 4°C, protected from light. Consult the datasheet for recommended dilutions, typically between 1:500 – 1:1000 [12].
- Final Washes: Perform a final series of washes with wash buffer (3–5 changes over 6–24 hours) to remove unbound secondary antibody.
Counterstaining, Mounting, and Imaging
- Counterstaining: If required, incubate the tissue with a counterstain such as DAPI (0.5 μg/mL) to label cell nuclei [12].
- Mounting: Rinse the tissue in distilled water and mount on a glass slide using an anti-fade mounting medium. Secure the tissue under a coverslip, sealing the edges with nail polish to prevent drying and movement [12].
- Imaging: Acquire images using a high-resolution confocal or two-photon microscope. For large tissues, tile scanning may be necessary to create a panoramic view of the structure [7] [9].
Diagram 1: Whole-mount immunofluorescence staining workflow.
The Scientist's Toolkit: Essential Reagents and Materials
Table 2: Key Research Reagent Solutions for Whole-Mount Immunofluorescence
| Reagent / Material | Function | Example & Notes |
|---|---|---|
| Fixative | Preserves tissue architecture and immobilizes antigens. | 4% Paraformaldehyde (PFA); optimal fixation time is tissue-dependent [12]. |
| Permeabilization Agent | Disrupts cell membranes to allow antibody penetration. | Triton X-100 (e.g., 0.025-0.5%); concentration and time require optimization [12]. |
| Blocking Serum | Reduces non-specific background binding of antibodies. | Normal serum from the host species of the secondary antibody (e.g., 2-5% in buffer) [12]. |
| Primary Antibody | Binds specifically to the target antigen/epitope. | Must be validated for IF/IHC; host species should be chosen for multiplexing plans [10]. |
| Fluorophore-Conjugated Secondary Antibody | Binds to the primary antibody for detection; provides signal amplification. | e.g., Goat anti-Mouse IgG conjugated to Alexa Fluor 488; species-specific [11] [10]. |
| Biotin-Streptavidin System | Signal amplification for low-abundance targets. | Biotinylated secondary antibody + Fluorophore-conjugated Streptavidin [11] [10]. |
| Counterstain | Labels general cellular structures for spatial context. | DAPI (nuclei), Phalloidin (F-actin). Incubate after secondary antibody washes [12]. |
| Antifade Mounting Medium | Presves fluorescence and reduces photobleaching during imaging and storage. | Commercial aqueous mounting media (e.g., ProLong Diamond); crucial for signal retention [12]. |
| Tissue Clearing Reagents | Reduces light scattering in thick tissues to improve imaging depth. | ScaleS, ScaleH; ScaleH adds polyvinyl alcohol to improve fluorescence preservation over time [9]. |
Advanced Applications in Research
Whole-mount immunofluorescence has been pivotal in advancing research across biological disciplines by providing a holistic view of cellular arrangements.
- Visualization of Schlemm's Canal: A protocol for immunofluorescent staining of mouse whole-mount anterior eye cup has been developed to visualize the formation and functionality of Schlemm's canal (SC), a critical conduit for aqueous humor drainage. This allows panoramic and focal visualization of this vessel at different postnatal ages, providing insights into its unique combination of blood and lymphatic vascular features [7].
- Analysis of Neuromuscular Junctions (NMJs): Whole-mount immunofluorescence of small mouse hind paw muscles (e.g., lumbrical and flexor digitorum brevis) enables complete visualization of the neuromuscular innervation pattern without the need for embedding and cryosectioning. This approach eliminates sectioning artifacts and allows accurate assessment of NMJ development, denervation, and regeneration in disease models using pre-synaptic (anti-synaptophysin) and post-synaptic (α-bungarotoxin) markers [8].
- Regenerative Ophthalmology: Optimized tissue-clearing methods, such as the ScaleH protocol, have been developed for whole-mount retinas and optic nerves. This workflow improves visualization of transplanted human stem cell-derived retinal neurons, facilitating robust assessment of donor cell integration—a key requirement for evaluating the success of gene and cell therapies aimed at restoring vision [9].
Data Interpretation and Analysis
The interpretation of whole-mount IF data requires careful consideration to extract meaningful biological insights.
- Qualitative vs. Quantitative Analysis: Initial evaluation is often qualitative, describing the localization, intensity, and morphological pattern of the fluorescent signal [13]. For quantitative comparisons, fluorescence intensity can be measured using image analysis software. However, it is critical that this quantitative data is interpreted by a scientist or pathologist to confirm that the signal represents on-target binding within the correct biological context [14].
- Scoring Systems: Semiquantitative scoring systems are widely used to convert subjective observations into ordinal data for statistical analysis. An effective scoring system should be definable, reproducible, and produce meaningful results. It often incorporates multiple parameters, such as the intensity of staining and the percentage of positive cells, which are combined into a total score [13].
- Controls: Appropriate controls are non-negotiable. These include:
- Isotype Control: An antibody of the same class as the primary antibody but without specificity for the target, used to assess non-specific background staining [14].
- No-Primary Control: Omission of the primary antibody to check for non-specific binding of the secondary antibody.
- Biological Controls: Tissues with known expression or lack of expression of the target [14].
Diagram 2: Data analysis and interpretation workflow for whole-mount IF.
Whole-mount immunofluorescence (IF) staining represents a paradigm shift in the morphological and molecular analysis of biological samples, enabling the comprehensive examination of tissues and organoids in their native three-dimensional (3D) context. Unlike traditional methods that require tissue sectioning, whole-mount IF preserves the intricate spatial relationships between cells and their microenvironment, providing unprecedented insights into tissue organization, cell signaling, and disease mechanisms. This technical guide explores the foundational principles, methodologies, and applications of whole-mount IF staining, with particular emphasis on its transformative role in organoid research—where maintaining 3D architecture is paramount for replicating in vivo physiology.
The fundamental advantage of this technique lies in its capacity to maintain spatial context and tissue integrity, which are often compromised in conventional histological preparations. Where flow cytometry requires tissue disaggregation into single-cell suspensions—destroying architectural information and spatial localization of cells—and traditional immunohistochemistry on sectioned samples provides only a two-dimensional (2D) snapshot of complex 3D structures, whole-mount IF enables researchers to visualize molecular markers throughout intact tissues and organoids [15]. This capability is particularly crucial for studying complex biological phenomena such as cell-cell interactions, gradient formation, and tissue morphogenesis, all of which depend on precise 3D organization [16].
Organoids, as simplified tissue-engineered in vitro models that recapitulate key aspects of the complex structure and function of corresponding in vivo tissues, have emerged as powerful tools for studying development, disease, and drug responses [17]. The ability of whole-mount IF to preserve and visualize the 3D architecture of these systems makes it an indispensable methodology in modern biomedical research, enabling investigations that bridge the gap between traditional 2D cell cultures and animal models.
Technical Foundations of Whole-Mount Immunofluorescence
Core Principles and Comparative Advantages
Whole-mount immunofluorescence staining involves the application of antibody-based fluorescent detection to entire, unsectioned biological specimens, enabling 3D visualization of molecular targets while preserving spatial relationships. This approach presents unique technical challenges compared to traditional methods, primarily related to antibody penetration and signal detection in thick tissues, but offers unparalleled insights into tissue architecture and cellular organization.
The following table summarizes the key methodological differences between whole-mount immunofluorescence and traditional approaches:
Table 1: Comparison of Whole-Mount Immunofluorescence with Traditional Analytical Methods
| Method | Spatial Context | Tissue Integrity | Multiplexing Capability | Quantitative Potential | Primary Applications |
|---|---|---|---|---|---|
| Whole-Mount IF | Preserved 3D architecture | Maintained intact | High (with cyclic approaches) | High (with advanced imaging) | Organoid analysis, developmental biology, tumor microenvironment |
| Traditional IHC/IF on Sections | 2D representation only | Disrupted by sectioning | Limited (typically 1-4 markers) | Moderate (section-to-section variation) | Diagnostic pathology, basic research |
| Flow Cytometry | Completely lost | Fully dissociated | Very high (10+ parameters) | High (single-cell resolution) | Immune cell profiling, hematology |
| Single-Cell RNA Sequencing | Lost (with standard protocols) | Fully dissociated | Limited to transcriptome | High (but destructive) | Cell type identification, heterogeneity studies |
As illustrated in the table, whole-mount IF uniquely combines spatial context preservation with multiplexing capability, making it particularly valuable for studying complex 3D systems like organoids and intact tissues. A key limitation of flow cytometry noted in the literature is that "converting the proportional abundances generated by flow cytometry to absolute abundances is challenging, and thus flow cytometry is a poor tool for estimating the density of immune cells in the tissue, which is a key indicator of local inflammation" [15]. Furthermore, "disrupting the tissues also destroys information of the spatial location of cells within the mucosa, essential for understanding immune cell function and also their relative susceptibility to pathogens" [15].
Key Technical Challenges and Solutions
The implementation of whole-mount IF presents several technical hurdles that researchers must address:
Antibody Penetration: The dense extracellular matrix and cellular packing in intact tissues and organoids can limit antibody access. This is particularly challenging for ECM gel-embedded cultures where "the mandatory usage of extracellular matrix (ECM) gels in 3D cultures limits antibody penetration and increases background" [18]. Effective strategies to overcome this limitation include extended incubation times, optimized detergent concentrations, and careful tissue clearing.
Background Signal and Autofluorescence: Tissues often exhibit intrinsic fluorescence that can obscure specific signals. "Mucosal tissues exhibit high levels of autofluorescence from abundant extracellular structural proteins" such as collagen, which "autofluoresce in all channels, but particularly in the green spectrum, limiting the use of common fluorophores such as FITC and GFP" [15]. specialized techniques such as bleaching treatments with hydrogen peroxide [19] and spectral unmixing can mitigate these issues.
Light Scattering in Thick Samples: Imaging deep into tissues is hampered by light scattering, which blurs signals and reduces resolution. Multiphoton microscopy addresses this challenge by using longer wavelength excitation that penetrates more deeply with less scattering [16].
The following diagram illustrates the core workflow and decision points in a whole-mount IF experiment:
Diagram 1: Whole-Mount Immunofluorescence Workflow and Technical Challenges
Experimental Protocols and Methodologies
Whole-Mount Immunofluorescence for ECM Gel-Embedded Organoids
The preservation of 3D architecture in organoids often requires embedding in extracellular matrix (ECM) gels, which presents unique challenges for immunostaining. The following protocol, adapted from recent literature, addresses these challenges while maintaining structural integrity [18]:
Sample Preparation and Fixation
- Culture pancreatic organoids (or other organoid types) in appropriate ECM gel (e.g., Matrigel) according to established protocols
- Fix samples with 4% paraformaldehyde (PFA) in PIPES buffer (100mM PIPES, 2mM MgCl2, 1mM EGTA in PBS, pH 6.8) for 2-4 hours at room temperature [15]
- Wash fixed samples 3× with PBS-glycine buffer to quench residual fixative
Permeabilization and Blocking
- Permeabilize samples with 0.5-1.0% Triton X-100 in PBS for 4-12 hours depending on organoid size and density
- Prepare blocking solution containing 10% normal serum (species matched to secondary antibodies), 0.1% Triton X-100, and 0.01% sodium azide in PBS [15]
- Block non-specific binding sites for 12-24 hours at 4°C with gentle agitation
Antibody Incubation and Washing
- Incubate with primary antibodies diluted in blocking solution for 24-48 hours at 4°C
- Wash extensively with IF-wash buffer (0.1% Triton X-100 in PBS) over 12-24 hours with multiple buffer changes
- Incubate with fluorophore-conjugated secondary antibodies diluted in blocking solution for 24-48 hours at 4°C, protected from light
- Perform final washes with IF-wash buffer followed by PBS
Clearing and Mounting
- Clear samples with fructose-glycerol clearing solution (60% fructose, 0.5% glycerol in PBS) or commercial alternatives [18]
- Mount samples between coverslips using spacers of defined thickness (250-500μm) to prevent compression [16]
- Seal edges with nail polish or VALAP for long-term storage
Tissue Clearing for Enhanced Imaging Depth
Effective tissue clearing is often essential for high-quality whole-mount imaging, particularly for larger organoids and tissue specimens. The EZ Clear method provides a simple and efficient approach [20]:
EZ Clear Protocol
- Lipid Removal: Immerse fixed samples in lipid removal solution (50% tetrahydrofuran in sterile Milli-Q water) for 24 hours at room temperature
- Washing: Transfer samples to sterile Milli-Q water for 4 hours to remove residual THF
- Refractive Index Matching: Incubate samples in aqueous RI matching solution (EZ View, RI = 1.518) for 24 hours at room temperature
This method effectively clears whole adult mouse organs in 48 hours with minimal sample size change (size change ratio = 1.072 ± 0.062), preserving endogenous fluorescence and allowing subsequent immunostaining [20].
Multiplexed Staining Using Cyclic Immunofluorescence
For comprehensive cellular phenotyping, whole-mount IF can be combined with cyclic staining approaches to achieve high multiplexing. The t-CyCIF (tissue-based cyclic immunofluorescence) method enables highly multiplexed imaging of FFPE specimens [21]:
t-CyCIF Workflow
- Sample Preparation: Cut 5μm sections from FFPE blocks, dewax, and perform antigen retrieval
- Pre-staining Treatment: Reduce autofluorescence through fluorophore bleaching (incubation with hydrogen peroxide at high pH under light)
- Staining Cycle (repeated for multiple markers):
- Immunostain with antibodies against 2-3 protein antigens
- Stain with DNA dye (Hoechst) for nuclear segmentation and image registration
- Multi-channel imaging at low and high magnification
- Fluorophore bleaching to remove signal
- Image Processing: Stitch and register individual images across cycles
- Analysis: Segment cells and quantify marker expression
This approach enables up to 60-plex imaging using conventional microscopes and reagents, making it accessible to most research laboratories [21].
Advanced Imaging Techniques for 3D Samples
Imaging Modalities for Whole-Mount Samples
The choice of imaging modality is critical for successful visualization of whole-mount stained samples. Each technology offers distinct advantages and limitations for 3D imaging:
Table 2: Comparison of Imaging Modalities for Whole-Mount Immunofluorescence
| Imaging Modality | Maximum Penetration Depth | Resolution | Advantages | Limitations | Best Applications |
|---|---|---|---|---|---|
| Confocal Microscopy | 50-100μm | High (lateral: 200nm, axial: 500nm) | Fast acquisition, widely available, good resolution | Limited penetration, photobleaching | Small organoids (<100μm), surface structures |
| Multiphoton Microscopy | 500μm+ | High (lateral: 300nm, axial: 1μm) | Superior penetration, minimal photodamage, reduced scattering | Expensive equipment, slower acquisition | Large organoids (200-500μm), deep tissue imaging |
| Light-Sheet Microscopy | Several mm | Moderate to high | Very fast acquisition, low phototoxicity, high throughput | Lower resolution, specialized setup | Large samples, live imaging, high-throughput screening |
| Super-Resolution Microscopy | <50μm | Very high (lateral: 20nm, axial: 50nm) | Nanoscale resolution, precise localization | Very limited penetration, complex sample prep | Subcellular structures, molecular interactions |
For large, densely packed organoids such as gastruloids, which can reach diameters of 300μm or more, multiphoton microscopy provides significant advantages. As noted in recent research, "multiphoton microscopy provides a powerful alternative due to its ability to penetrate deep into thick tissues with minimal photodamage" [16]. Furthermore, it "avoids drawbacks of confocal or light-sheet microscopy on large, densely packed samples, such as strong intensity gradients, image blurring, and reduced axial information due to light scattering, aberrations, degradation or divergence of the light-sheet" [16].
Optimization of Imaging Parameters
To maximize image quality in whole-mount IF, several parameters require careful optimization:
Refractive Index Matching Proper refractive index matching between mounting medium and sample is crucial for minimizing spherical aberration and maintaining resolution at depth. Comparative studies have shown that "80% glycerol provided the best clearing performance, leading to a 3-fold/8-fold reduction in intensity decay at 100μm/200μm depth compared to mounting in phosphate-buffered saline" [16].
Spectral Unmixing Multiplexed staining often results in fluorescence bleed-through between channels. Spectral unmixing algorithms can distinguish between fluorophores with overlapping emission spectra, significantly improving signal specificity. As demonstrated in gastruloid imaging pipelines, "spectral unmixing to remove signal cross-talk" is an essential step in processing multi-channel 3D images [16].
Dual-View Registration For large samples that require imaging from multiple angles, computational fusion of opposing views enhances resolution throughout the volume. This approach involves "sequential opposite-view multi-channel imaging of cleared samples" followed by "dual-view registration and fusion to reconstruct in toto images" [16].
Quantitative Analysis of 3D Imaging Data
Segmentation and Feature Extraction
The analysis of whole-mount IF data requires specialized computational approaches to extract meaningful biological information from 3D volumes. Recent advances have led to the development of comprehensive pipelines such as Tapenade, which includes [16]:
- 3D nuclei segmentation for identifying individual cells within dense tissues
- Signal normalization across depth and channels to correct for intensity variations
- Cell shape quantification to assess morphological changes
- Spatial expression patterns analysis for understanding tissue organization
These tools enable "quantifying 3D spatial patterns of gene expression and nuclear morphology in gastruloids, revealing how local cell deformations and gene co-expression relate to tissue-scale organization" [16].
Alternative Quantification Approaches
For situations where cell segmentation is challenging, alternative quantification methods based on pixel intensity analysis can provide valuable data. One novel approach utilizes "histograms and 2D plot profiling of whole-section panoramic images" to quantify expression domains and spatial gradients of multiple IF signals [22]. This method:
- Uses pixel counts and grey value comparisons rather than cell counting
- Analyzes entire histological sections without selecting multiple regions of interest
- Enables colocalization of up to 30 markers from standard IF staining protocols
- Particularly useful for ubiquitously expressed markers with large expression domains
This approach addresses the limitation of conventional scoring systems in quantifying spatial gradients of IF signals, which are "extremely important indicator of biological function" but difficult to measure with traditional methods [22].
The Scientist's Toolkit: Essential Reagents and Materials
Successful implementation of whole-mount IF requires careful selection of reagents and materials. The following table summarizes key solutions and their functions:
Table 3: Essential Research Reagent Solutions for Whole-Mount Immunofluorescence
| Reagent Category | Specific Examples | Function | Application Notes |
|---|---|---|---|
| Fixatives | 4% Paraformaldehyde in PIPES buffer | Preserve tissue morphology and antigen integrity | PIPES buffer (100mM PIPES, 2mM MgCl2, 1mM EGTA, pH 6.8) improves structural preservation [15] |
| Permeabilization Agents | Triton X-100 (0.1-1.0%), Saponin, Tween-20 | Enable antibody penetration through membranes | Concentration and incubation time must be optimized for each sample type |
| Blocking Solutions | 10% Normal serum, 1-5% BSA, 0.1% Triton X-100 | Reduce non-specific antibody binding | Serum should match host species of secondary antibodies [15] |
| Mounting Media | 80% Glycerol, ProLong Gold, Fluoromount-G | Refractive index matching, photobleaching protection | 80% glycerol provides excellent clearing with 3× less intensity decay at 100μm depth [16] |
| Tissue Clearing | Fructose-glycerol, EZ Clear, EZ View (RI=1.518) | Reduce light scattering for deeper imaging | EZ Clear renders organs transparent in 48 hours with minimal size change [20] |
| Autofluorescence Reduction | Hydrogen peroxide (4.4M in methanol), Sudan Black, Sodium borohydride | Quench endogenous fluorescence | Cold hydrogen peroxide treatment effectively reduces autofluorescence [19] |
The following diagram illustrates the relationships between these reagents and the key challenges they address in the whole-mount IF workflow:
Diagram 2: Key Reagents for Addressing Whole-Mount IF Challenges
Applications in Organoid Research and Drug Development
Advancing Organoid Characterization
Whole-mount IF has become an indispensable tool for comprehensive organoid characterization, enabling researchers to:
Assess Cellular Composition and Heterogeneity By preserving the complete 3D structure of organoids, whole-mount IF reveals spatial patterns of differentiation and cellular heterogeneity that are obscured in sectioned samples. This is particularly valuable for complex organoid systems such as gastruloids, where "understanding how organoids or tumoroids develop and self-organize also requires capturing how individual stem cells or cancerous cells differentiate and modulate their behavior and morphology in response to their local microenvironment" [16].
Evaluate Morphogenetic Processes The ability to image entire organoids in 3D allows researchers to study morphogenetic events such as lumen formation, branching, and patterning. For example, in developing gastruloids, whole-mount IF has enabled researchers to "quantify 3D spatial patterns of gene expression and nuclear morphology, revealing how local cell deformations and gene co-expression relate to tissue-scale organization" [16].
Validate Disease Models Patient-derived organoids are increasingly used to model human diseases, and whole-mount IF provides a powerful method for validating these models against original patient tissues. This application is particularly important in cancer research, where "the tumor microenvironment exploration proved useful in cancer biology, enabling the understanding of immune-escape mechanisms and could be exploited as new treatment targets" [19].
Enhancing Drug Discovery and Development
In pharmaceutical research, whole-mount IF offers significant advantages for drug screening and development:
High-Content Screening The combination of organoid technology with whole-mount IF enables high-content screening of compound libraries in physiologically relevant 3D models. Automated imaging and analysis pipelines allow "systematically screening the impact of chemical compounds or signaling pathway perturbations on organoid morphology, as well as on the localization and proportion of various cell types and tissues within the organoid" [16].
Biomarker Discovery and Validation Multiplexed whole-mount IF facilitates the discovery and validation of predictive biomarkers by enabling comprehensive characterization of cellular responses to therapeutic interventions. As noted in cancer research, "a deeper characterization of the tumor microenvironment composition, cell-cell, cell-matrix, and co-localization interactions, are fundamental keys to understanding neoplasm complexities and to possibly improving cancer diagnosis, prognosis, and assertive treatment" [19].
Mechanistic Studies By preserving spatial relationships between cells, whole-mount IF provides insights into drug mechanisms of action that would be difficult to obtain with traditional methods. For example, the technique can reveal how targeted therapies affect not only cancer cells but also the surrounding tumor microenvironment, including immune cell infiltration and stromal responses.
Future Perspectives and Concluding Remarks
Whole-mount immunofluorescence staining has emerged as a cornerstone technology for studying 3D biological systems, with particular importance in the rapidly expanding field of organoid research. As the technique continues to evolve, several exciting developments are on the horizon:
Integration with Spatial Transcriptomics The combination of whole-mount IF with spatial transcriptomic methods will enable correlative analysis of protein localization and gene expression patterns in intact tissues and organoids, providing unprecedented insights into cellular heterogeneity and tissue organization.
Live-Cell Imaging in 3D Advances in fluorophore technology and microscopy are making it increasingly feasible to perform long-term live imaging of organoids with whole-mount IF, enabling real-time observation of dynamic processes such as differentiation, migration, and tissue morphogenesis.
Standardization and Reproducibility As organoid models become more widely adopted in both basic research and drug development, there is growing need for standardized protocols and analytical frameworks to ensure reproducibility across laboratories. Whole-mount IF will play a crucial role in these quality control efforts by providing comprehensive morphological and molecular characterization of organoid cultures.
In conclusion, whole-mount immunofluorescence staining represents a powerful methodology that uniquely preserves the 3D architecture of tissues and organoids, enabling researchers to investigate biological systems with unprecedented spatial context. As organoid technology continues to advance and find applications across diverse fields—from basic developmental biology to personalized medicine—whole-mount IF will remain an essential tool for validating these complex 3D models and extracting meaningful biological insights from their intricate structures.
Whole mount immunofluorescence (WMIF) is a powerful immunochemical technique that allows for the visualization of protein distribution and localization within intact, three-dimensional (3D) biological specimens. Unlike traditional methods that require tissue sectioning, WMIF preserves the complete spatial architecture of the sample, enabling comprehensive analysis of cellular relationships and tissue organization in their native context [23]. This approach has become indispensable for studying complex biological systems where three-dimensional architecture is critical to understanding function and development.
The fundamental principle of WMIF relies on the specific binding of antibodies conjugated to fluorescent dyes (fluorophores) to target antigens within the specimen. When exposed to light of a specific wavelength, these fluorophores emit light of a longer wavelength, which is captured using fluorescence microscopy to create a detailed image of the target's spatial distribution [24]. This technique has evolved significantly since its inception in 1941 when Albert Hewett Coons and his team first used fluorescently labeled antibodies to detect antigens in infected tissue [24]. Recent advances in fluorescent probes, antibody technology, and microscopy have substantially improved the sensitivity and resolution of WMIF, making it a cornerstone technique in modern biological research [24].
This technical guide explores the application of WMIF to three fundamental specimen types that have revolutionized developmental biology, disease modeling, and drug discovery: organoids, embryos, and intact tissues. These specimens represent critical models for understanding human physiology and disease in vitro and in vivo, and WMIF provides the essential tool for visualizing their complex 3D organization at the molecular level.
Core Principles and Technical Considerations of WMIF
Whole mount immunofluorescence presents unique technical challenges compared to traditional immunohistochemistry on sectioned samples. The three-dimensional nature of specimens requires careful optimization of several parameters to ensure adequate reagent penetration throughout the entire sample while preserving structural integrity and antigenicity.
Specimen Preparation and Fixation
Proper specimen preparation is paramount for successful WMIF. Fixation preserves cellular structures and prevents antigen degradation, but must be carefully optimized to avoid epitope masking. The most common fixative for WMIF is 4% paraformaldehyde (PFA), which works by forming protein cross-links that stabilize cellular architecture [23]. For some sensitive antigens, methanol fixation may be preferable as it precipitates cellular components without extensive cross-linking [23]. Fixation time must be extended for whole mount specimens—typically ranging from 30 minutes at room temperature to overnight at 4°C—to allow complete penetration of fixative throughout the sample [23].
Permeabilization is essential after fixation to allow antibodies access to intracellular targets. Detergents like Triton X-100 are commonly used to create pores in cell membranes [25]. The duration of permeabilization must be optimized based on specimen size and density, with thicker samples requiring longer incubation times. For particularly challenging specimens such as zebrafish embryos, additional steps like enzymatic dechorionation may be necessary to remove physical barriers that impede reagent penetration [23].
Antibody Incubation and Signal Detection
WMIF employs either direct or indirect immunofluorescence approaches. In the direct method, the primary antibody is conjugated directly to a fluorophore, making the protocol quicker but less sensitive due to limited signal amplification [24]. The indirect method uses an unlabeled primary antibody followed by a fluorophore-conjugated secondary antibody that recognizes the primary antibody. This approach provides significant signal amplification as multiple secondary antibodies can bind to a single primary antibody [24]. The indirect method is generally preferred for WMIF due to its enhanced sensitivity, especially when detecting low-abundance targets.
Blocking is a critical step to reduce non-specific antibody binding and minimize background signal. Common blocking agents include bovine serum albumin (BSA), non-fat dry milk, normal serum, or commercial protein-free blocking buffers [26]. Blocking conditions must be empirically determined for each specimen type and antibody combination.
Antibody incubation times must be substantially extended for WMIF compared to sectioned samples—often ranging from 24 hours to several days—to allow for complete penetration throughout the specimen [23]. Similarly, washing steps between incubations must be more thorough and prolonged to remove unbound antibodies from the deep tissue layers.
Table 1: Comparison of Direct and Indirect Immunofluorescence Methods
| Feature | Direct Immunofluorescence | Indirect Immunofluorescence |
|---|---|---|
| Antibodies Used | Primary antibody conjugated to fluorophore | Primary antibody + secondary antibody conjugated to fluorophore |
| Signal Amplification | Limited | Multiple secondary antibodies bind to each primary antibody |
| Sensitivity | Lower | Higher |
| Time Required | Faster - fewer steps | Slower - additional incubation and washing steps |
| Flexibility | Limited - each primary needs distinct fluorophore | High - one secondary can be used with multiple primaries |
| Protocol Complexity | Simpler | More complex |
Imaging and Analysis
Imaging whole mount specimens requires specialized microscopy techniques capable of resolving structures in three dimensions. Confocal microscopy is particularly valuable for WMIF as it uses optical sectioning to generate high-resolution 3D images without physical sectioning [24]. For larger specimens, light-sheet microscopy may be preferred as it enables rapid imaging with reduced photobleaching and phototoxicity. Advanced techniques like total internal reflection fluorescence (TIRF) microscopy can provide exceptional resolution for surface structures [24].
Image analysis for WMIF involves specialized software for 3D reconstruction, volume rendering, and quantitative analysis of fluorescence intensity, cellular distribution, and spatial relationships. The complexity of 3D data requires sophisticated computational approaches, including machine learning algorithms for segmenting individual cells and structures within dense tissues [27].
Whole Mount Immunofluorescence for Organoids
Organoids are 3D in vitro tissue cultures that self-organize into structures recapitulating key aspects of native organs [17]. These miniature, simplified organ systems have emerged as powerful models for studying human development, disease mechanisms, and drug responses. WMIF is an essential tool for characterizing organoid structure, composition, and function.
Organoid Culture and Applications
Organoids can be generated from pluripotent stem cells (embryonic or induced) or adult stem cells isolated from various tissues [28]. They are typically embedded in 3D extracellular matrix (ECM) scaffolds like Matrigel and maintained with carefully optimized media containing growth factors and signaling molecules that promote self-organization and tissue-specific differentiation [17]. To date, researchers have successfully established organoid models for numerous tissues, including brain [29] [30], intestine [17], kidney [28], liver [28], pancreas [17], lung [28], and many others [28].
The applications of organoids in biomedical research are extensive. They serve as physiologically relevant models for studying fundamental biology of organ development and tissue morphogenesis [28]. Disease modeling using patient-derived organoids enables investigation of pathological mechanisms in a human context [17]. In drug discovery and development, organoids provide platforms for high-throughput compound screening, toxicity testing, and personalized medicine approaches [28] [27]. Organoids also show promise for regenerative medicine and cell therapy applications [28].
WMIF Protocols for Organoids
The following protocol outlines a standardized approach for whole mount immunofluorescence of organoids:
- Fixation: Transfer organoids to Eppendorf tubes and wash with phosphate-buffered saline (PBS). Fix with 4% PFA for 1 hour at 37°C with gentle agitation [27].
- Permeabilization and Blocking: Wash fixed organoids with PBS containing 1% FBS. Quench with 0.5 M glycine in PBS for 1 hour at 37°C to remove residual fixative. Incubate in penetration buffer containing 0.2% Triton X-100 for 30 minutes, followed by blocking buffer (PBS + 1% BSA + 0.2% non-fat dry milk powder + 0.3% Triton X-100) for 1 hour at room temperature [25] [27].
- Antibody Incubation: Incubate organoids with primary antibody diluted in blocking buffer overnight at 4°C with gentle rocking [25]. Wash extensively with PBS-T (PBS + 0.1% Triton X-100) 4 times for 20 minutes each. Incubate with fluorophore-conjugated secondary antibodies diluted in blocking buffer overnight at 4°C [25].
- Imaging and Analysis: After final washes, mount organoids in appropriate mounting medium and image using confocal microscopy. For larger organoids or those with significant light scattering, optical clearing techniques may be employed to improve imaging depth and quality [27].
Advanced Applications in Organoid Research
WMIF has enabled sophisticated applications in organoid research, including the characterization of complex model systems. In brain organoid research, WMIF combined with ultra-high-density CMOS microelectrode arrays has allowed researchers to map neural activity while simultaneously visualizing cellular architecture [30]. This integration of functional and structural analysis provides unprecedented insights into neuronal network formation and function.
In cancer research, WMIF facilitates detailed analysis of tumor organoids and their microenvironment. A recent study developed a pipeline combining tumor-fibroblast spheroid co-cultures, whole mount staining, optical clearing, and 3D confocal microscopy to analyze cell-type-specific drug responses [27]. This approach revealed that apparent co-culture drug resistance was actually due to fibroblast resilience rather than increased cancer cell resistance—a finding with significant implications for cancer therapy development.
Organoid Research Applications and WMIF Characterization
Whole Mount Immunofluorescence for Embryos
Embryos represent fundamental specimens for studying developmental biology, and WMIF has revolutionized our ability to visualize molecular patterns during embryogenesis. The three-dimensional context provided by WMIF is essential for understanding how spatial relationships between cells and tissues guide embryonic development.
Embryo-Specific WMIF Considerations
WMIF of embryos presents unique challenges due to their size, complexity, and ongoing developmental processes. Successful staining requires careful attention to developmental stage, as older, larger embryos present greater barriers to reagent penetration. As a general guideline, effective whole mount staining can typically be achieved for chicken embryos up to 6 days and mouse embryos up to 12 days of development [23]. Beyond these stages, dissection into smaller segments or removal of surrounding tissues may be necessary to ensure adequate antibody penetration.
A critical limitation in embryo WMIF is the general infeasibility of antigen retrieval techniques commonly used in traditional IHC. Heat-induced epitope retrieval (HIER) typically destroys embryonic tissues, making it essential to optimize fixation conditions that preserve both morphology and antigenicity without requiring subsequent retrieval [23]. This often necessitates empirical testing of alternative fixatives when PFA compromises antigen detection.
WMIF Protocol for Embryos
The following protocol provides a framework for whole mount immunofluorescence of embryonic specimens:
- Dissection and Fixation: Dissect embryos in ice-cold PBS and transfer to appropriate containers. Fix with 4% PFA for 30 minutes at room temperature or overnight at 4°C, depending on embryo size and antigen stability [23].
- Dehydration and Rehydration (Optional): For improved antibody penetration, dehydrate embryos through a graded ethanol series (25%, 50%, 75%, 100%), 10 minutes each at 4°C, then rehydrate through descending ethanol concentrations (100%, 75%, 50%, 25%) [25]. This process can help permeabilize tissues but must be optimized for each embryo type.
- Permeabilization and Blocking: Wash embryos with PBS-T (PBS + 1% Triton X-100) 3 times for 10 minutes each. Block with appropriate blocking buffer (e.g., PBS + 1% BSA + 0.3% Triton X-100) for 1-2 hours at room temperature or overnight at 4°C [25].
- Antibody Incubation: Incubate with primary antibody diluted in blocking buffer for 24-72 hours at 4°C with gentle agitation. Wash extensively with PBS-T 4-6 times over 8-24 hours. Incubate with fluorophore-conjugated secondary antibodies for 24-48 hours at 4°C [23].
- Imaging and Analysis: Wash thoroughly with PBS-T over 8-24 hours. For imaging, embryos can be mounted in glycerol or specialized mounting media. Confocal microscopy is essential for capturing 3D structure throughout the embryo [23].
Specialized Embryo Models
The Wolffian duct (WD) system serves as an exemplary model for studying tubular organ morphogenesis using WMIF. In one protocol, mouse embryonic gonadal ridges are isolated from 15.5 days post coitum pregnant dams and cultured in vitro for 3 days [25]. During this period, uncoiled WDs transform into highly convoluted tubes, mimicking normal epididymal development [25]. WMIF with markers like cytokeratin 8 (epithelial cell marker), phospho-Histone 3 (proliferation marker), and active β-catenin (Wnt signaling) enables visualization of the cellular and molecular mechanisms driving this complex morphogenetic process [25].
Table 2: Maximum Recommended Ages for Whole Mount Staining of Embryos
| Organism | Maximum Age for Effective WMIF | Special Considerations |
|---|---|---|
| Chicken | Up to 6 days | May require dissection of larger specimens |
| Mouse | Up to 12 days | Older embryos may need tissue dissection |
| Zebrafish | Varies by size | Requires dechorionation to remove egg membrane |
Whole Mount Immunofluorescence for Intact Tissues
While organoids and embryos represent engineered and developmental systems respectively, WMIF of intact tissues from mature organisms provides critical insights into physiological and pathological processes in native contexts. This application is particularly valuable for understanding tissue architecture in complex organs where cellular spatial relationships determine function.
Tissue Processing Considerations
For intact tissues, specimen size remains a primary consideration. Optimal thickness varies depending on tissue density and porosity, but generally ranges from 0.5 to 2 mm for most organs. Thicker samples present challenges for antibody penetration and light transmission during imaging. For larger samples, dissection into smaller segments may be necessary [23].
Different tissue types present unique challenges for WMIF. Dense connective tissues like tendon or cartilage require extended permeabilization times, while more porous tissues like liver or kidney may be susceptible to over-fixation that masks antigens. Optimal conditions must be determined empirically for each tissue type and target antigen combination.
WMIF Protocol for Intact Tissues
The following protocol adapts WMIF for intact tissue specimens:
- Tissue Collection and Fixation: Collect fresh tissue specimens and immediately place in ice-cold transport medium if processing will be delayed. For fixation, use 4% PFA for 4-24 hours depending on tissue size and density [23]. Perfusion fixation may be preferable for larger tissue blocks to ensure uniform preservation.
- Sectioning (Optional): While whole mount implies intact tissue, some applications may benefit from sectioning thicker tissues into 1-2 mm slices using a vibratome or tissue slicer. This maintains tissue architecture while improving reagent penetration.
- Permeabilization and Blocking: Wash fixed tissues with PBS 3 times for 15 minutes each. Permeabilize with 0.5-1.0% Triton X-100 in PBS for 6-24 hours at 4°C with agitation. Block with optimized blocking buffer (e.g., PBS + 1% BSA + 5% normal serum + 0.3% Triton X-100) for 24-48 hours at 4°C [25].
- Antibody Incubation: Incubate with primary antibody for 24-72 hours at 4°C. Wash with PBS-T 6-8 times over 24-48 hours. Incubate with secondary antibodies for 24-48 hours at 4°C [23].
- Optical Clearing and Imaging: For thicker tissues (>500 μm), consider optical clearing techniques to reduce light scattering. Image using confocal or light-sheet microscopy to capture 3D structure throughout the tissue [27].
The Scientist's Toolkit: Essential Reagents and Materials
Successful whole mount immunofluorescence requires careful selection of reagents and materials optimized for 3D specimens. The following table summarizes essential components and their functions in WMIF protocols.
Table 3: Essential Research Reagent Solutions for Whole Mount Immunofluorescence
| Reagent/Material | Function | Examples & Considerations |
|---|---|---|
| Fixatives | Preserve cellular structure and antigenicity | 4% PFA (most common), methanol (for sensitive epitopes) [23] |
| Permeabilization Agents | Create pores in membranes for antibody access | Triton X-100 (0.1-1.0%), Tween-20, saponin [25] |
| Blocking Buffers | Reduce non-specific antibody binding | BSA (1-5%), normal serum (1-10%), non-fat dry milk (1-5%) [25] [26] |
| Primary Antibodies | Bind specifically to target antigens | Monoclonal (high specificity), polyclonal (increased chance of recognition) [24] |
| Secondary Antibodies | Bind to primary antibodies with conjugated fluorophores | Species-specific, multiple fluorophore options [24] |
| Fluorophores | Emit light upon excitation for detection | FITC, TRITC, Alexa Fluor dyes, Cy dyes [31] [26] |
| Mounting Media | Preserve samples for microscopy | Antifade reagents to reduce photobleaching [24] |
| Optical Clearing Agents | Reduce light scattering in thick samples | Various commercial kits available [27] |
Visualization and Analysis Strategies
The complex three-dimensional data generated by WMIF requires specialized visualization and analysis approaches. Advanced microscopy techniques are essential for capturing high-quality image data from whole mount specimens.
Microscopy Techniques
Confocal microscopy represents the gold standard for WMIF imaging, using spatial pinholes to eliminate out-of-focus light and create sharp optical sections through thick specimens [24]. This optical sectioning capability enables reconstruction of 3D structures from a series of 2D images taken at different focal planes.
For very large specimens or those requiring rapid imaging, light-sheet fluorescence microscopy (LSFM) provides an excellent alternative. LSFM illuminates only a thin plane of the specimen at a time, significantly reducing photobleaching and phototoxicity while enabling high-speed imaging of large volumes [27].
When imaging multiple fluorophores, careful attention must be paid to spectral separation to avoid bleed-through between channels. Sequential scanning of channels rather than simultaneous acquisition can minimize cross-talk. Additionally, fluorophores with minimal spectral overlap should be selected for multiplex experiments [24].
Image Analysis and Quantification
The analysis of WMIF data extends beyond qualitative assessment to sophisticated quantitative measurements of fluorescence intensity, cellular distribution, and spatial relationships. Volume rendering software creates 3D representations from z-stack images, allowing visualization of the specimen from any angle [27].
Segmentation algorithms identify and delineate individual cells or structures within the 3D image data. For complex samples, machine learning approaches like convolutional neural networks (CNNs) can automate this process, enabling high-throughput analysis of large datasets [27]. These tools can quantify cell number, size, shape, and spatial distribution patterns throughout the entire specimen.
For co-culture systems like tumor-stroma models, simultaneous segmentation of different cell types allows researchers to analyze cell-type-specific responses to experimental conditions, providing insights into cellular interactions within complex microenvironments [27].
Whole Mount Immunofluorescence Workflow
Whole mount immunofluorescence has established itself as an indispensable technique for studying biological systems in their native three-dimensional context. By preserving spatial relationships that are lost in traditional sectioning approaches, WMIF provides unique insights into the structural and molecular organization of organoids, embryos, and intact tissues. The continued refinement of this methodology—including improved optical clearing techniques, more sensitive fluorophores, and advanced computational analysis tools—will further expand its applications in basic research, drug discovery, and diagnostic pathology. As 3D model systems become increasingly sophisticated and central to biomedical research, WMIF will remain an essential tool for visualizing and quantifying biological structure and function across scales.
Immunofluorescence (IF) is a cornerstone technique in biological and medical research, enabling the visualization of specific proteins and antigens within their native cellular and tissue contexts. Since its inception in 1941 by Albert Coons and colleagues, who first used fluorescently labeled antibodies to detect pneumococcal antigens, the technique has revolutionized our ability to study cellular processes [24] [32]. The fundamental principle of IF relies on the specific binding of antibodies to target antigens, with conjugated fluorophores allowing detection through fluorescence microscopy. Within this framework, two primary methodologies have emerged: direct and indirect immunofluorescence, each with distinct advantages and applications. This technical guide explores the critical trade-offs between these approaches, with particular emphasis on their application in whole mount immunofluorescence staining—an increasingly valuable method for examining intact tissue architecture in three dimensions [33].
Whole mount immunofluorescence (WM-IF) has proven particularly effective for investigating marker expression in complex tissues like the corneal limbus, where it provides superior visualization compared to traditional tissue sections [33]. This methodology allows researchers to analyze tissue integrity and stem cell populations without disrupting spatial relationships, making it especially valuable for developmental biology and tissue engineering research. However, the choice between direct and indirect IF approaches significantly impacts staining quality, sensitivity, and experimental flexibility in these preparations.
Core Principles and Technical Comparisons
Direct Immunofluorescence: Streamlined Simplicity
Direct immunofluorescence employs a single incubation step where a primary antibody directly conjugated to a fluorophore binds to the target antigen [34] [24]. After sample preparation, fixation, and blocking, the labeled primary antibody is applied directly to the specimen. Following incubation and washing to remove unbound antibody, the sample is ready for microscopy visualization [24]. This approach offers significant advantages in simplicity and speed, requiring fewer procedural steps and reducing total experiment time [34] [35].
The technical simplicity of direct IF translates to practical benefits. With only one antibody involved, the potential for non-specific binding and cross-reactivity is substantially reduced, leading to lower background signal [34] [36]. This characteristic makes direct IF particularly suitable for detecting highly expressed proteins and for applications where rapid turnaround is essential, such as clinical diagnostics [34] [32]. However, this method faces limitations in sensitivity due to the absence of signal amplification, potentially making it less suitable for detecting low-abundance targets [34] [36]. Furthermore, the availability of pre-conjugated primary antibodies can be limiting, especially for multiplex experiments targeting multiple antigens simultaneously [34].
Indirect Immunofluorescence: Amplified Detection
Indirect immunofluorescence employs a two-step detection process [26] [24]. First, an unlabeled primary antibody binds specifically to the target antigen. After washing, a fluorophore-conjugated secondary antibody—raised against the species of the primary antibody—is applied and binds to the primary antibody [34] [24]. This layered approach creates significant signal amplification, as multiple secondary antibodies can bind to a single primary antibody molecule [24] [32]. This amplification makes indirect IF notably more sensitive than direct methods, enabling detection of low-abundance proteins that might otherwise escape visualization [34] [36].
The indirect method also offers greater experimental flexibility [34]. Researchers can use the same labeled secondary antibody with various primary antibodies from the same host species, reducing the need for multiple conjugated primaries [35] [32]. This flexibility is particularly valuable in multiplexing experiments, where detecting several targets simultaneously requires different fluorophores [34]. However, these advantages come with increased complexity: additional incubation and washing steps prolong protocol duration, and the use of secondary antibodies introduces greater potential for background noise and cross-reactivity if not properly controlled [34] [35].
Technical Comparison: Direct vs. Indirect IF
Table 1: Comprehensive Comparison of Direct and Indirect Immunofluorescence
| Feature | Direct Immunofluorescence | Indirect Immunofluorescence |
|---|---|---|
| Antibody Configuration | Fluorophore conjugated directly to primary antibody [34] [24] | Unlabeled primary antibody + fluorophore-conjugated secondary antibody [34] [24] |
| Number of Steps | Single incubation step [24] | Multiple incubation steps (primary then secondary) [24] |
| Process Time | Shorter (fewer steps) [34] [35] | Longer (additional operational steps) [34] [35] |
| Sensitivity | Lower (no signal amplification) [34] [36] | Higher (signal amplification via multiple secondary antibodies) [34] [24] |
| Signal Amplification | Limited [24] | Yes; multiple secondaries bind to each primary [24] |
| Flexibility | Less flexible (limited availability of conjugated primaries) [34] | High flexibility (wide range of available secondary antibodies) [34] [32] |
| Multiplexing Capability | Challenging (requires multiple conjugated primaries) [34] | Excellent (species-specific secondaries enable multi-target detection) [34] [32] |
| Cost | Higher (conjugated primary antibodies are costly) [34] [35] | Lower (secondary antibodies are relatively inexpensive) [34] [36] |
| Background / Noise | Lower (fewer non-specific binding events) [34] [32] | Higher (potential for secondary antibody cross-reactivity) [34] [35] |
| Species Cross-reactivity | Low [34] | Higher (can be mitigated with pre-adsorbed secondaries) [34] |
| Complexity | Lower (simpler protocol) [34] | Higher (requires careful secondary antibody selection) [34] [36] |
| Best Applications | Detection of highly expressed proteins; rapid clinical assays [34] | Detection of low-abundance targets; multiplex experiments [34] [36] |
Experimental Protocols and Workflows
Standardized Staining Procedures
Both direct and indirect IF share critical preliminary steps that significantly impact staining quality. Proper sample preparation is paramount, beginning with fixation to preserve cellular architecture and prevent antigen degradation [26]. Cross-linking fixatives like formaldehyde or precipitating fixatives like methanol/acetone are commonly used, though the optimal choice depends on the target antigen and sample type [26]. For whole mount preparations, careful attention to fixation timing and concentration is essential to ensure antibody penetration while maintaining structural integrity [33].
Following fixation, samples often require permeabilization to allow antibody access to intracellular targets, particularly crucial for whole mount specimens where tissue depth can impede reagent penetration [24]. Antigen retrieval may also be necessary, especially for epitopes masked by cross-linking fixatives [26]. Both Heat-Induced (HIER) and Protease-Induced (PIER) Epitope Retrieval methods can effectively restore antigenicity, though HIER generally causes less tissue damage [26]. Blocking with protein solutions (e.g., BSA) or normal serum is then performed to minimize non-specific antibody binding and reduce background [26] [24].
Table 2: Research Reagent Solutions for Immunofluorescence
| Reagent Category | Specific Examples | Function & Importance |
|---|---|---|
| Fixatives | Formaldehyde, Paraformaldehyde, Methanol, Acetone [26] [24] | Preserves cellular structure and immobilizes antigens; critical for maintaining morphology [26]. |
| Permeabilization Agents | Triton X-100, Tween-20, Saponin [24] | Creates pores in membranes allowing antibody access to intracellular targets [24]. |
| Blocking Reagents | BSA, Normal Serum, Non-Fat Dry Milk, Commercial Protein-Free Blocks [26] | Reduces non-specific antibody binding to minimize background staining [26] [24]. |
| Primary Antibodies | Monoclonal (e.g., Anti-SARM1, Anti-CSPG4/NG2), Polyclonal, Recombinant [24] [32] | Specifically recognizes target antigen; choice affects specificity and signal intensity [32]. |
| Secondary Antibodies | Species-specific conjugates (e.g., Anti-Rabbit, Anti-Mouse) with fluorophores like Alexa Fluor dyes [24] [36] | Binds to primary antibody for detection; provides signal amplification in indirect IF [24]. |
| Fluorophores | FITC, TRITC, Alexa Fluor dyes (e.g., 488, 594, 647) [26] [24] | Emits detectable light upon excitation; choice affects brightness, photostability, and multiplexing capability [26] [24]. |
| Mounting Media | Antifade reagents with DAPI [26] [24] | Preserves samples, reduces photobleaching, and often includes counterstains for nuclei [24]. |
Direct Immunofluorescence Protocol
- Sample Preparation: Fix cells or tissues using an appropriate fixative (e.g., 4% paraformaldehyde for 15 minutes at room temperature) [26] [24]. For whole mount tissues, optimize fixation duration to ensure complete penetration without over-fixation [33].
- Permeabilization and Blocking: Permeabilize with 0.1-0.5% Triton X-100 for 10-15 minutes, then incubate with blocking buffer (e.g., 1-5% BSA in PBS) for 30-60 minutes at room temperature to reduce non-specific binding [24].
- Primary Antibody Incubation: Apply fluorophore-conjugated primary antibody diluted in blocking buffer directly to the sample. Incubate for 1-2 hours at room temperature or overnight at 4°C with gentle agitation [34] [24].
- Washing: Remove unbound antibody by washing 3-5 times with PBS or wash buffer (5-10 minutes per wash) [24].
- Counterstaining and Mounting (Optional): Apply nuclear counterstains (e.g., DAPI) if desired, and mount samples using antifade mounting medium [24].
- Visualization: Image samples using appropriate fluorescence microscopy techniques [24].
Indirect Immunofluorescence Protocol
- Sample Preparation, Permeabilization, and Blocking: Perform as described for direct IF (Steps 1-2 above) [26] [24].
- Primary Antibody Incubation: Incubate samples with unlabeled primary antibody diluted in blocking buffer for 1-2 hours at room temperature or overnight at 4°C [24].
- Washing: Wash thoroughly 3-5 times with PBS or wash buffer to remove unbound primary antibody [24].
- Secondary Antibody Incubation: Apply fluorophore-conjugated secondary antibody (specific to the host species of the primary antibody) diluted in blocking buffer. Incubate for 1 hour at room temperature protected from light [34] [24].
- Washing: Wash 3-5 times with PBS or wash buffer to remove unbound secondary antibody [24].
- Counterstaining and Mounting (Optional): Apply DAPI or other counterstains if desired, and mount with antifade medium [24].
- Visualization: Image using fluorescence microscopy with appropriate filter sets for each fluorophore [24].
Method Selection and Experimental Design
Strategic Decision Framework
Choosing between direct and indirect IF requires careful consideration of experimental goals and constraints. The decision framework can be visualized through the following workflow:
Essential Experimental Controls
Proper controls are indispensable for validating IF results, particularly in complex whole mount preparations where non-specific binding and autofluorescence can complicate interpretation [24] [32]. Essential controls include:
- Negative Controls: Samples known to lack the target antigen, confirming antibody specificity when no signal is observed [24].
- Secondary Antibody-Only Controls: Omission of primary antibody to assess non-specific binding of secondary antibodies [24].
- Isotype Controls: Application of non-specific immunoglobulins matching the primary antibody isotype to evaluate background from Fc receptor binding [24].
- Positive Controls: Samples known to express the target antigen, validating antibody performance and protocol effectiveness [24].
- Knockout/Knockdown Controls: Genetically modified samples lacking the target protein provide the most rigorous specificity validation [32].
In whole mount IF studies of limbal stem cell markers, for instance, comparison with freshly processed tissue rather than stored specimens serves as a critical control, as storage duration significantly impacts epithelial integrity and marker expression [33].
Advanced Applications in Whole Mount Immunofluorescence
Whole mount immunofluorescence (WM-IF) represents a powerful application of IF techniques that preserves three-dimensional tissue architecture, providing comprehensive visualization of spatial relationships between cells and extracellular matrix [33]. This methodology has proven particularly valuable in corneal research, where it enables analysis of putative limbal stem cell distribution without the structural disruption inherent in sectioning [33]. WM-IF has demonstrated superiority over traditional sectioning methods for visualizing expression patterns across tissue planes, as evidenced by studies of PAX6 expression in the limbal-corneal region [33].
The choice between direct and indirect IF becomes particularly significant in WM-IF. For thick specimens, indirect IF's signal amplification often provides superior penetration and detection sensitivity [33]. However, direct IF's lower background can be advantageous for minimizing non-specific signal in complex tissue matrices. Recent research utilizing WM-IF has revealed that prolonged storage of human donor corneas significantly influences limbal stem cell marker expression, underscoring the importance of fresh control tissues—a finding with substantial implications for tissue engineering and regenerative medicine [33].
The decision between direct and indirect immunofluorescence involves a fundamental trade-off between simplicity and sensitivity. Direct IF offers streamlined protocols with reduced background, while indirect IF provides amplified signals and greater experimental flexibility at the cost of additional complexity. In the context of whole mount immunofluorescence, where preserving three-dimensional architecture is paramount, this choice becomes even more significant. As research continues to advance, particularly in fields requiring spatial context like developmental biology and tissue engineering, understanding these methodological distinctions ensures appropriate technique selection. Proper implementation of either approach, with careful attention to controls and experimental conditions, provides powerful insights into protein localization and function within complex biological systems.
Executing WM-IF: From Sample Preparation to Imaging and Analysis
Whole mount immunofluorescence (WM-IF) staining represents a powerful methodological approach that enables the three-dimensional visualization of biological structures and molecular distributions within intact tissues and organoids. Unlike traditional sectioning techniques that disrupt spatial context, WM-IF preserves the inherent architecture of the specimen, providing unparalleled insights into cellular relationships, tissue organization, and molecular gradients in their native configuration [33] [16]. The critical foundation of any successful WM-IF experiment lies in the meticulous execution of three interdependent preparatory steps: fixation, permeabilization, and blocking. These steps collectively ensure the preservation of structural integrity, facilitate antibody accessibility to intracellular targets, and minimize non-specific background staining. When optimized, this preparatory trilogy enables researchers to extract meaningful quantitative data from complex 3D systems, from donor corneas investigating limbal stem cells to self-organizing gastruloids modeling embryonic development [33] [16].
Core Principles of Whole Mount Immunofluorescence
Comparative Advantages and Technical Challenges
Table 1: Advantages and Challenges of Whole Mount Immunofluorescence
| Advantages | Technical Challenges |
|---|---|
| Preservation of 3D tissue architecture and spatial relationships [16] | Limited antibody penetration in dense tissues |
| Volumetric data acquisition from single specimens [37] | Need for specialized clearing techniques for deep imaging [16] |
| Capability for quantitative analysis of fluorescence intensity [33] | Extended protocol duration compared to section-based methods |
| Reduced sampling bias through complete tissue analysis [37] | Requirement for specialized imaging equipment (e.g., two-photon microscopy) [16] |
Essential Reagents for Whole Mount Immunofluorescence
Table 2: Research Reagent Solutions for WM-IF
| Reagent Category | Specific Examples | Function | Application Notes |
|---|---|---|---|
| Fixatives | 4% Paraformaldehyde (PFA) [37] | Cross-links proteins to preserve tissue structure | Standard fixation: 1 hour at room temperature [37] |
| Permeabilization Agents | 0.1% Triton X-100 [37] | Dissolves membranes for intracellular antibody access | Used in washing buffers after fixation |
| Blocking Agents | Serum (species-matched to secondary antibody), BSA, Fc Block [38] [37] | Reduces non-specific antibody binding | Incubation typically 4 hours at room temperature [37] |
| Mounting Media | 80% Glycerol [16], ProLong Gold Antifade [16], Anti-fade mounting medium [37] | Preserves fluorescence and reduces photobleaching | Glycerol provides effective clearing for deep imaging [16] |
| Washing Buffers | Phosphate-Buffered Saline (PBS) [37] | Removes reagents between steps | Maintains physiological pH and osmolarity |
Step-by-Step Protocol: Fixation, Permeabilization, and Blocking
The following diagram illustrates the complete workflow for whole mount immunofluorescence staining, highlighting the central role of fixation, permeabilization, and blocking:
Detailed Procedural Steps
Step 1: Fixation
Objective: To preserve tissue architecture and antigen epitopes in their native state.
- Sample Preparation: Dissect tissue or organoids carefully to maintain morphological integrity while removing unnecessary surrounding material [37].
- Fixative Application: Immerse samples immediately in fresh 4% Paraformaldehyde (PFA) in PBS. The volume of fixative should exceed sample volume by at least 10:1 to ensure adequate penetration [37].
- Incubation Parameters: Fix for 1 hour at room temperature with gentle agitation. Critical consideration: Optimization may be required for different tissue types; longer durations may be needed for larger/denser specimens, but over-fixation can mask antigen epitopes.
- Washing: Following fixation, wash samples three times with PBS for 5-15 minutes each wash to completely remove residual PFA [37].
Step 2: Permeabilization
Objective: To render intracellular targets accessible to antibodies by dissolving cellular membranes.
- Solution Preparation: Prepare permeabilization buffer containing 0.1% Triton X-100 in PBS. Alternative permeabilization agents include Tween-20 or saponin, with selection dependent on target antigen sensitivity and tissue density [37].
- Treatment: Incubate fixed samples in permeabilization buffer. Standard protocol uses three washes of 1 hour each at room temperature with gentle agitation [37]. Technical note: For denser tissues or organoids, extension of permeabilization time or increased detergent concentration may be necessary, but requires empirical optimization to avoid tissue damage.
- Post-Permeabilization Wash: Rinse samples with PBS to prepare for blocking step.
Step 3: Blocking
Objective: To reduce non-specific antibody binding and minimize background signal.
- Blocking Buffer Formulation: Prepare blocking buffer consisting of 2-5% serum (from species matching secondary antibody host), 1% BSA, and 0.1% Triton X-100 in PBS. For specific applications, commercial Fc Block solutions (0.35 mg/mL) can be incorporated to further block Fc receptor-mediated binding [38].
- Blocking Incubation: Immerse samples in blocking buffer for a minimum of 4 hours at room temperature with continuous gentle agitation [37]. For optimal results, especially with tissues high in endogenous immunoglobulins, extend blocking to overnight at 4°C.
- Preparation for Staining: Following blocking, proceed directly to primary antibody application without intermediate washing.
Critical Factors for Success and Troubleshooting
Tissue-Specific Considerations
The structural density and biochemical composition of the sample significantly influence protocol parameters. Studies on densely packed gastruloids (200-500 µm diameter) necessitate extended permeabilization and the implementation of specialized clearing techniques using 80% glycerol to achieve sufficient antibody penetration and imaging depth [16]. Conversely, delicate tissues like corneal limbus require careful balancing of permeabilization intensity to preserve fragile antigen epitopes while ensuring antibody access [33].
Temporal Considerations in Experimental Planning
The integrity of tissue samples is profoundly influenced by pre-processing storage conditions. Research on human donor corneas has demonstrated that prolonged storage time (1-30 days) directly correlates with notable epithelial degeneration and loss of limbal stem cell (LSC) markers [33]. This underscores the critical importance of utilizing fresh or properly preserved control tissues and accounting for post-collection time as a significant experimental variable.
Quality Control and Validation
Robust validation of WM-IF results requires implementation of appropriate controls, including isotype controls to confirm antibody specificity and sample processing controls to distinguish true signal from artifacts [38]. The integration of artificial intelligence (AI)-supported analysis pipelines for colocalization quantification can further enhance objectivity, particularly when analyzing complex neuronal networks or densely packed tissues where overlapping signals and background fluorescence present analytical challenges [39].
Whole mount immunofluorescence (WMIF) staining represents a powerful approach for visualizing protein localization within the intact three-dimensional architecture of tissues and embryos. Unlike traditional section-based methods, WMIF preserves spatial relationships and tissue context, making it invaluable for developmental biology, neurobiology, and disease modeling research [23]. Within this context, antibody incubation strategies form the critical foundation for successful experimentation, determining signal specificity, intensity, and ultimately, the biological insights achievable through this technique.
The fundamental challenge in WMIF lies in achieving specific antibody binding throughout thick, intact samples while minimizing background signal—a task requiring carefully optimized incubation parameters [23]. This technical guide provides researchers with comprehensive strategies for primary and secondary antibody incubation, framed within the specialized requirements of whole mount immunofluorescence staining research.
Core Principles: Direct vs. Indirect Detection Methods
Immunofluorescence detection employs two primary methodologies, each with distinct mechanisms and applications suitable for whole mount research.
Direct Immunofluorescence
The direct method utilizes a single incubation step with a primary antibody directly conjugated to a fluorophore [26] [40]. This approach offers simplicity and speed, typically requiring only one incubation period followed by washing steps before imaging. Direct detection minimizes potential background since fewer procedural steps reduce opportunities for non-specific binding [41]. This method is particularly valuable in multiplexing experiments where multiple targets must be visualized simultaneously using primary antibodies from the same host species [42].
However, direct immunofluorescence generally provides lower signal amplification compared to indirect methods, as each target antigen receives only the limited number of fluorophores attached to the primary antibody [42]. This reduced sensitivity can be problematic when targeting low-abundance antigens or when working with suboptimal antibody penetration in thick whole mount samples.
Indirect Immunofluorescence
Indirect immunofluorescence employs a two-step incubation process: first with an unlabeled primary antibody that binds the target antigen, followed by a fluorophore-conjugated secondary antibody that recognizes the primary antibody [26] [40]. This method offers significant signal amplification as multiple secondary antibodies can bind to a single primary antibody molecule, dramatically increasing the fluorescent signal per antigen [42]. This enhanced sensitivity proves particularly advantageous in WMIF where antibody penetration may be incomplete or when detecting scarce targets.
The indirect method also offers greater flexibility and cost-effectiveness, as the same labeled secondary antibody can be used with various primary antibodies from the same host species [40]. The primary disadvantage includes lengthier procedures and potentially increased background signal due to additional incubation steps and the possibility of secondary antibodies binding non-specifically to tissue components [41].
Table 1: Comparison of Direct and Indirect Immunofluorescence Methods
| Parameter | Direct IF | Indirect IF |
|---|---|---|
| Steps | Single incubation | Two sequential incubations |
| Time Required | Shorter (~2 hours incubation) | Longer (2 hours + 30min-2 hours incubations) |
| Sensitivity | Lower | Higher due to signal amplification |
| Signal Amplification | Limited | Multiple secondaries bind to each primary |
| Flexibility | Lower - requires conjugated primaries | Higher - same secondary works with multiple primaries |
| Background | Generally lower | Potentially higher |
| Multiplexing with Same Host Species | Ideal | Problematic due to cross-reactivity |
| Cost | Higher for conjugated primaries | Lower - secondary antibodies are inexpensive |
Strategic Implementation for Whole Mount Systems
Combined Direct and Indirect Method
For complex WMIF experiments requiring multiple labels from the same host species, a sequential combination approach enables effective multiplexing. This protocol allows researchers to leverage the advantages of both methods while avoiding cross-reactivity issues [42]:
- Perform standard indirect detection first: Incubate with unlabeled primary antibodies, followed by appropriate secondary antibodies [42]
- Complete thorough washing: Rinse samples three times with PBS, then perform three 5-minute washes with PBS
- Apply directly labeled primary antibodies: Incubate with fluorophore-conjugated primary antibodies from the same species used in the first step [42]
- Final washing and mounting: Rinse again and mount samples for imaging
This sequential approach prevents cross-reactivity because the secondary antibodies from the indirect step cannot recognize the directly-labeled primary antibodies applied afterward, enabling effective multiplexing even with antibodies from identical host species [42].
Incubation Parameter Optimization
Whole mount systems demand specialized incubation parameters to ensure adequate antibody penetration throughout thick samples:
- Duration: While standard immunocytochemistry typically requires 1-2 hours for primary antibody incubation, whole mount samples often need extended incubation times ranging from 24-72 hours to permit sufficient antibody penetration into deep tissue layers [23]
- Temperature: Most protocols recommend incubation at 4°C for extended periods to reduce degradation while maintaining antibody binding efficiency
- Concentration: Antibody concentrations must be carefully titrated for whole mount applications. While higher concentrations may improve penetration and signal, they can also increase background; empirical optimization is essential [5]
- Agitation: Gentle agitation during incubation periods promotes even distribution of antibodies throughout the sample and prevents settling
Table 2: Troubleshooting Antibody Incubation in Whole Mount Systems
| Problem | Potential Causes | Solutions |
|---|---|---|
| Weak or No Signal | Inadequate antibody penetration | Extend incubation times (24-72 hours), increase antibody concentration, enhance permeabilization |
| Insufficient antibody concentration | Titrate antibody to determine optimal concentration | |
| Epitope masking from fixation | Try alternative fixatives (e.g., methanol instead of PFA) [23] | |
| High Background | Non-specific antibody binding | Optimize blocking conditions (serum, BSA, commercial blockers) [26] |
| Inadequate washing | Increase wash frequency and duration, include mild detergents in wash buffers | |
| Antibody concentration too high | Reduce antibody concentration, shorten incubation time | |
| Uneven Staining | Incomplete tissue penetration | Ensure adequate permeabilization, extend incubation times |
| Air bubbles trapped in sample | Use agitation during incubation, ensure proper sample orientation | |
| Autofluorescence | Native tissue fluorescence | Use fluorophores with different emission spectra, apply autofluorescence quenchers [43] [15] |
Multiplexing Strategies in Whole Mount Immunofluorescence
Multiplexed WMIF enables researchers to visualize multiple molecular targets simultaneously within their native three-dimensional context, providing insights into cellular interactions and spatial relationships. Successful multiplexing requires careful strategic planning:
- Antibody Host Species Selection: For indirect detection, primary antibodies must be raised in different host species to prevent cross-reactivity of secondary antibodies [44]. For example, combining rabbit, mouse, and goat primaries allows specific detection with corresponding secondaries
- Direct Conjugation for Same-Species Antibodies: When multiple antibodies from the same species are required, directly conjugated primaries eliminate cross-reactivity concerns [44]
- Spectral Compatibility: Ensure selected fluorophores have minimal spectral overlap and are compatible with available microscope filter sets [5]. Abundant targets should be paired with dimmer fluorophores, while sparse targets require brighter fluorophores [26]
- Sequential Application: When combining direct and indirect methods from the same host species, always perform indirect detection first, followed by thorough washing, before applying directly conjugated antibodies [42]
Experimental Protocols for Whole Mount Systems
Standard Indirect Immunofluorescence Protocol for Whole Mount Samples
The following protocol provides a framework for whole mount immunofluorescence, with particular attention to the extended timelines required for adequate antibody penetration [23]:
Fixation
- Fix samples in 4% paraformaldehyde (PFA) for 30 minutes at room temperature or overnight at 4°C
- For fixation-sensitive epitopes, methanol may be substituted [23]
- Wash 3×5 minutes with PBS
Permeabilization
- Permeabilize with 0.1-1.0% Triton X-100 in PBS for 1-2 hours at room temperature
- For membrane proteins, consider gentler alternatives like saponin or Tween-20 [5]
- Wash 3×5 minutes with PBS
Blocking
- Block with 5-10% normal serum from the secondary antibody host species in PBS for 4-6 hours at room temperature or overnight at 4°C [15]
- Include 0.1% Triton X-100 to maintain permeabilization during blocking
Primary Antibody Incubation
- Incubate with primary antibody diluted in blocking solution for 24-72 hours at 4°C with gentle agitation
- Optimize concentration through titration (typical range: 1:100-1:500)
- Wash 6×30 minutes to 2 hours each with PBS containing 0.1% Tween-20
Secondary Antibody Incubation
- Incubate with fluorophore-conjugated secondary antibodies diluted in blocking solution for 24-48 hours at 4°C with gentle agitation, protected from light
- Include nuclear counterstains (e.g., DAPI) if desired
- Wash 6×30 minutes to 2 hours each with PBS containing 0.1% Tween-20, protected from light
Mounting and Imaging
- Mount in anti-fade mounting medium compatible with imaging
- Image using confocal microscopy to resolve three-dimensional structure [23]
Combined Direct and Indirect Staining Protocol
This specialized protocol enables multiplexing with antibodies from the same host species [42]:
Standard Indirect Staining First
- Fix, permeabilize, and block samples as described above
- Incubate with unlabeled primary antibodies (e.g., mouse and rabbit) for 24-72 hours at 4°C
- Wash thoroughly (6×30 minutes to 2 hours each)
- Incubate with appropriate fluorescent secondary antibodies for 24-48 hours at 4°C
- Wash thoroughly (6×30 minutes to 2 hours each)
Direct Staining Second
- Incubate with directly labeled primary antibodies (e.g., mouse) conjugated to fluorophores for 24-48 hours at 4°C
- Include nuclear counterstains if not already applied
- Wash thoroughly (6×30 minutes to 2 hours each)
- Mount and image as described above
The Scientist's Toolkit: Essential Research Reagents
Table 3: Essential Reagents for Whole Mount Immunofluorescence
| Reagent Category | Specific Examples | Function | Whole Mount Considerations |
|---|---|---|---|
| Fixatives | 4% Paraformaldehyde (PFA), Methanol, Acetone | Preserve tissue architecture and antigenicity | PFA most common; methanol alternative for fixation-sensitive epitopes [23] |
| Permeabilization Agents | Triton X-100, Tween-20, Saponin | Enable antibody access to intracellular targets | Concentration and duration must be optimized for complete tissue penetration |
| Blocking Reagents | Normal serum, BSA, Commercial protein-free blockers | Reduce non-specific antibody binding | Extended blocking times (4-6 hours) necessary; serum from secondary host recommended [26] |
| Primary Antibodies | Target-specific antibodies validated for IHC | Bind specifically to target antigens | Must be validated for immunofluorescence; extended incubation times required [44] |
| Secondary Antibodies | Species-specific cross-adsorbed antibodies conjugated to fluorophores | Bind to primary antibodies for detection | Highly cross-adsorbed antibodies reduce background; multiple labels enable signal amplification [42] |
| Wash Buffers | PBS, PBS with 0.1% Tween-20 | Remove unbound antibodies | Extended and frequent washing crucial for reducing background in thick samples |
| Mounting Media | Anti-fade mounting media with DAPI | Preserve samples and reduce photobleaching | Must maintain 3D structure for imaging; DAPI counterstains nuclei [5] |
Workflow and Decision Framework
The following diagram illustrates the key decision points and workflow for planning antibody incubation strategies in whole mount immunofluorescence:
Antibody incubation strategies form the methodological cornerstone of successful whole mount immunofluorescence research. The selection between direct, indirect, or combined approaches must be guided by experimental goals, target abundance, and multiplexing requirements. Within whole mount systems, all incubation parameters require significant extension to accommodate complete penetration of antibodies throughout thick, intact samples. By applying the principles and protocols outlined in this technical guide, researchers can overcome the unique challenges of WMIF and leverage its powerful capacity to reveal molecular distributions within preserved three-dimensional biological contexts.
Nuclear Counterstaining and Mounting for Confocal Microscopy
Within the expanding field of whole-mount immunofluorescence staining research, the techniques of nuclear counterstaining and specimen mounting are critical final steps that determine the clarity, resolution, and analytical value of confocal microscopy data. Whole-mount techniques allow for the three-dimensional analysis of intact tissues and organoids, preserving structural context that is lost in sectioned samples [18] [45]. In this approach, nuclear counterstains provide essential spatial landmarks for orienting within complex tissue architectures, while proper mounting ensures optimal optical conditions for high-resolution imaging through thick specimens. This technical guide details the protocols and considerations for executing these fundamental procedures effectively within the context of whole-mount immunofluorescence studies.
The Scientist's Toolkit: Essential Research Reagents
The following table catalogues essential materials and reagents required for successful nuclear counterstaining and mounting of whole-mount specimens for confocal microscopy.
Table 1: Key Research Reagent Solutions for Nuclear Counterstaining and Mounting
| Item | Function | Examples & Working Concentrations |
|---|---|---|
| Nuclear Counterstains | Binds nucleic acids to visualize cell nuclei for spatial orientation. | To-Pro-3 (1:3,000) [45]; Hoechst 33342 [46] [47]; DAPI [47]; DRAQ5 [47] |
| Mounting Medium | Preserves fluorescence and provides correct refractive index for imaging. | Prolong Gold [45] |
| Blocking Serum | Reduces non-specific antibody binding. | Normal Goat Serum (NGS), Donkey Serum [45] |
| Permeabilization Agent | Enables antibody and stain penetration into tissues. | Triton X-100 [45] [46] |
| Fixative | Preserves tissue structure and antigen integrity. | 4% Paraformaldehyde (PFA) [45] [46]; Methanol [47] |
Quantitative Analysis of Nuclear Staining
Incorporating a nuclear counterstain is not merely for visualization; it enables crucial quantitative histomorphometric analysis. The expression domain of a stain like DAPI can be quantified to determine the cellularity of a sample—the proportion of a tissue section or compartment area occupied by cell nuclei [22]. This is achieved by analyzing panoramic images and calculating pixel counts based on grey value thresholds from histograms [22]. Such data provides critical context for quantifying the expression domains of other immunofluorescence markers, ensuring that comparisons between samples are not confounded by differences in cellular density [22].
Table 2: Quantitative Profile of Common Nuclear Counterstains
| Counterstain | Target | Excitation/Emission | Compatible Fixatives | Incubation Time |
|---|---|---|---|---|
| To-Pro-3 | DNA | Red/Far-Red | PFA/Methanol [45] | Specified in protocol [45] |
| Hoechst 33342 | DNA (A-T rich regions) | UV/Blue | PFA/Methanol [46] [47] | 30 minutes [47] |
| DAPI | DNA (A-T rich regions) | UV/Blue | PFA/Methanol [47] | 5-10 minutes [47] |
| DRAQ5 | DNA | Red/Far-Red | PFA/Methanol [47] | 5-30 minutes [47] |
Experimental Workflow for Whole-Mount Processing
The journey from a fixed tissue to a mounted sample ready for confocal imaging involves a critical sequence of steps designed to ensure optimal stain penetration and image quality. The following diagram outlines the core workflow, highlighting key decision points.
Nuclear Counterstaining and Mounting Workflow
Detailed Experimental Protocols
Protocol 1: Nuclear Counterstaining for Embryonic Tissues
This protocol is adapted for whole-mount embryonic tissues, such as limb skin or heart, following immunofluorescence staining [45].
- Following Antibody Staining: After completing the incubation with secondary antibodies and subsequent washes, proceed with the nuclear stain.
- Counterstain Application: Prepare a dilution of To-Pro-3 iodide (or an equivalent DNA-binding dye) in your wash buffer (e.g., PBT) at a 1:3,000 dilution [45].
- Incubation: Incubate the tissues with the nuclear counterstain solution with gentle mixing on a Nutator mixer at room temperature for the time specified by the manufacturer and experimental validation.
- Final Washes: After incubation, wash the tissues thoroughly with phosphate-buffered saline (PBS) or PBT to remove any unbound stain. The samples are now ready for mounting.
Protocol 2: Mounting Whole-Mount Specimens for Confocal Microscopy
Proper mounting is critical for stabilizing the sample and achieving the best possible image quality, especially for Z-stack imaging [45].
- Preparation: Place a drop of anti-fade mounting medium (e.g., Prolong Gold) onto a microscope slide [45].
- Positioning Tissue: Carefully transfer the stained tissue onto the drop of mounting medium.
- Creating a Chamber: If dealing with thick tissues, place a secure-seal spacer (e.g., 9 mm diameter, 0.12 mm deep) around the tissue to create a well that prevents crushing [45].
- Sealing: Gently lower a cover glass onto the specimen, taking care to avoid introducing air bubbles. Seal the edges of the cover glass with clear nail varnish or tape and allow it to dry completely.
- Storage: If imaging is not performed immediately, store the prepared slides protected from light at 4°C.
Troubleshooting and Special Considerations
Working with three-dimensional samples presents unique challenges that require specific adaptations.
- Imaging Depth: Scaffolds or thick tissues exceeding 100-200 µm may approach the Z-stack capacity of some confocal microscopes [46]. The achievable imaging depth will vary with the density of the cell culture and the fluorophores used. For very deep imaging, consider using fluorophores specifically developed for in vivo deep imaging.
- Autofluorescence Control: The polymer scaffold Alvetex is reported to produce minimal autofluorescence, resulting in low background signal [46]. Efficient washing and blocking steps are universally critical to prevent non-specific binding of antibodies and reduce background.
- Fixation Compatibility: The choice of fixative can impact staining. While To-Pro-3 is compatible with standard PFA fixation [45], other stains like Hoechst and DAPI are compatible with both PFA and methanol fixation [47]. Note that methanol fixation can destroy some protein epitopes and is not compatible with phalloidin staining of actin [47].
Whole mount immunofluorescence staining enables the three-dimensional analysis of biological structures in their intact, unsectioned state, providing unparalleled insights into the spatial relationships and architecture of tissues. A significant technical challenge in this field, however, is achieving high-resolution imaging deep within light-scattering specimens. Two-photon excitation microscopy has emerged as a cornerstone technology for addressing this challenge, allowing researchers to visualize dynamic processes in living tissues at depths inaccessible to conventional fluorescence microscopy. This technical guide explores the fundamental principles, current advancements, and practical methodologies of two-photon microscopy within the context of deep-tissue imaging for whole mount and in vivo applications.
Core Principles and Advantages of Two-Photon Microscopy
Two-photon microscopy operates on the principle of simultaneous absorption of two low-energy (long-wavelength) photons by a fluorophore, an event that occurs with significant probability only at the focal point of a high-numerical-aperture objective where photon density is greatest. This non-linear excitation process confers several critical advantages for deep-tissue and whole mount imaging:
- Enhanced Penetration Depth: The use of near-infrared (NIR) excitation light (typically 700-1100 nm) reduces scattering in biological tissues and minimizes absorption by endogenous chromophores, allowing excitation light to reach deeper structures and emitted photons to return to the detector [48] [49].
- Confined Excitation Volume: The probability of two-photon absorption is proportional to the square of the excitation intensity, effectively limiting fluorescence excitation to a tiny volume (~0.1 fl) at the focal point. This inherent spatial confinement eliminates the need for a confocal pinhole and reduces out-of-focus photobleaching and phototoxicity [49].
- Improved Signal-to-Noise Ratio: The minimal out-of-focus excitation significantly reduces background fluorescence, resulting in clearer images from deep tissue layers without physical sectioning [50].
Table 1: Comparison of Imaging Modalities for Deep-Tissue Visualization
| Imaging Modality | Excitation Mechanism | Penetration Depth | Resolution | Key Advantages | Primary Limitations |
|---|---|---|---|---|---|
| Confocal Microscopy | Single-photon | ~100-200 µm | High (lateral: ~200 nm; axial: ~500 nm) | Rejects out-of-focus light with pinhole | Limited depth, significant out-of-focus bleaching |
| Two-Photon Microscopy | Simultaneous two-photon absorption | Up to ~1 mm | High (lateral: ~300 nm; axial: ~1 µm) | Deep penetration, minimal out-of-focus damage, inherent optical sectioning | Expensive femtosecond lasers, complex alignment |
| Photoacoustic Tomography (PAT) | Pulsed laser absorption | Several centimeters | Moderate (~0.5 mm) | Exceptional depth, combines optical contrast with ultrasound resolution | Lower resolution, limited molecular probes |
| Ultrasound Localization Microscopy (ULM) | Ultrasound waves | Several centimeters | Super-resolution (~10 µm) | Extreme depth, blood flow imaging | Requires contrast agents, limited to vascular imaging |
Diagram 1: Two-Photon Microscope Workflow
Technical Advances Enhancing Two-Photon Performance
Chromophore and Probe Engineering
The performance of two-photon microscopy in deep-tissue applications is fundamentally limited by the availability of endogenous chromophores and the brightness of fluorescent probes. Recent work has addressed this through genetic and chemical approaches:
Biliverdin Elevation Strategies: Research has demonstrated that Biliverdin reductase A knockout (Blvra−/−) mouse models exhibit significantly elevated endogenous biliverdin levels, enhancing the function of bacterial phytochrome-based near-infrared imaging systems [48]. This augmentation improves the signal for both two-photon fluorescence and photoacoustic imaging, enabling cellular resolution of miRFP720-expressing neurons at depths of approximately 2.2 mm through intact tissue [48].
Multifunctional Probe Design: Advanced probes like CyB integrate BODIPY and hemicyanine frameworks to create "five-in-one" capabilities including pH responsiveness, viscosity responsiveness, ratiometric detection, two-photon fluorescence imaging, and lipid droplet targeting [51]. This multi-parameter sensing capability enables researchers to monitor multiple microenvironmental factors simultaneously in pathological states.
Table 2: Recent Technical Innovations in Deep-Tissue Two-Photon Imaging
| Innovation Area | Technical Approach | Performance Improvement | Research Application |
|---|---|---|---|
| Chromophore Availability | Biliverdin reductase A knockout (Blvra−/−) model | ~25-fold improvement in optogenetic activation; cellular resolution at ~2.2 mm depth [48] | Neural circuit mapping in awake behaving mice |
| Probe Design | Unimolecular CyB probe combining BODIPY and hemicyanine dyes | Simultaneous monitoring of pH, viscosity, and lipid droplet dynamics [51] | Disease model characterization (atherosclerosis, diabetes) |
| System Integration | 3D-PAULM combining PAT and ULM | Simultaneous molecular and vascular imaging at ~7 mm depth through skull [48] | Comprehensive brain function and connectivity studies |
| Beam Conditioning | Confocal pinhole integration | Optimized balance between resolution and signal-to-noise ratio [50] | Improved image sharpness in scattering specimens |
Integrated Multimodal Imaging Platforms
The combination of two-photon microscopy with complementary imaging modalities has created powerful platforms for comprehensive tissue analysis:
3D Photoacoustic and Ultrasound Localization Microscopy (3D-PAULM): This integrated system enables simultaneous photoacoustic imaging of molecular probes and super-resolution ultrasound localization microscopy of brain vasculature at depths up to 7 mm through intact scalp and skull [48]. When applied to Blvra−/− mice, this approach provides superior molecular imaging in various deep tissues, including brain, liver, spleen, and breast tumors expressing bacterial phytochrome-based probes [48].
Hybrid Optical Systems: Modern implementations often incorporate both one-photon and two-photon excitation paths, widefield and confocal detection capabilities, and complementary techniques like fluorescence lifetime imaging (FLIM) to extract maximal information from each specimen while leveraging the depth penetration of two-photon excitation.
Practical Implementation for Whole Mount Imaging
Experimental Considerations for Deep-Tissue Imaging
Successful application of two-photon microscopy to whole mount specimens requires careful attention to multiple technical factors:
Specimen Preparation and Clearing: For fixed whole mount tissues, optical clearing techniques using refractive index-matched solutions (e.g., Scale, CUBIC, iDISCO) significantly improve penetration depth and signal strength by reducing light scattering.
Objective Lens Selection: High-numerical-aperture (NA > 1.0) water immersion objectives are essential for deep imaging, as they minimize spherical aberration at the tissue-water interface and maximize light collection efficiency.
Excitation Wavelength Optimization: While standard two-photon systems use Ti:Sapphire lasers (680-1080 nm), optical parametric oscillators (OPOs) extend the wavelength range further into the infrared (up to 1600 nm) for enhanced penetration in highly scattering tissues.
The Scientist's Toolkit: Essential Research Reagents
Table 3: Key Research Reagents for Advanced Two-Photon Imaging
| Reagent Category | Specific Examples | Function and Application | Key Characteristics |
|---|---|---|---|
| Genetically Encoded Calcium Indicators (GECIs) | GCaMP6/7/8 series, jGCaMP7 | Monitoring neural activity in behaving animals [49] | High signal-to-noise ratio, multiple affinity variants |
| Near-Infrared Fluorescent Proteins | miRFP720, iRFP670/iRFP720 | Deep-tissue imaging and optogenetics [48] | Bacterial phytochrome-derived, biliverdin-dependent |
| Small Molecule Probes | CyB probe [51] | Simultaneous pH, viscosity, and lipid droplet imaging | Ratiometric, multi-parameter, two-photon optimized |
| Optogenetic Actuators | iLight system [48] | Near-infrared light-controlled gene transcription | Biliverdin-dependent, minimal background activation |
| Viral Delivery Systems | Adeno-associated viruses (AAVserotypes) | Efficient gene delivery in whole mount tissues [49] | Cell-type specific promoters, high transduction efficiency |
Diagram 2: Whole Mount Sample Processing
Applications in Neuroscience and Disease Models
The unique capabilities of two-photon microscopy have made it particularly valuable for investigating dynamic processes in intact neural circuits and disease models:
Neural Activity Monitoring in Behaving Animals
Two-photon microscopy enables the recording of neural activity with subcellular resolution in awake, behaving mice, providing critical insights into how neural circuits process information and generate behavior [49]. Standard systems can simultaneously image hundreds of neurons in a 300 × 300 μm field of view at frame rates up to 40 Hz, sufficient to resolve calcium transients associated with individual action potentials [49]. When combined with head-fixation systems and behavioral paradigms, researchers can establish precise links between sensory stimuli, neural activity patterns, and motor outputs.
Structural and Functional Plasticity Studies
The high spatial resolution of two-photon microscopy enables chronic imaging of dendritic spines and other subcellular structures over days to weeks, revealing how neural circuits change with experience:
Structural Plasticity: Studies have shown that during initial learning phases, approximately one-third of new dendritic spines appear in clusters, with most clusters consisting of adjacent spine pairs [49]. This clustering phenomenon suggests that repeated activation during learning induces localized structural changes that may optimize information storage.
Functional Plasticity: Simultaneous imaging with glutamate sensors (iGluSnFR3) and calcium indicators (RCaMP2) has revealed that apical dendrites form task-related functional clusters through high synaptic activity during motor learning [49]. This spatial organization of synaptic activation patterns potentially optimizes signal integration efficiency during learning.
Pathological Process Characterization
The multi-parameter imaging capability of advanced two-photon systems enables comprehensive characterization of disease processes:
Atherosclerosis: The CyB probe enables simultaneous monitoring of lipid droplet accumulation, cellular acidification, and increased viscosity in foam cells [51], providing a comprehensive view of disease progression.
Tumor Microenvironment: Simultaneous tracking of pH and viscosity changes helps distinguish tumor cells from normal tissue, as decreased acidity and increased viscosity represent crucial distinguishing features in many cancer types [51].
Emerging Trends and Technologies
The field of deep-tissue two-photon imaging continues to evolve rapidly, with several promising directions emerging:
Deeper Penetration Imaging: The combination of longer wavelength excitation (1300-1700 nm) with three-photon microscopy is pushing imaging depths beyond 1 mm in scattering tissues like the brain, potentially enabling visualization of structures previously accessible only with invasive procedures.
High-Speed Volumetric Imaging: Acousto-optic deflectors and light-sheet two-photon microscopy approaches are dramatically increasing volumetric imaging rates, enabling functional recording from thousands of neurons simultaneously at near-cellular resolution.
Multimodal Integration: The combination of two-photon microscopy with complementary techniques like photoacoustic tomography and ultrasound localization microscopy provides comprehensive structural, functional, and molecular information across spatial scales [48].
Two-photon microscopy has revolutionized deep-tissue imaging in whole mount specimens by providing unprecedented access to dynamic biological processes in their native three-dimensional context. Ongoing advancements in laser technology, probe development, and imaging methodologies continue to expand the capabilities and applications of this powerful technology. For researchers investigating complex biological systems in intact tissues, two-photon microscopy remains an indispensable tool that bridges the critical gap between cellular resolution and tissue-scale relevance, particularly within the framework of whole mount immunofluorescence studies. The continued integration of two-photon microscopy with complementary imaging modalities and computational analysis approaches promises to further enhance our ability to visualize and understand biological complexity in health and disease.
Whole-mount immunofluorescence staining research represents a frontier in biomedical science, enabling the examination of biological structures in their intact, three-dimensional context. This approach provides unparalleled insights into spatial biology, organogenesis, and disease mechanisms within physiologically relevant environments [52]. However, the complexity of 3D datasets generated by advanced microscopy techniques necessitates equally sophisticated computational pipelines for segmentation and quantification. These pipelines transform raw volumetric images into quantifiable biological insights, allowing researchers to extract meaningful data on cellular and tissue-scale organization.
The transition from 2D to 3D analysis presents significant computational challenges, including managing large data volumes, correcting optical artifacts, and accurately identifying structures in three dimensions [16]. This technical guide examines current methodologies for 3D segmentation and quantification, with a focus on pipelines that maintain biological relevance while addressing the computational demands of whole-mount imaging data.
Core Computational Pipeline Architecture
A robust computational pipeline for 3D segmentation and quantification typically integrates multiple sequential modules, each addressing specific processing steps from raw image data to biological insight. The architecture must be flexible enough to handle diverse sample types while maintaining computational efficiency.
Integrated Experimental-Computational Workflow
The following diagram illustrates a generalized computational pipeline for 3D segmentation and quantification, integrating elements from multiple established methodologies:
Segmentation Methodologies and Applications
Different biological structures and research questions require specialized segmentation approaches. The table below summarizes methodologies validated for specific applications in 3D whole-mount imaging:
Table 1: Segmentation Methodologies for Different Biological Structures
| Biological Structure | Segmentation Method | Key Algorithm | Application Context | Reference |
|---|---|---|---|---|
| Cell Nuclei in Gastruloids | Automated 3D segmentation | Tapenade (Python package) | Organoid development, gene expression patterns | [16] |
| Blood Vessels in Heart Tissue | Deep-learning regression | U-net with regression loss | Vascular morphometrics without vessel labeling | [53] |
| Peripheral Nerves in Bone | Machine learning classification | Ilastik open-source software | Skeletal nerve patterning in homeostatic and injury conditions | [54] |
| Cell Membranes in Live Tissue | Human-in-the-loop deep learning | Cellpose with manual correction | 3D cell shape analysis in Drosophila wing disc | [55] |
| Cell Nuclei in Liver Cancer | U-net architecture | Deep learning-based segmentation | Feature extraction for cancer classification | [56] |
Detailed Experimental Protocols
Pipeline for Multi-layered Organoid Analysis
The Tapenade pipeline provides a comprehensive framework for analyzing complex organoid systems, particularly gastruloids ranging from 100-500 μm in diameter [16].
Sample Preparation and Imaging:
- Implement whole-mount immunostaining followed by optical clearing with 80% glycerol, which demonstrates superior performance with 3-fold and 8-fold reduction in intensity decay at 100 μm and 200 μm depth respectively compared to PBS mounting
- Utilize two-photon microscopy for deep imaging, with sequential opposite-view multi-channel acquisition
- Mount samples between two glass coverslips using spacers matching gastruloid size (typically 250-500 μm) to prevent compression
Computational Processing:
- Spectral Unmixing: Remove signal cross-talk between fluorescent channels
- Dual-view Registration and Fusion: Reconstruct in toto images from opposing views
- 3D Nuclei Segmentation: Identify individual cells across the entire volume
- Signal Normalization: Correct for intensity variations across depth and channels
- Multi-scale Analysis: Extract data from cellular to tissue-level scales
The pipeline is distributed as a user-friendly Python package with napari plugins for interactive data exploration [16].
Digital Labeling for Vasculature Segmentation
This approach enables blood vessel segmentation without specific vascular labeling, using only autofluorescence signals and a nuclei stain [53].
Sample Preparation:
- Perform one-step optical clearing using LIMPID (Lipid-preserving Index Matching for Prolonged Imaging Depth)
- Stain with DAPI nuclei staining for 48 hours
- Image using confocal microscopy with sequential channel acquisition
Deep Learning Implementation:
- Network Architecture: U-net with regression loss instead of segmentation loss
- Training Strategy: Separate networks for large vessels (>14 μm) and small vessels (<14 μm)
- Data Augmentation: On-the-fly transformations including random rotation, vertical flipping, and brightness adjustment
- Performance: Achieves clDice score of 0.80 in validation data
This method eliminates the need for transgenic animals, antibody labeling, or dye perfusion while providing accurate vascular morphometrics such as vessel length density and orientation [53].
Ilastik-Based Nerve Segmentation in Bone
This workflow addresses the challenge of segmenting filamentous peripheral nerves (∼4 μm diameter) in dense bony tissues [54].
Imaging Protocol:
- Implement whole-mount immunostaining combined with tissue clearing
- Acquire high-resolution 3D images using lightsheet microscopy (LSM)
- Process multiple skeletal contexts (calvaria, metatarsals, knees) with varied processing protocols
Segmentation Workflow:
- Train Ilastik classifier on a subset of manually annotated data
- Apply classifier to entire 3D volume for automated segmentation
- Handle low signal-to-noise ratio inherent in nerve imaging
- Maintain effectiveness under inflammatory conditions with enhanced background
This approach enables characterization of spatial nerve patterning in bone homeostasis, injury, and disease while reducing subjective manual tracing [54].
Quantitative Performance Metrics
The evaluation of segmentation and quantification pipelines requires multiple performance metrics to assess accuracy, precision, and biological relevance.
Table 2: Quantitative Performance Metrics of Segmentation Methods
| Method | Sample Type | Key Metric | Performance Value | Biological Application |
|---|---|---|---|---|
| Tapenade Pipeline | Gastruloids | Cell detection depth | Reliable detection up to 200 μm depth | Gene expression pattern analysis in organoid development |
| Digital Labeling (Vessels) | Heart Tissue | clDice score | 0.80 | Vascular morphometrics without specific labeling |
| Ilastik Nerve Segmentation | Bone | Comparison to manual tracing | Reduced processing time with maintained accuracy | Nerve patterning in skeletal contexts |
| Human-in-the-loop Cellpose | Drosophila wing disc | 3D segmentation accuracy | Improved with iterative training | 3D cell shape analysis in live tissue |
| E-CUT Virtual Staining | Liver Cancer | Classification accuracy | 98.00% with StepFF method | Cancerous vs. non-cancerous cell classification |
Successful implementation of 3D segmentation and quantification pipelines requires both wet-lab reagents and computational resources.
Table 3: Essential Resources for 3D Segmentation and Quantification
| Resource Category | Specific Tool/Reagent | Function/Purpose | Application Example |
|---|---|---|---|
| Mounting Media | 80% glycerol | Refractive index matching for deep imaging | Reduces intensity decay in gastruloid imaging [16] |
| Clearing Protocols | LIMPID (Lipid-preserving Index Matching) | Fast, non-toxic sample clearing | Enables 3D histology with minimal processing [53] |
| Segmentation Software | Ilastik open-source software | Machine learning-based segmentation | Nerve segmentation in bone with low SNR [54] |
| Deep Learning Tools | Cellpose with custom training | Instance segmentation for cellular structures | 3D cell segmentation in live Drosophila tissue [55] |
| Visualization Platforms | Napari with plugins | Interactive 3D data exploration | Joint data processing across scales [16] |
| Computational Framework | Tapenade (Python package) | End-to-end processing pipeline | Analysis of multi-layered organoids across scales [16] |
Advanced Methodologies: Deep Learning and Virtual Staining
Explainable Deep Learning for Virtual Staining
The E-CUT (Explainable Contrastive Unpaired Translation) framework enables virtual H&E staining of label-free photoacoustic histology (PAH) images [56]:
Network Architecture:
- Based on patch-wise contrastive learning with saliency loss and integrated gradients
- Preserves morphological aspects of cell nucleus and cytoplasm
- Provides explainability by highlighting histologically significant morphologies
Integrated Analysis Pipeline:
- Virtual staining of label-free PAH images to H&E-like appearance
- U-net based segmentation for feature extraction (cell area, cell count, inter-cellular distance)
- Stepwise feature fusion (StepFF) classification combining deep feature vectors from PAH, VHE, and segmented images
- Achieves 98.00% classification accuracy for hepatocellular carcinoma
This interconnected deep learning framework demonstrates how virtual staining can expand the utility of label-free imaging modalities while maintaining diagnostic relevance [56].
Human-in-the-Loop Segmentation for Live Tissue
For challenging segmentation tasks in live tissue, a human-in-the-loop approach combines AI-assisted prediction with minimal expert input [55]:
Protocol Workflow:
- Obtain initial segmentation with Cellpose using pre-trained 'cyto3' model
- Manually correct segmentation on each 2D slice
- Use TrackMate to correct 3D stitching issues automatically
- Re-train the model with corrected ground truth dataset
- Repeat with newly trained model for each image
This iterative approach addresses the fundamental challenge in deep learning segmentation: the dependence on training data similarity to the target dataset. By incorporating minimal manual correction, the pipeline achieves accurate 3D instance segmentation in complex tissues like the Drosophila wing disc, where cells have highly heterogeneous 3D shapes [55].
Future Directions and Implementation Considerations
The evolution of 3D segmentation and quantification pipelines continues to address challenges in whole-mount immunofluorescence research. Key developments include improved deep learning architectures with better explainability, enhanced handling of large datasets through lazy loading approaches, and more accessible interfaces for researchers without computational backgrounds.
Successful implementation requires careful consideration of sample preparation optimizations, such as the demonstrated superiority of glycerol-based clearing [16], combined with appropriate computational methods matched to specific biological questions. As these pipelines become more sophisticated and accessible, they promise to unlock deeper insights into 3D biological systems across fundamental research and drug development applications.
Solving Common WM-IF Challenges: Antibody Validation and Image Quality
The Role of Controls in Whole Mount Immunofluorescence Staining
Whole mount immunofluorescence (IF) staining is a powerful technique that allows researchers to examine protein localization and tissue architecture in three dimensions within intact biological specimens, such as lymph nodes, organoids, and entire organs [57] [58]. This approach preserves the spatial context of cells and their interactions, which is often lost in traditional thin-sectioned samples. However, the complexity of these specimens and the multi-step staining process introduce numerous potential pitfalls that can compromise data integrity. Within this context, implementing robust negative controls, primarily the omission of the primary antibody and knockout validation, becomes paramount. These controls are foundational for distinguishing specific signal from non-specific background and ensuring that experimental conclusions are accurate and reproducible [59] [60].
The Critical Importance of Negative Controls
Undertaking any immunofluorescence experiment without appropriate negative controls is akin to interpreting a result without a baseline. The absence of controls makes it impossible to verify that the observed fluorescence originates from the specific binding of the primary antibody to its target antigen. Non-specific staining can arise from various sources, including cross-reactivity of the secondary antibody, hydrophobic or ionic interactions between antibodies and tissue components, or autofluorescence [60].
The international scientific community has recognized the critical role of antibody validation in addressing the reproducibility crisis in biomedical research. The International Working Group for Antibody Validation has established five pillars for validating antibody specificity, with genetic strategies, such as knockout validation, being the first and most direct [59]. Furthermore, the use of isotype controls is recommended to confirm that staining is not due to nonspecific binding by the primary antibody's immunoglobulin class [60].
In the specific context of whole mount staining, where tissue penetration of antibodies can be uneven and background autofluorescence may be more pronounced, these controls are even more critical. They provide the necessary benchmarks to confidently interpret complex 3D data sets.
Omitting the Primary Antibody
Concept and Purpose
The "No Primary Antibody" control is a fundamental negative control where the primary antibody is deliberately left out of the staining procedure. The sample is processed identically to the experimental sample, including incubation with the secondary antibody and all subsequent detection steps [60].
The primary purpose of this control is to identify staining generated by the detection system itself. This includes signal from non-specific binding of the secondary antibody to the tissue or cells, as well as fluorescence from endogenous proteins like enzymes (e.g., alkaline phosphatase) that might interact with the detection reagents [60]. A clean no-primary control, showing no staining, indicates that the signal in the experimental sample is dependent on the presence of the primary antibody.
Detailed Protocol
The following workflow outlines the steps for performing a whole mount immunofluorescence experiment with an integrated "No Primary" control.
Interpretation and Troubleshooting
A successful "No Primary" control will show an absence of the specific fluorescent signal. Any staining observed in this control under the same imaging settings as the experimental sample is considered background and must be subtracted from the experimental result.
If the control shows high background, consider the following troubleshooting steps:
- Secondary Antibody Specificity: Re-centrifuge the secondary antibody to remove aggregates, or try a different lot or supplier. Ensure the antibody is highly cross-adsorbed against immunoglobulins from other species to minimize cross-reactivity [60].
- Incomplete Blocking: Optimize the blocking step by trying different blocking agents (e.g., BSA, serum, or commercial blocking buffers) and increasing the blocking time, especially for thicker whole mount samples [57].
- Autofluorescence: Check for inherent tissue autofluorescence by imaging an unstained sample. If present, it can often be reduced with treatments like Sudan Black B or TrueBlack Lipofuscin Autofluorescence Quencher.
It is crucial to note that while the "No Primary" control is necessary, it is not sufficient on its own. As Dr. Craig Pow from Vector Laboratories emphasizes, "It doesn’t really address whether or not the primary antibody is contributing to any of the staining," as it cannot detect non-specific binding caused by the primary antibody itself [60]. Therefore, it should be used in conjunction with other controls.
Knockout Validation as the Gold Standard
Concept and Purpose
Knockout (KO) validation is widely regarded as the gold standard for confirming antibody specificity [59]. This method involves comparing the staining pattern of an antibody in a wild-type (WT) sample, which expresses the target protein, to that in a genetically modified sample where the gene encoding the target protein has been disrupted (knocked out). The most common modern technique for generating knockouts is the CRISPR-Cas9 system, which uses a guide RNA (gRNA) to direct the Cas9 nuclease to create a double-strand break in the target gene, leading to insertions or deletions (indels) that disrupt the protein's expression [61] [59].
The power of this control lies in its direct genetic link. A specific signal present in the WT sample that is absent in the KO sample provides strong evidence that the antibody is binding to its intended target. This control simultaneously validates the antibody's specificity and the experimental result.
Detailed Protocol for CRISPR-Cas9 KO Validation
The following workflow details the steps for validating an antibody using a CRISPR-Cas9-generated knockout cell line or tissue.
Key Considerations:
- gRNA Design: Multi-guide RNA approaches, using several gRNAs targeting different exons of the same gene, can significantly increase the efficiency of achieving complete knockout, as described in protocols for editing human colonic organoids [61].
- Validation of the Knockout: Before proceeding with IF, the knockout must be validated at the molecular level. This is typically done by Western blot analysis of cell extracts from wild-type and putative knockout cells. The ideal result shows a single band at the expected molecular weight in the WT lane that is absent in the KO lane [59].
- Parallel Processing: For the immunofluorescence validation, the WT and KO samples must be fixed, permeabilized, stained, and imaged in parallel using identical protocols and reagent batches to ensure a fair comparison [59].
Interpretation and Scenarios
The table below outlines the possible outcomes when comparing Western blots of wild-type and knockout samples and their interpretation.
Table: Interpreting Knockout Validation by Western Blot
| Scenario | Wild-Type (WT) Banding Pattern | Knockout (KO) Banding Pattern | Interpretation |
|---|---|---|---|
| A. Ideal & Specific | A single band at the expected molecular weight. | Absence of the specific target band. | Antibody is highly specific for the target protein. [59] |
| B. Specific with Cross-reactivity | The target band plus other non-specific bands. | Absence of the target band, but non-specific bands remain. | Antibody is specific for the target but also binds unrelated proteins. May be usable with careful interpretation. [59] |
| C. Non-specific | A band at the expected molecular weight. | The target band is still present, though potentially weaker. | Antibody may be binding to a homologue; not specific for the target. [59] |
For whole mount IF, the principle is the same: the specific fluorescent signal should be present in the WT architecture and absent in the KO specimen when imaged under identical conditions.
Additional Controls and Best Practices
To build a comprehensive case for antibody specificity, researchers should employ a suite of controls:
- Isotype Control: This involves using a non-immune immunoglobulin of the same species and isotype (e.g., mouse IgG2a) as the primary antibody, at the same concentration. If staining is observed with this control, it indicates non-specific binding of the immunoglobulins to the tissue. An irrelevant antibody that should not be present in the tissue can also be used for this purpose [60].
- Biological Positive Control: Using a tissue or cell line known to express the protein of interest confirms that the entire staining protocol is working correctly. This is particularly useful for troubleshooting when the experimental sample shows absent staining [60].
- Knockdown Controls: For essential genes where a knockout is lethal, a knockdown using siRNA or shRNA can be a viable alternative, though it is typically less complete than a genetic knockout [59].
Consistency in sample preparation is also critical for reproducible whole mount staining. Inconsistent staining can often be traced to issues with antigen retrieval, improper fixation times, incomplete paraffin removal (for embedded samples), or uneven application of reagents [60].
The Scientist's Toolkit: Key Reagents for Controlled Experiments
Table: Essential Research Reagents for Whole Mount Immunofluorescence and Validation
| Reagent / Solution | Function | Example Components / Notes |
|---|---|---|
| Fixation Buffer | Preserves tissue architecture and immobilizes antigens. | 4% Paraformaldehyde (PFA) in PBS. Bouin's solution is used for histology but is poor for IF due to autofluorescence. [58] |
| Permeabilization Solution | Creates pores in cell membranes to allow antibody penetration. | Triton X-100, Saponin. [61] |
| Blocking Buffer | Reduces non-specific binding of antibodies to the tissue. | Bovine Serum Albumin (BSA), goat serum, or proprietary commercial blockers. [61] [57] |
| Primary Antibody | Binds specifically to the target protein (antigen). | Must be validated for application and species. Knockout validation is the gold standard. [59] |
| Secondary Antibody | Binds to the primary antibody and is conjugated to a fluorophore. | Highly cross-adsorbed antibodies are preferred to minimize cross-reactivity. [57] |
| CRISPR-Cas9 System | Generates knockout cells/tissues for validation. | Cas9 nuclease and sequence-specific guide RNA (gRNA). Multi-guide RNA increases knockout efficiency. [61] [59] |
| Mounting Medium | Preserves the sample and allows for high-resolution microscopy. | May contain antifading agents to reduce photobleaching. |
In the complex three-dimensional world of whole mount immunofluorescence, robust negative controls are not optional but essential. The "No Primary Antibody" control and knockout validation serve distinct yet complementary purposes: the former detects artifacts of the detection system, while the latter provides definitive proof of the primary antibody's specificity. By integrating these controls into a rigorous experimental workflow that may also include isotype and positive controls, researchers can generate reliable, interpretable, and reproducible data. This disciplined approach is fundamental to advancing our understanding of biological systems in their native spatial context and for building a solid foundation for drug development and diagnostic applications.
Combating Autofluorescence in Tissues Like Lung and Brain
Whole-mount immunofluorescence staining provides a powerful approach for analyzing the three-dimensional architecture of tissues and organs, enabling researchers to visualize biological processes within their native spatial context. However, a significant technical challenge in this technique is tissue autofluorescence (AF)—the natural emission of light by biological structures upon excitation. This phenomenon is particularly pronounced in tissues such as lung and brain, which contain abundant endogenous fluorophores like lipofuscin, elastin, and collagen [15]. This autofluorescence can obscure specific antibody-derived signals, compromising data quality and interpretation.
The imperative to combat autofluorescence is a critical aspect of methodological rigor in whole-mount imaging. For researchers working with complex 3D tissue models, such as organoids or thick tissue sections, the problem is amplified. Light scattering and the increased presence of autofluorescent compounds at greater imaging depths can render specific signals indistinguishable from background noise [16] [62]. This technical guide details proven strategies to identify, characterize, and suppress autofluorescence, thereby enhancing the signal-to-noise ratio and the reliability of whole-mount immunofluorescence studies.
Understanding and Characterizing Autofluorescence
Autofluorescence originates from intrinsic biomolecules. Key contributors include lipofuscin (an age-related pigment prevalent in neurons and cardiac tissue), collagen and elastin (structural components of extracellular matrix), and nicotinamide adenine dinucleotide (NADH) [63] [15]. The spectral profile of autofluorescence is often broad, spanning multiple wavelengths, but it is particularly strong in the green spectrum (around 488 nm) [64] [15].
A critical first step in any study is to characterize the autofluorescence of the specific tissue type under investigation. This involves preparing a negative control sample—a tissue section that undergoes the entire staining protocol except for incubation with the primary antibodies [65] [15]. Imaging this control under the same settings as experimental samples will reveal the inherent autofluorescent signature, which can then be discounted during analysis or used to inform the choice of the most effective quenching strategy.
Methods to Combat Autofluorescence
Photobleaching and Chemical Quenching
Photobleaching and chemical quenching are two primary methods for reducing autofluorescence. The following table summarizes the key characteristics of major quenching agents.
Table 1: Characteristics of Autofluorescence Quenching Agents
| Quenching Agent | Mechanism of Action | Target Tissues/Conditions | Key Considerations |
|---|---|---|---|
| TrueBlack [62] | Binds to lipofuscin | Brain, myocardial tissue | May reduce overall imaging depth; effective for lipofuscin-rich tissues. |
| Sudan Black B [62] | Binds to lipofuscin | Brain, myocardial tissue | Similar to TrueBlack; can limit imaging depth in cleared tissues. |
| TrueVIEW [62] | Not specified | Myocardial tissue | Shows potential for improved SNR without compromising depth. |
| Glycine [62] | Not specified | Myocardial tissue | Compatible with cleared tissues; potential for improved SNR and depth. |
| Trypan Blue [62] | Not specified | Myocardial tissue | Does not significantly impact SNR; can be considered for use. |
| Sodium Borohydride [15] | Reduces aldehyde groups | General tissue AF from PFA fixation | Used to reduce fluorescence caused by PFA crosslinking. |
A. White Light Photobleaching
A straightforward and cost-effective method involves exposing the stained tissue samples to high-intensity white LED light prior to imaging. This simple pre-treatment can achieve a near-total reduction of lipofuscin autofluorescence without adversely affecting the integrity of the tissue or the specific fluorescent signal from antibodies [63]. This approach is scalable and has proven effective even in highly autofluorescent tissues, such as Alzheimer's disease brain samples [63].
B. Chemical Quenching
Chemical quenchers work by binding to or reacting with autofluorescent compounds. The choice of quencher is highly tissue-dependent.
- For brain tissue, which is rich in lipofuscin, TrueBlack and Sudan Black B are commonly used [64] [62].
- For myocardial tissues, studies on cleared tissue suggest that TrueVIEW and Glycine may offer a better balance between improving the signal-to-noise ratio (SNR) and preserving imaging depth [62].
It is critical to validate the chosen quencher with your specific tissue and antibodies, as some agents can diminish the target immunofluorescence signal or impair antibody penetration in whole-mount samples.
Tissue Clearing and Advanced Imaging
For whole-mount studies, tissue clearing is often indispensable. Clearing reduces light scattering by matching the refractive index (RI) throughout the tissue, which allows for deeper imaging and can also mitigate some autofluorescence.
- Clearing Agents: The CUBIC (Clear, Unobstructed Brain/Body Imaging Cocktails and Computational analysis) protocol is one effective method. For gastruloid imaging, an 80% glycerol mounting medium provided a 3-fold to 8-fold reduction in signal intensity decay at depths of 100-200 µm compared to PBS, significantly improving image quality and cell detection at depth [16].
- Imaging Modalities: Choosing the right microscope is crucial. Multiphoton microscopy is superior for imaging thick, densely packed samples like whole-mount organoids because it uses longer-wavelength light for deeper penetration with minimal photodamage and reduced out-of-focus background fluorescence [16]. In contrast, laser scanning confocal microscopy can suffer from strong intensity gradients and signal degradation in such samples [16].
Table 2: Quantitative Comparison of Autofluorescence Reduction Techniques
| Technique | Reported Efficacy | Typical Application | Impact on Specific Signal |
|---|---|---|---|
| White Light Photobleaching [63] | Near-total reduction of lipofuscin AF | Human brain, DRG neurons | No adverse impact measured |
| CUBIC Clearing (80% Glycerol) [16] | 3-fold/8-fold less intensity decay at 100µm/200µm | Whole-mount organoids | Improves signal detection at depth |
| TrueVIEW Quencher [62] | Improved SNR trends in myocardial tissue | Cleared heart tissue | No significant negative impact reported |
| Glycine Quencher [62] | Improved SNR trends in myocardial tissue | Cleared heart tissue | No significant negative impact reported |
Figure 1: A workflow diagram for selecting and applying autofluorescence reduction strategies in whole-mount immunofluorescence.
Tissue-Specific Experimental Protocols
Protocol for Brain Tissue
Brain tissue presents a significant challenge due to high levels of lipofuscin and the potential for increased autofluorescence after tissue-damaging procedures like laser interstitial thermal therapy (LITT) [64].
- Tissue Preparation: Generate thin sections (5-10 µm) from frozen or FFPE brain tissue [64] [15].
- Quenching: After deparaffinization (if using FFPE) and rehydration, incubate sections with a lipofuscin-targeted quenching agent such as TrueBlack or Sudan Black B [64] [62].
- Staining: Proceed with standard immunofluorescence protocols. A typical blocking solution contains 4% BSA and 1% Triton X-100 in PBS [65]. Use primary and secondary antibodies diluted in this blocking solution.
- Photobleaching (Optional): For additional reduction, expose the stained and mounted slides to high-intensity white LED light [63].
- Imaging: For whole-mount brain samples or thick sections, implement tissue clearing (e.g., CUBIC) and image using a multiphoton microscope [16] [62].
Protocol for Lung and Myocardial Tissues
These tissues are rich in elastic fibers and blood components (heme), which are highly autofluorescent [62]. An immersion-based labeling and clearing approach is effective.
- Fixation and Sectioning: Fix tissue in 4% paraformaldehyde (PFA) and prepare 300 µm sections [62].
- Quenching: Test quenchers like TrueVIEW or Glycine, which have shown promise for myocardial tissue without significantly compromising imaging depth [62].
- Immunostaining and Clearing:
- Perform whole-mount immunostaining by incubating the thick sections with primary and secondary antibodies diluted in a blocking solution with a high concentration of detergent (e.g., 1% Triton X-100) to facilitate antibody penetration [65].
- Clear the stained tissue using the CUBIC protocol. An incubation of 24 hours in CUBIC Reagent-I has been shown to provide optimal SNR [62].
- Mounting and Imaging: Mount the cleared tissue in 80% glycerol [16]. Use confocal or multiphoton microscopy to image the samples. This protocol has successfully visualized microvascular networks at depths of up to 150 µm in myocardial tissue [62].
Figure 2: Tissue-specific experimental protocols for combating autofluorescence in brain versus lung and myocardial tissues.
The Scientist's Toolkit: Research Reagent Solutions
Table 3: Essential Reagents for Autofluorescence Management
| Reagent / Material | Function | Example Use Case |
|---|---|---|
| TrueBlack Lipofuscin Autofluorescence Quencher [62] | Chemically quenches lipofuscin fluorescence. | Suppressing AF in human brain sections and aged neuronal tissues. |
| Sudan Black B [62] | Chemical quencher for lipofuscin. | An alternative cost-effective quencher for brain tissue. |
| CUBIC Reagent-I [62] | A tissue-clearing reagent that delipidates and decolorizes. | Clearing whole-mount myocardial and lung tissues for deep imaging. |
| High-Intensity White LED Lamp [63] | Photobleaches autofluorescent pigments prior to imaging. | Simple, scalable AF reduction for a wide range of tissues. |
| Triton X-100 Detergent [65] | A non-ionic surfactant used in blocking and antibody buffers. | Permeabilizing tissues for whole-mount antibody penetration. |
| Glycerol (80%) Mounting Medium [16] | A refractive index matching mounting medium. | Aqueous-based clearing for whole-mount organoids and tissues. |
Autofluorescence is a formidable but surmountable obstacle in whole-mount immunofluorescence. A methodical approach that includes characterizing the background signal, strategically applying photobleaching or chemical quenching, and employing tissue clearing coupled with advanced microscopy is essential for success. The protocols and tools outlined herein provide a robust foundation for researchers to obtain high-quality, publication-ready data from notoriously difficult tissues like lung and brain. By systematically implementing these strategies, scientists can enhance the clarity and reliability of their imaging studies, ultimately driving more confident conclusions in complex biological research.
Optimizing Permeabilization and Blocking to Reduce Background
Whole mount immunofluorescence (WMIF) staining represents a significant advancement in biomedical research, enabling the comprehensive three-dimensional analysis of intact tissues, organoids, and biological structures. Unlike traditional sectioning methods that disrupt spatial context, WMIF preserves the native architecture of samples, providing unprecedented insights into cellular relationships, tissue organization, and molecular distributions within their natural microenvironment. This technique has become particularly valuable in developmental biology, neuroscience, and drug development, where understanding cellular interactions in three dimensions is critical for elucidating complex biological processes. However, the transition from sectioned to whole mount tissues introduces substantial technical challenges, with background fluorescence emerging as a primary obstacle that can compromise data quality and interpretation. Effective optimization of permeabilization and blocking steps is therefore essential for generating reliable, publication-quality data in whole mount immunofluorescence research.
The persistence of high background in WMIF stems from multiple factors inherent to thick tissue samples. Non-specific antibody binding, cellular autofluorescence, and inadequate reagent penetration collectively contribute to noisy images that obscure specific signal. Furthermore, the dense extracellular matrix and intact cellular membranes in whole mount specimens create formidable barriers that require optimized conditions for antibody access while simultaneously controlling for non-specific interactions. This technical guide provides evidence-based strategies to overcome these challenges, leveraging current methodologies and quantitative approaches to enhance signal-to-noise ratios in whole mount immunofluorescence applications.
Background interference in WMIF can be categorized into several distinct types, each requiring specific intervention strategies. Non-specific antibody binding occurs when antibodies interact with non-target epitopes through hydrophobic, ionic, or other molecular interactions. This phenomenon is particularly problematic in whole mount samples due to the increased surface area and complexity of antigens presented in three-dimensional space. Additionally, tissue autofluorescence from endogenous fluorophores such as lipofuscin, collagen, and NADPH becomes more pronounced in thick samples where light scattering and absorption are increased.
The retention of charged molecules within tissues represents another significant source of background. Modern fluorescent dyes like Alexa Fluor or CF dyes often carry multiple negative charges to improve solubility and brightness. However, these charges can promote non-specific binding to cellular components, particularly in fixed tissues where electrostatic interactions are enhanced. Conventional blocking agents like BSA are ineffective against this charge-based background, necessitating specialized approaches [66].
Insufficient permeabilization leaves lipid membranes partially intact, creating barriers that limit antibody penetration while simultaneously trapping cellular components that contribute to background. Conversely, excessive permeabilization can damage tissue morphology and expose additional non-specific binding sites. Finding the optimal balance is therefore critical for successful WMIF experiments.
Permeabilization Optimization Strategies
Permeabilization is a critical determinant of success in WMIF, influencing both antibody penetration and background levels. The goal is to create sufficient pores in cellular membranes to allow antibody access without compromising structural integrity.
Permeabilization Agent Selection
Different permeabilization agents operate through distinct mechanisms and are suited to particular applications:
Detergents remain the most widely used permeabilization agents. Triton X-100 (0.1-0.5%) effectively dissolves lipid membranes and is suitable for most applications, though its relatively slow action can require extended incubation times (6-24 hours) for larger tissues [67]. Saponin (0.05-0.1%) offers milder, reversible permeabilization that preferentially extracts cholesterol from membranes, making it ideal for preserving antigenicity of membrane-associated proteins but often requiring inclusion in all staining solutions. Digitonin provides similar cholesterol-specific extraction with potentially cleaner results for certain tissue types.
Organic solvents like methanol accomplishes both fixation and permeabilization through lipid extraction and protein precipitation. While effective for many targets, it can destroy some epitopes and increase autofluorescence in certain tissues.
Optimizing Permeabilization Parameters
Beyond agent selection, precise optimization of concentration, duration, and temperature is essential:
Table 1: Permeabilization Optimization Parameters for Whole Mount Tissues
| Parameter | Optimization Range | Impact on Staining | Considerations |
|---|---|---|---|
| Concentration | 0.1-1% for Triton X-100 | Higher concentrations increase penetration but may damage morphology | Titrate from lowest effective concentration; 0.3% often optimal |
| Duration | 6-48 hours | Longer times improve penetration depth | Monitor tissue integrity beyond 24 hours |
| Temperature | 4°C (slow, preserved morphology) to RT (faster) | Higher temperatures accelerate process | 4°C recommended for delicate tissues >1mm |
| Agitation | Constant gentle rotation | Improves reagent distribution | Essential for samples >500μm |
The optimal permeabilization strategy must be empirically determined for each tissue type and target combination. Pilot experiments comparing multiple conditions using a well-characterized antibody are invaluable for establishing laboratory-specific protocols. For tissues exceeding 1mm in thickness, consider combination approaches using mild detergents with extended incubation times, or sequential treatment with different agents to balance penetration and preservation.
Advanced Blocking Techniques
Effective blocking is arguably the most critical step for reducing background in WMIF. The three-dimensional nature of whole mount samples demands more rigorous blocking strategies than those used for thin sections or cells.
Blocking Agent Composition
An optimized blocking solution should address multiple potential sources of non-specific binding:
Protein-based blockers (1-5% BSA, 2-10% normal serum, or 1-5% gelatin) occupy hydrophobic and charge-based binding sites. Serum from the same species as secondary antibodies should be avoided to prevent cross-reactivity. For complex tissues, combination approaches using 2-5% BSA with 2-5% normal serum often provide superior blocking compared to single agents.
Specialized commercial blockers like TrueBlack IF Background Suppressor contain proprietary components specifically designed to block non-specific binding from both proteins and charged fluorescent dyes, which conventional blockers like BSA cannot effectively address [66]. These systems are particularly valuable when using modern high-quantum-yield fluorophores that carry multiple charges.
Chemical blockers including sodium azide (0.02-0.05%) prevent enzymatic activity that might generate background, while glycine (0.1-0.3M) can quench aldehyde groups from fixation.
Blocking Protocol Optimization
Table 2: Blocking Solution Formulations for Whole Mount Staining
| Component | Standard Block | High-Sensitivity Block | Charged Dye Block | Function |
|---|---|---|---|---|
| BSA | 2-3% | 5% | - | Blocks hydrophobic sites |
| Normal Serum | 2-3% (host matches 2° Ab) | 5% (host matches 2° Ab) | - | Provides species-specific immunoglobulin |
| Triton X-100 | 0.1-0.3% | 0.3% | 0.1-0.3% | Maintains permeabilization during blocking |
| TrueBlack Suppressor | - | - | 1X | Blocks charge-based dye interactions |
| Sodium Azide | 0.02% | 0.02% | 0.02% | Prevents microbial growth & enzyme activity |
| Incubation Time | 2-4 hours, RT | 6-12 hours, 4°C | 2-4 hours, RT | Varies by tissue size |
Blocking efficiency increases with extended incubation times, particularly for thicker tissues. While standard protocols often recommend 1-2 hours, whole mount samples frequently benefit from overnight blocking at 4°C to ensure complete penetration of blocking agents throughout the tissue. For tissues exceeding 1mm in thickness, consider refreshing the blocking solution after 6-8 hours to maintain concentration gradients that drive penetration.
Temperature also significantly impacts blocking efficiency. Room temperature incubations generally provide faster kinetics, while 4°C incubations may yield cleaner background suppression for challenging targets, albeit with longer required durations.
Integrated Workflows: From Sample Preparation to Imaging
Successful WMIF requires careful coordination of all steps from sample preparation through imaging. The following workflow diagram illustrates the optimized integrated process:
Sample Preparation and Fixation Considerations
Proper sample preparation establishes the foundation for successful WMIF. Tissue size should be limited to <1mm thickness when possible, as thicker samples require exponentially longer processing times and present greater challenges for uniform reagent penetration. Fixation with 4% paraformaldehyde (2-24 hours at 4°C depending on tissue size) effectively preserves morphology while maintaining antigenicity. Over-fixation should be avoided as it can mask epitopes and increase autofluorescence.
Following fixation, thorough washing (3×15 minutes with PBS) removes residual fixative that might contribute to background. For delicate tissues, gradual transition to permeabilization buffer through stepped concentrations of detergent can better preserve morphology.
Antibody Incubation and Washing
Antibody penetration represents perhaps the most significant challenge in WMIF. Primary antibody incubations typically require 24-72 hours at 4°C with constant gentle agitation. Antibodies should be diluted in blocking buffer or specialized diluents rather than plain PBS to maintain background suppression during extended incubations.
Washing efficiency critically impacts background levels. For whole mount samples, washes should be extensive (typically 3-6 changes over 6-24 hours total) with sufficient volume (至少 10× sample volume) and contain low concentrations of detergent (0.1-0.2% Triton X-100) to facilitate removal of unbound antibodies from deep within the tissue.
Tissue Clearing and Imaging
Tissue clearing enhances imaging depth and quality by reducing light scattering in whole mount samples. Multiple clearing methods are available, with BABB (benzyl alcohol:benzyl benzoate) and ScaleS-based methods among the most widely used. A modified protocol, ScaleH, which adds polyvinyl alcohol to ScaleS, has demonstrated superior fluorescence preservation with 32% less decay over time while maintaining optical clarity [9]. Clearing method compatibility with specific fluorophores must be verified during experimental optimization.
Image acquisition parameters should be optimized for quantitative analysis. Laser power and detector gain must be set within the linear range of the system, and saturation must be avoided to ensure accurate intensity measurements [68]. For thick tissues, Z-stack imaging with appropriate optical sections enables three-dimensional reconstruction and analysis.
The Scientist's Toolkit: Essential Reagents and Materials
Table 3: Research Reagent Solutions for Whole Mount Immunofluorescence
| Reagent/Material | Function | Application Notes |
|---|---|---|
| TrueBlack IF Background Suppressor | Blocks non-specific antibody binding and charged dye interactions | Particularly effective for modern charged fluorophores (Alexa Fluor 647, Cy5.5) [66] |
| Triton X-100 | Non-ionic detergent for membrane permeabilization | Standard concentration 0.1-0.5%; higher concentrations for challenging tissues |
| Saponin | Cholesterol-specific detergent for gentle permeabilization | Must be included in all antibody solutions as effect is reversible |
| BABB (Benzyl Alcohol:Benzyl Benzoate) | Organic clearing agent for enhanced light penetration | Rapid clearing (minutes); may quench some fluorophores over time [67] |
| ScaleS/ScaleH | Aqueous-based clearing methods | ScaleH provides 32% better fluorescence retention vs. original ScaleS [9] |
| DAPI | Nuclear counterstain | Penetrates whole mount tissues effectively; use 1:1000-1:5000 dilution |
| Alexa Fluor Conjugates | High-quantum-yield secondary antibodies | Modern dyes may require specialized blocking for charge-based background |
Quantitative Assessment of Background Reduction
Robust quantitative methods are essential for objectively evaluating optimization efforts. Mean fluorescence intensity (MFI) measurements in regions lacking specific staining provide the most direct assessment of background levels. These measurements should be performed on unmanipulated raw images acquired with identical settings across compared conditions.
Signal-to-background ratios (SBR) calculate the ratio of MFI in positive regions to MFI in background regions, with values >3 generally considered acceptable for qualitative work and >5 required for reliable quantification. Signal-to-noise ratios (SNR) incorporate measurement precision and are more appropriate for quantitative comparisons.
Automated image analysis pipelines like TDAExplore, which leverages topology-based machine learning, can provide sophisticated quantification of image features while also assessing how closely images resemble training data and identifying specific differences [69]. Such approaches move beyond simple intensity measurements to provide more comprehensive image characterization.
For consistent quantification, establish standardized background regions for each experiment, such as areas known to lack the target antigen or external to the tissue entirely. These reference measurements enable normalization across samples and experimental sessions.
Optimizing permeabilization and blocking represents a foundational requirement for successful whole mount immunofluorescence staining. The integrated approaches presented here—combining empirically determined permeabilization parameters, advanced blocking strategies, and rigorous washing protocols—provide a roadmap for significantly reducing background while maintaining specific signal in three-dimensional tissues. As WMIF continues to enable new discoveries in complex biological systems, these methodological refinements will prove increasingly valuable for researchers seeking to extract maximum information from intact tissue samples. The quantitative framework presented here offers objective criteria for assessing optimization success, ensuring that methodological improvements translate to enhanced scientific insight in whole mount immunofluorescence research.
The expansion of whole mount immunofluorescence (WM-IF) staining into non-model organism research presents significant challenges in antibody selection and validation. This technical guide examines cross-reactivity risks and mitigation strategies essential for obtaining reliable, reproducible data in three-dimensional biological systems. We provide a comprehensive framework for antibody evaluation, including quantitative validation metrics, experimental protocols for specificity testing, and reagent solutions optimized for non-model species. Within the context of WM-IF research, proper antibody validation becomes particularly critical due to the technical complexities of staining intact three-dimensional specimens and the limited availability of species-specific reagents. Researchers must navigate epitope conservation, antibody specificity, and staining optimization simultaneously to successfully visualize biological structures in non-model organisms.
Whole mount immunofluorescence (WM-IF) staining enables three-dimensional visualization of protein localization and expression patterns in intact tissues, organoids, and small organisms, providing significant advantages over traditional sectioning methods [33] [16]. However, when applied to non-model organisms—species beyond conventional laboratory models such as human, mouse, and rat—researchers face substantial antibody cross-reactivity challenges that can compromise data interpretation.
The fundamental issue stems from most commercially available antibodies being developed and validated for conserved epitopes in model organisms [70]. Non-model organisms often express protein variants with sequence divergence that can prevent antibody binding, even when targeting orthologous proteins. Conversely, antibodies may demonstrate unexpected cross-reactivity with non-target proteins sharing similar epitopes, generating false positive signals. These challenges are compounded in WM-IF research, where the entire specimen is stained and imaged in three dimensions, making traditional validation approaches insufficient.
Research involving non-model organisms has expanded rapidly over the past decade as scientists explore biological diversity, novel molecular pathways, and unique physiological systems [70]. This shift presents an important analytical challenge requiring specialized antibody selection strategies to ensure data reproducibility, detection sensitivity, and assay compatibility in non-traditional species.
Antibody Selection Fundamentals
Antibody Types and Their Applications
Table 1: Comparison of Antibody Types for Non-Model Organism Research
| Antibody Type | Epitope Recognition | Advantages | Limitations | Recommended Applications |
|---|---|---|---|---|
| Polyclonal | Multiple epitopes on the same antigen | Higher sensitivity for low-abundance targets; more tolerant to minor epitope variations | Batch-to-batch variability; higher cross-reactivity risk | Initial screening when target conservation is unknown; detecting denatured proteins |
| Monoclonal | Single, specific epitope | High specificity; minimal batch-to-batch variation | May fail if single epitope is not conserved; generally more expensive | Well-conserved targets; multiplexing experiments; long-term projects |
| Recombinant | Defined epitope(s) with known sequence | Superior reproducibility; minimal batch variation; engineering capability | Limited availability for non-standard targets; higher initial cost | Critical applications requiring maximum reproducibility; long-term studies |
Polyclonal antibodies consist of a heterogeneous mixture of antibodies, with each antibody recognizing different epitopes of a particular antigen [71]. This multi-epitope targeting can produce strong signal amplification, which is beneficial when analyzing low-abundance targets or proteins with potential sequence divergence in non-model organisms. However, this broad reactivity profile also increases the risk of non-specific binding and cross-reactivity with off-target proteins.
Monoclonal antibodies recognize a single epitope per antigen, providing high specificity for their target with low non-specific cross-reactivity and minimal batch-to-batch variations [71]. While this specificity is advantageous for well-conserved targets, monoclonal antibodies can completely fail to bind if their single target epitope has diverged in non-model organisms.
Recombinant antibodies, produced in vitro using synthetic genes, represent the gold standard for reproducibility with minimal batch-to-batch variation [71]. The known and defined antibody-encoding sequence enables engineering for specific applications, making them ideal for non-model organism research despite potentially higher initial costs and limited availability for non-standard targets.
Critical Antibody Selection Criteria
When selecting antibodies for non-model organisms, several criteria require careful consideration:
Species Reactivity: Primary antibodies will recognize a protein only from certain species, typically the species that the immunizing antigen was derived from as well as closely related species [72]. An antibody should be chosen that has been validated as working in specific species, which is always indicated on the product datasheet. If a species is not listed, particularly for a non-model organism, an antibody may still work if the epitope sequence is sufficiently conserved between species.
Application Compatibility: Not all antibodies work with all applications due to differences in sample processing between techniques [72]. For WM-IF, which involves fixed but not denatured samples, antibodies validated for immunohistochemistry (IHC) are generally more suitable than those validated only for western blotting, which requires denatured samples.
Immunogen Alignment: The immunogen used defines which region of the protein the antibody binds [71] [72]. If the immunogen sequence is publicly available, researchers should verify that the immunogen is identical to or contained within the region of the protein they are trying to detect in their non-model organism. For example, if detecting a cell surface protein on live cells by WM-IF, choose an antibody raised against the protein's extracellular domain.
Host Species Considerations: For indirect detection methods, primary antibodies should ideally be raised in a species different from the sample to avoid cross-reactivity of secondary antibodies with endogenous immunoglobulins [71]. When multiplexing, primary antibodies must be raised in different host species to prevent cross-reactivity between secondary antibodies.
Figure 1: Antibody Selection Decision Framework for Non-Model Organisms. This workflow outlines the key decision points when selecting antibodies for non-model species, emphasizing sequence conservation analysis and validation planning.
Quantitative Assessment of Cross-Reactivity Risks
Validation Metrics and Performance Criteria
Table 2: Cross-Reactivity Risk Assessment and Validation Metrics
| Risk Factor | Low Risk Indicators | High Risk Indicators | Validation Approach | Acceptance Criteria |
|---|---|---|---|---|
| Sequence Conservation | >85% immunogen sequence identity with target protein | <70% immunogen sequence identity | Sequence alignment using tools like CLUSTALW | Strong alignment across epitope region |
| Antibody Specificity | Knock-out validation data available | No specificity testing documented | Western blot showing single band; KO validation | No signal in KO controls; single band at expected MW |
| Species Validation | Validated in phylogenetically related species | No validation in related species | Tissue staining with known expression patterns | Staining pattern matches expected expression |
| Staining Homogeneity | Uniform signal throughout 3D structure | Signal gradient from surface to core | Quantitative analysis of signal penetration in 3D samples | >80% signal homogeneity throughout depth |
Sequence conservation represents the most significant risk factor for cross-reactivity in non-model organisms. An alignment score of over 85% between the immunogen sequence and the target protein in the non-model organism indicates that the antibody may bind to your protein, though this doesn't guarantee performance [71]. For scores below 70%, the risk of failed detection increases substantially, necessitating either custom antibody development or alternative validation methods.
Knock-out (KO) validation remains one of the most trusted validation processes for antibody specificity [71]. This robust technique confirms the antibody's specificity by testing it in a KO cell line, cell lysate, or tissue that does not express the target protein. A specific antibody should produce no signal in the KO sample but give a specific signal in the wild-type control. While challenging to implement for non-model organisms, the principle can be adapted using gene knockdown approaches or tissues with naturally absent expression.
In WM-IF research, staining homogeneity presents an additional validation metric particularly relevant for three-dimensional samples. Studies evaluating immunostaining protocols for large three-dimensional specimens have quantified staining efficiency based on signal intensity achieved by the staining procedure and the correlation of the signal intensity with that of a homogeneously dispersed fluorescent dye [73]. Optimal staining protocols should achieve >80% signal homogeneity throughout the sample depth.
Experimental Design for Specificity Testing
Proper experimental design must incorporate multiple controls to verify antibody specificity in non-model organisms:
- Negative Controls: Include samples where the primary antibody is omitted or replaced with an isotype control to identify non-specific binding of secondary antibodies [71] [73].
- Absorption Controls: Pre-incubate the antibody with its immunizing peptide (if available) to compete for binding sites; this should significantly reduce or eliminate staining.
- Tissue Specificity Controls: Test the antibody on tissues known to express and not express the target protein based on independent evidence (e.g., transcriptomic data).
- Orthogonal Validation: Confirm findings using alternative methods such as in situ hybridization or functional assays when possible.
For WM-IF specifically, researchers should include additional controls for staining penetration efficiency in three-dimensional samples. One established method involves comparing the antibody signal distribution with that of a homogeneous nuclear stain or a small molecular weight dye that penetrates tissues readily [73].
Custom vs. Catalog Antibodies: A Strategic Decision
Decision Framework
When working with non-model organisms, researchers must often choose between catalog antibodies (commercially available) and custom antibodies (developed specifically for their needs). This decision has significant implications for project timelines, budgets, and data quality.
Catalog antibodies offer convenience and lower upfront costs but typically provide limited organism specificity information [70]. They are most appropriate when:
- The target protein is highly conserved across evolution
- The antibody datasheet indicates reactivity with related species
- Initial testing demonstrates specific staining patterns
- Budget or time constraints preclude custom development
Custom antibodies provide higher antigen specificity, flexible design, and organism-adapted targeting at the expense of longer development timelines (typically 3-6 months) and higher initial investment [70]. They become necessary when:
- The target protein has low sequence conservation
- Catalog antibodies fail validation tests
- The research requires detection of organism-specific isoforms
- The project involves long-term studies requiring consistent reagent supply
Table 3: Economic and Practical Considerations: Custom vs. Catalog Antibodies
| Consideration | Catalog Antibodies | Custom Antibodies |
|---|---|---|
| Initial Cost | $200-$800 | $5,000-$20,000+ |
| Development Time | Immediate availability | 3-6 months |
| Specificity | Limited to available epitopes | Designed for target organism |
| Reproducibility | Variable (especially for polyclonals) | High (defined sequence) |
| Long-term Supply | Subject to discontinuation | Secured through cell banks |
| Optimization | Fixed specifications | Tailored to application needs |
| Best Use Cases | Preliminary studies; highly conserved targets | Long-term projects; low-conservation targets |
Epitope Selection Strategy for Custom Antibodies
When commissioning custom antibodies for non-model organisms, epitope selection becomes critical. The following strategies maximize the likelihood of success:
- Conserved Region Targeting: Identify regions of the protein with highest evolutionary conservation using multiple sequence alignment tools.
- Surface Accessibility: Prioritize epitopes with high surface accessibility predictions, particularly for WM-IF applications where the protein is in its native conformation.
- Unique Sequence Avoidance: Avoid regions with significant homology to other proteins in the organism to minimize cross-reactivity.
- Domain-Focused Design: Target functionally important domains when the research question involves specific protein functions.
For non-model organisms with limited genomic information, alternative approaches include using heterologous immunization with the full-length protein from the closest related species with available sequence data, or employing proteomic-based epitope mapping when possible.
Integrated Experimental Protocols
Protocol for Cross-Reactivity Testing in Non-Model Organisms
This protocol adapts established immunohistochemistry validation methods for non-model species:
Sample Preparation
- Collect target tissues from the non-model organism using appropriate ethical guidelines
- Divide samples for fixation (for WM-IF) and protein extraction (for western blot)
- For WM-IF, fix samples in 4% paraformaldehyde for 15 minutes at room temperature [73]
Sequence Analysis
- Obtain immunogen sequence from antibody datasheet or manufacturer
- Perform protein sequence alignment using CLUSTALW or similar tool
- Calculate percentage identity across the epitope region
Initial Specificity Screening via Western Blot
- Prepare protein extracts from target tissues
- Separate proteins via SDS-PAGE and transfer to membrane
- Probe with candidate antibody at manufacturer's recommended concentration
- Assess for single band at expected molecular weight
Whole Mount Immunofluorescence Staining
- Permeabilize fixed samples with 0.3% Triton X-100 for 15 minutes [73]
- Block with 0.1% BSA, 0.2% Triton X-100, 0.05% Tween-20, and 10% appropriate serum for 1 hour
- Incubate with primary antibody diluted in blocking solution overnight at 37°C with shaking [73]
- Wash with PBS-Tx (PBS with 0.5% Triton X-100) [74]
- Incubate with fluorophore-conjugated secondary antibody for 4 hours or overnight at 37°C
- Counterstain nuclei with DAPI (1 μg/ml) and mount with suitable mounting medium
Specificity Verification
- Perform absorption controls by pre-incubating antibody with immunizing peptide
- Conduct tissue controls using tissues with known expression patterns
- Include secondary antibody-only controls
Image Acquisition and Analysis
Protocol for Staining Penetration Assessment in 3D Samples
Evaluating antibody penetration in whole mount samples requires specialized approaches:
Sample Processing
- Prepare uniform spheroids or tissue samples of known size
- Apply immunostaining protocols with test antibodies
- Co-stain with homogeneous reference dye (e.g., DAPI or small molecular weight dye)
Image Acquisition
- Acquire z-stack images through entire sample thickness
- Use consistent imaging parameters across samples
- For large samples (>100μm), utilize two-photon microscopy [16]
Penetration Quantification
- Measure signal intensity from surface to core for both antibody and reference dye
- Calculate penetration efficiency as antibody signal correlation with reference dye
- Generate intensity profiles using histogram analysis of whole-section panoramic images [22]
Data Interpretation
- Compare antibody penetration pattern with reference dye distribution
- Calculate staining homogeneity index (signal variance throughout depth)
- Establish minimum acceptable penetration threshold for data inclusion
Figure 2: Comprehensive Antibody Validation Workflow for Whole Mount Immunofluorescence. This detailed workflow outlines the sequential steps required to thoroughly validate antibodies for use in non-model organism research, emphasizing three-dimensional staining assessment.
The Scientist's Toolkit: Research Reagent Solutions
Table 4: Essential Reagents for Whole Mount Immunofluorescence in Non-Model Organisms
| Reagent Category | Specific Examples | Function | Non-Model Organism Considerations |
|---|---|---|---|
| Primary Antibodies | Custom recombinant monoclonals; Cross-reactive catalog antibodies | Target protein recognition | Prioritize antibodies with known cross-reactivity; verify immunogen alignment |
| Secondary Antibodies | Species-specific Fab fragments; Cross-adsorbed conjugates | Signal amplification | Use against host species of primary antibody; cross-adsorbed to minimize non-specific binding |
| Permeabilization Agents | Triton X-100; Tween-20; Saponin | Membrane disruption for antibody access | Concentration must be optimized for each tissue type; affects antibody penetration |
| Blocking Reagents | Fish skin gelatin; BSA; Species-specific serum | Reduce non-specific antibody binding | Use serum from secondary antibody host species; concentration affects signal-to-noise |
| Mounting Media | VectaShield; Fluoromount; ProLong Gold | Preserve fluorescence and enable imaging | Refractive index matching crucial for 3D imaging; anti-fade agents preserve signal |
| Clearing Agents | Glycerol; Murray's clear (BABB); TDE | Reduce light scattering in thick samples | Compatibility with fluorophores varies; some affect epitope integrity |
Discussion and Future Directions
Antibody selection for non-model organisms within whole mount immunofluorescence research requires methodical validation approaches that address both specificity concerns and the unique challenges of three-dimensional staining. The expansion of non-model organism research necessitates improved antibody validation standards and sharing of validation data within scientific communities.
Future developments in this field will likely include increased availability of recombinant antibodies with defined epitopes, improved computational tools for predicting cross-reactivity, and standardized validation protocols for non-model species. Additionally, methods such as DNA-barcoded antibody imaging mass cytometry may provide alternative approaches for multiplexed protein detection in non-model organisms without requiring species-specific antibodies.
The growing emphasis on non-model organism research reflects an important shift in biological inquiry toward understanding diverse biological solutions across the tree of life. By implementing rigorous antibody validation frameworks specifically designed for non-model species and WM-IF applications, researchers can generate reliable, reproducible data that advances our understanding of biological diversity while minimizing misleading results from antibody cross-reactivity.
Clearing Techniques and Mounting Media for Enhanced Image Clarity
Whole-mount immunofluorescence (WM-IF) staining is a powerful technique for evaluating the three-dimensional architecture of intact biological specimens, including organoids, thick tissue sections, and small organs [75] [33]. Unlike traditional methods that require physical sectioning, WM-IF preserves the intact spatial relationships and structural context of the sample, providing a more comprehensive view of biological systems [76]. However, a significant challenge in imaging these large, thick specimens is their inherent opacity, which hinders light penetration and limits the depth from which high-quality, in-focus signals can be collected [77] [76]. This opacity primarily arises from light scattering due to refractive index (RI) mismatches between various cellular components, such as lipids, proteins, and the aqueous cytosol [76] [78]. To overcome this barrier and achieve enhanced image clarity, researchers employ a combination of tissue clearing techniques and specialized mounting media, which work synergistically to render samples transparent and preserve fluorescence signals during microscopy.
The Fundamental Principle: Refractive Index Homogenization
The core principle behind achieving image clarity in thick samples is refractive index homogenization. Biological tissues are opaque because they comprise a mix of components with different refractive indices. Light passing through these heterogenous components is scattered, preventing clear imaging [76]. The refractive index (RI) is a measure of how much light bends, or slows down, as it passes through a substance. In a typical cell, proteins and lipids have a high RI (~1.45-1.47), while the cytosol has an RI closer to water (1.33) [76]. This mismatch causes light to scatter.
Tissue clearing methods aim to equalize the RI throughout the sample so that light can pass through the entire structure undisturbed, making it transparent [77] [76]. The general process involves treating the sample with a series of chemical solutions that remove or alter light-scattering components like lipids and then immerse it in a solution with a uniform, high RI [78]. The following diagram illustrates this core principle and the subsequent workflow for processing a sample.
The various tissue clearing techniques developed over the past decade can be grouped into a few major families based on their underlying chemistry, each with distinct advantages and limitations [77] [76]. Selecting the optimal method depends on factors such as sample type and size, the need for lipid preservation, compatibility with immunostaining or fluorescent proteins, and protocol duration [76] [78].
Organic Solvent-Based Methods
These methods involve dehydrating the sample, extracting lipids with organic solvents, and immersing it in a high-refractive-index solution [76]. They are among the fastest clearing protocols and are generally robust for clearing large samples [77] [76].
- Mechanism: Dehydration followed by lipid removal and RI matching [76].
- Key Characteristics: Results in significant sample shrinkage, quenches most fluorescent proteins, and uses toxic solvents that can damage microscope objectives [77] [76].
- Example Protocols: iDISCO/, uDISCO, and vDISCO, which have been used to clear entire adult mouse brains and even whole adult mice [76].
- RI: ~1.56 [76].
- Best For: Very large samples like whole organs where speed is critical and lipid staining is not required [77].
Aqueous-Based and Hyperhydrating Methods
These water-based methods use high concentrations of sugars, urea, or glycerol to homogenize the refractive index [77] [78]. They are less hazardous than solvent-based methods and better preserve fluorescent proteins and lipids [76].
- Mechanism: Immersion in hyperhydrating solutions that can also remove lipids (e.g., with detergents and urea) [77] [78].
- Key Characteristics: Simpler and safer protocols, but clearing can be slow for large samples. Some methods cause sample expansion [77] [76].
- Example Protocols:
- CUBIC: Effective for samples up to 1-2 mm, compatible with immunostaining, but causes tissue expansion [76].
- SeeDB2: Uses fructose-based solutions to achieve an RI of 1.48; ideal for superresolution imaging at depths over 100 μm [77] [78].
- ScaleS: A newer version of the Scale method that avoids tissue expansion and preserves lipids [77].
- RI Range: 1.38 - 1.52 [77] [76].
- Best For: Smaller samples like organoids and tissue slabs, and when preserving fluorescent protein signal or lipid staining is important [77].
Hydrogel Embedding Methods
These methods stabilize the sample's proteins by cross-linking them to an acrylamide hydrogel scaffold before removing lipids [76]. This approach excellently preserves native tissue structure and biomolecules [76].
- Mechanism: Hydrogel formation within the sample, followed by lipid extraction (often using electrophoresis or passive clearing) and RI matching [76].
- Key Characteristics: Best structural and biomolecular preservation, but protocols are technically more difficult and can be slow [77] [76].
- Example Protocols: CLARITY, PACT/PARS, and SHIELD. Some variants require custom electrophoresis equipment to accelerate the process [77] [76].
- RI: ~1.45 [76].
- Best For: Applications requiring maximal preservation of protein antigens and nucleic acids, such as multiplexed staining and in situ hybridization [76].
Table 1: Comparison of Major Tissue Clearing Method Families
| Method Type | Example Protocols | Compatible with Immunostaining? | Preserves Fluorescent Proteins? | Protocol Duration | Tissue Morphology | Ideal Sample Size | Refractive Index (RI) |
|---|---|---|---|---|---|---|---|
| Organic Solvent | iDISCO+, uDISCO [76] | Yes [76] | No (or limited) [76] | Hours to Days [76] | Shrinkage [76] | Adult mouse brain, whole adult mouse [76] | ~1.56 [76] |
| Aqueous / Hyperhydrating | CUBIC, SeeDB2, ScaleS [77] [76] | Yes [76] | Yes [76] | Days [76] | Expansion or Preserved [76] | Organoids, tissue slabs up to 1-2 mm [77] [76] | 1.38 - 1.52 [77] [76] |
| Hydrogel Embedding | CLARITY, PACT, SHIELD [76] | Yes [76] | Yes [76] | Days to Weeks [76] | Preserved (minor expansion) [76] | Whole mouse brain, up to 5 mm [76] | ~1.45 [76] |
Detailed Experimental Protocols
Whole-Mount Immunofluorescence Staining for Organoids
This protocol is adapted from established methods for staining prostate and intestinal organoids [75] [79]. The entire process, from fixation to mounting, typically requires 3-4 days.
Collection and Fixation:
- Carefully collect organoids from culture plates, using enzymes like dispase to digest the surrounding extracellular matrix (e.g., Matrigel) while preserving 3D structure [75].
- Pellet organoids by gentle centrifugation (e.g., 800 x g for 3 min) and fix with 4% paraformaldehyde (PFA) in PBS for 30 minutes to 2 hours at room temperature with gentle shaking [75] [79].
- Wash the fixed organoids with PBS 3 times for 15 minutes each to remove residual PFA [75] [79].
Permeabilization and Blocking:
- Permeabilize and block organoids by incubating in a blocking buffer (e.g., 5% serum from the secondary antibody host species + 0.1-0.5% Triton X-100 in PBS) for 2-4 hours at room temperature or overnight at 4°C [75] [79]. This step is critical for antibody penetration and reducing non-specific binding.
Antibody Incubations:
- Primary Antibody: Incubate organoids with primary antibodies diluted in blocking buffer overnight at 4°C with gentle shaking [75] [79].
- Washing: Pellet organoids and wash with PBS 3 times for 15 minutes each to remove unbound primary antibody [75].
- Secondary Antibody: Incubate with fluorescently-labeled secondary antibodies (and optional counterstains like phalloidin) diluted in blocking buffer overnight at 4°C in the dark with gentle shaking [75] [79].
- Washing: Repeat the PBS wash steps 3 times to remove unbound secondary antibody [75] [79].
- Nuclear Staining: A common step is to incubate with DAPI (e.g., 1-5 µg/mL) for 15-20 minutes at room temperature, followed by final PBS washes [75] [79].
Tissue Clearing and Mounting
Following staining, organoids are cleared and mounted. The sucrose gradient method below is an example of an aqueous-based clearing technique [75].
Tissue Clearing with a Sucrose Gradient:
- Gradually transfer the stained organoid pellet through a series of sucrose solutions in PBS with 1% Triton X-100 (e.g., 30%, 45%, 60%), incubating for 2 hours at room temperature with gentle shaking at each step [75]. This series equilibrates the sample's RI to a higher, more uniform level.
- After the final 60% sucrose incubation, pellet the organoids and remove most of the supernatant, leaving the organoids in a concentrated sucrose solution [75].
Mounting for Microscopy:
- Transfer a 10-20 µL droplet of the organoid suspension to a chambered coverslip or a standard slide [75].
- To prevent crushing the organoids, use small coverslip fragments as spacers on either side of the droplet before carefully placing the main coverslip on top [75].
- Seal the coverslip edges with nail polish to prevent the sample from drying out, especially when using non-hardening mounting media [80].
Mounting Media for Image Preservation and Clarity
Mounting media are essential for protecting the sample, enhancing optical clarity, and most importantly, preventing photobleaching—the irreversible loss of fluorescence signal due to exposure to excitation light [81] [82]. Antifade reagents in these media work by scavenging free radicals generated when fluorophores interact with oxygen [81].
Types of Mounting Media
- Aqueous Mounting Media: These are soft-setting (non-curing) media containing buffered glycerol. They are useful when slides need to be imaged immediately and can be washed off if the sample needs to be re-stained or used for downstream applications [81].
- Hard-Setting Mounting Media: These media contain a polymer that permanently affixes the coverslip to the slide after curing, providing excellent long-term storage stability [81] [82].
- Antifade Mounting Media: Specifically formulated with reagents to minimize photobleaching. They are available in both hardening and non-hardening formulations and are critical for preserving signal intensity during imaging and storage [81] [82].
Selecting the Optimal Mounting Medium
The choice of mounting medium depends on several factors, including the need for immediate versus long-term imaging, sample thickness, and the fluorophores used.
Table 2: Guide to Selecting Commercial Antifade Mounting Media
| Product Name | Setting Type | Imaging Type | Curing Time | Recommended Sample Thickness | Refractive Index (RI) | Key Features |
|---|---|---|---|---|---|---|
| ProLong Glass [81] | Hard-Setting | Long-term storage | 18-60 hours | Up to 150 µm | 1.51 | High RI, ideal for thick samples and super-resolution. |
| ProLong Diamond [81] | Hard-Setting | Long-term storage | 24 hours | Up to 80 µm | 1.47 | Broad compatibility with dyes and fluorescent proteins. |
| VECTASHIELD Vibrance [82] | Hard-Setting | Long-term storage | Not specified | Not specified | Not specified | Hardening formula with superior anti-fade protection. |
| VECTASHIELD PLUS [82] | Non-Hardening | Immediate to short-term | N/A | Not specified | Not specified | Non-hardening, ready for immediate imaging. |
| SlowFade Glass [81] | Non-Hardening | Immediate imaging | N/A | Up to 500 µm | 1.52 | For immediate imaging of very thick samples. |
| SlowFade Diamond [81] | Non-Hardening | Immediate imaging | N/A | Up to 15 µm | 1.42 | For immediate imaging of standard-thickness samples. |
A Note on DAPI in Mounting Media
Many commercial mounting media are available with DAPI included for convenience. However, some expert resources caution against this practice, as unbound DAPI in the media can contribute to background fluorescence and reduce image contrast [80]. For the highest quality images, it is recommended to stain the sample with DAPI separately, wash away the excess, and then mount in a fluorophore-free, antifade medium [80].
The Scientist's Toolkit: Essential Reagents for Whole-Mount Imaging
Table 3: Key Research Reagent Solutions for Whole-Mount Immunofluorescence
| Reagent Category | Specific Examples | Function in the Protocol |
|---|---|---|
| Fixatives | 4% Paraformaldehyde (PFA) [75] [79] | Preserves cellular architecture and cross-links proteins to maintain the 3D structure of the sample. |
| Permeabilization Agents | Triton X-100 [75] [79] | Creates pores in lipid membranes to allow antibodies to access intracellular targets. |
| Blocking Agents | Normal Serum (e.g., Horse, Goat), BSA [79] | Reduces non-specific binding of antibodies to the sample, minimizing background fluorescence. |
| Staining Reagents | Primary Antibodies, Secondary Antibodies (e.g., Alexa Fluor conjugates) [75], DAPI [75] [79], Phalloidin [82] | Primary antibodies bind specific antigens; fluorescent secondary antibodies enable detection. DAPI stains nuclei, and phalloidin stains F-actin. |
| Clearing Reagents | Sucrose [75], Urea [77], 2,2'-Thiodiethanol (TDE) [78] | Homogenizes the refractive index of the sample to render it transparent. The choice depends on the clearing method. |
| Antifade Mounting Media | ProLong series [81], SlowFade series [81], VECTASHIELD series [82] | Preserves fluorescence, prevents photobleaching, and provides a medium with a suitable refractive index for high-resolution microscopy. |
The combination of effective tissue clearing and optimized mounting is indispensable for achieving high-resolution, three-dimensional imaging in whole-mount immunofluorescence research. By understanding the principles of refractive index matching and carefully selecting methods and reagents from the toolkit based on the specific experimental needs—such as sample size, the need for immunostaining, and desired imaging depth—researchers can dramatically enhance image clarity and data quality. As these techniques continue to evolve and become more accessible, they will undoubtedly play an increasingly vital role in advancing our understanding of complex biological systems in fields ranging from developmental biology to drug discovery.
Ensuring Specificity and Exploring Innovative Computational Alternatives
Validating Antibody Specificity with Knockout/Knockdown Controls
Whole-mount immunofluorescence (IF) enables three-dimensional profiling of protein expression within intact tissues, preserving structural context that is lost in sectioned specimens [83] [84]. This technique reveals anatomical structures and immune cell types in their native spatial relationships, providing superior physiological context for research and drug development. However, the reliability of any whole-mount IF experiment depends entirely on antibody specificity. Without rigorous validation, antibodies may produce misleading results due to non-specific binding or cross-reactivity with unrelated proteins [85] [59].
The crisis of reproducibility in biomedical research has been significantly linked to poorly validated antibodies, with more than 70% of researchers struggling to reproduce experiments conducted by other scientists [86]. For whole-mount IF studies, where complex three-dimensional data informs biological conclusions, antibody validation becomes even more critical. The International Working Group for Antibody Validation (IWGAV) has established five pillars of antibody validation, with genetic approaches (knockout/knockdown) considered the gold standard for demonstrating specificity [59] [86].
The Scientific Basis of Knockout/Knockdown Validation
Principles and Importance
Knockout (KO) and knockdown (KD) validation methods test antibody performance against genetically modified samples where the target protein expression has been eliminated or reduced [85] [59]. This approach provides a direct link between gene, protein, and antibody, creating an unambiguous readout for specificity assessment.
In a properly validated experiment, the antibody should show:
- Strong signal in wild-type (control) samples expressing the target protein
- Absent or significantly diminished signal in knockout/knockdown samples lacking the target protein
- No non-specific binding to unrelated proteins that could generate false positives
The fundamental strength of this method lies in its ability to distinguish true target recognition from non-specific binding events. When a signal disappears in genetically modified cells or tissues, it provides compelling evidence that the antibody is specifically recognizing its intended target [59].
Genetic Engineering Approaches
CRISPR-Cas9 for Genetic Knockouts
The CRISPR-Cas9 system has become the preferred method for creating genetic knockouts due to its flexibility, efficiency, and specificity [85] [59]. This system employs a noncoding single guide RNA (sgRNA) to direct the Cas9 endonuclease to a specific genomic location, where it creates a double-strand break in the DNA. The cell's repair mechanisms then introduce insertions or deletions (indels) that often result in frameshift mutations and premature stop codons, effectively ablating target protein expression [59].
CRISPR-Cas9 offers several advantages for validation:
- Precision: Can be directed to any gene by simply altering the gRNA sequence
- Efficiency: Higher success rates compared to older technologies like TALENs or homologous recombination
- Multiplexing capability: Can simultaneously knockout multiple genes to test antibody specificity across related proteins or pathway components [85]
- Broad applicability: Can be implemented in various cell lines and model organisms
Table: Comparison of Genetic Modification Methods for Antibody Validation
| Method | Mechanism | Efficiency | Advantages | Limitations |
|---|---|---|---|---|
| CRISPR-Cas9 | Creates double-strand breaks repaired with indels | High | High specificity, multiplexing capability | Potential off-target effects |
| RNAi (siRNA/shRNA) | Degrades or blocks translation of mRNA | Variable | Rapid implementation, tunable knockdown | Incomplete protein removal, off-target effects |
| TALENs | Creates double-strand breaks at specific sequences | Moderate | High specificity | More difficult to design and implement |
| Homologous Recombination | Replaces target gene with selection marker | Low in mammalian cells | Complete gene removal | Technically challenging, time-consuming |
RNA Interference for Knockdown Strategies
RNA interference (RNAi) technology utilizes a cell's natural machinery to reduce gene expression. In this approach, short pieces of double-stranded RNA (siRNA) or short hairpin RNA (shRNA) vectors are introduced into cells, where they initiate the degradation of complementary mRNA sequences [85]. This results in reduced translation and lower target protein levels.
While RNAi is widely used for antibody validation, it has limitations:
- Knockdown efficiency rarely reaches 100%, leaving residual protein that can complicate interpretation
- Off-target effects may silence unrelated genes with partial sequence similarity
- Transient nature of siRNA knockdown may require careful timing of experiments
RNAi approaches are particularly valuable when the target protein is essential for cell survival, making complete knockout impossible [59]. They also serve as complementary approaches to confirm results obtained with CRISPR-Cas9.
Experimental Design and Protocols
Knockout/Knockdown Validation Workflow
The diagram below illustrates the complete workflow for validating antibody specificity using genetic approaches:
Whole-Mount Immunofluorescence Protocol with KO/KD Controls
The following protocol adapts standard whole-mount IF procedures to incorporate knockout/knockdown controls, based on established methods for tissue processing and imaging [83] [5] [84].
Sample Preparation and Fixation
- Generate paired samples: Process wild-type and KO/KD tissues in parallel throughout the experiment. For mammalian cell models, use CRISPR-Cas9 to generate knockout cell lines, followed by xenografting if needed [85] [59].
- Tissue collection: Dissect tissues of interest and immediately place in cold PBS. For whole-mount studies, keep tissues intact without sectioning.
- Fixation: Immerse tissues in 4% paraformaldehyde (PFA) in PBS (pH 7.4) for 2-24 hours depending on tissue size at 4°C. Alternative fixatives include methanol for certain antigens, though PFA generally better preserves morphology for 3D imaging [5] [87] [26].
- Washing: Remove fixative by washing 3×5 minutes in PBS with 0.1% Tween-20 (PBS-T).
- Permeabilization: Incubate tissues in 0.5-1% Triton X-100 in PBS for 1-24 hours depending on tissue density and thickness. Alternative permeabilization agents include Tween-20 or saponin for less harsh treatment [5].
Immunofluorescence Staining
- Blocking: Incubate tissues in blocking buffer (1-5% BSA, 10% serum from secondary antibody host species, and 0.1% Tween-20 in PBS) for 4-24 hours at 4°C with gentle agitation [5] [26].
- Primary antibody incubation: Dilute primary antibody in antibody dilution buffer (1% BSA, 0.1% Tween-20 in PBS). Incubate tissues for 24-72 hours at 4°C with gentle agitation. Optimal dilution must be determined empirically.
- Washing: Remove unbound antibody by washing 3×1 hour with PBS-T at room temperature with agitation.
- Secondary antibody incubation: Incubate with fluorophore-conjugated secondary antibodies diluted in antibody dilution buffer for 24-48 hours at 4°C protected from light.
- Washing: Remove unbound secondary antibody by washing 3×1 hour with PBS-T in the dark.
- Counterstaining and mounting: Incubate with DAPI (1 µg/mL) for 1-2 hours to label nuclei. Mount tissues in anti-fade mounting medium with coverslips for imaging [5].
Imaging and Analysis
- Image acquisition: Use confocal laser scanning microscopy (CLSM) to capture z-stacks of whole-mount specimens. Maintain identical imaging parameters between wild-type and KO/KD samples [83].
- 3D reconstruction: Process z-stacks using software such as ImageJ/FIJI to generate three-dimensional representations of the stained tissue [83].
- Signal quantification: Compare fluorescence intensity and distribution between wild-type and KO/KD samples. Use spatial analysis tools like CellProfiler to calculate indices such as Spatial Distribution Index (SDI) and Neighborhood Frequency (NF) [83].
Essential Research Reagent Solutions
Table: Key Reagents for KO/KN Validation in Whole-Mount IF
| Reagent Category | Specific Examples | Function in Protocol | Technical Considerations |
|---|---|---|---|
| Genetic Modification Tools | CRISPR-Cas9 system, siRNA/shRNA | Ablate or reduce target protein expression | CRISPR provides complete knockout; RNAi allows partial knockdown for essential genes [85] [59] |
| Fixation Reagents | 4% Paraformaldehyde (PFA), Methanol, Acetone | Preserve tissue architecture and antigenicity | PFA best for morphology; alcohols may destroy some epitopes but permeabilize [5] [87] |
| Permeabilization Agents | Triton X-100, Tween-20, Saponin | Enable antibody penetration through membranes | Concentration and duration must be optimized for each tissue type [5] |
| Blocking Buffers | BSA, normal serum, commercial protein-free blockers | Reduce non-specific antibody binding | Serum from secondary antibody host species most specific [5] [26] |
| Detection Systems | Fluorophore-conjugated secondary antibodies, enzyme-based amplification | Visualize target protein localization | Fluorophores must match microscope capabilities; consider brightness and spectral overlap [5] [26] |
| Mounting Media | Anti-fade media with DAPI | Preserve samples and counterstain nuclei | Low-autofluorescence formulations critical for signal-to-noise ratio [5] |
Data Interpretation and Quality Assessment
Analyzing Validation Results
Proper interpretation of knockout/knockdown experiments is essential for accurate antibody validation. The diagram below illustrates the decision process for assessing antibody specificity based on experimental outcomes:
Quantitative Assessment Methods
For rigorous validation, incorporate quantitative measures when comparing wild-type and knockout/knockdown samples:
- Signal intensity measurement: Quantify fluorescence intensity in wild-type versus KO/KD samples using image analysis software. Specific antibodies should show statistically significant reduction in KO/KD samples.
- Signal-to-noise ratio: Calculate the ratio of specific signal (wild-type) to background (KO/KD). A high ratio indicates strong specificity.
- Spatial distribution analysis: Use tools like CellProfiler to characterize spatial relationships between cell types using mathematical indices such as Spatial Distribution Index (SDI), Neighborhood Frequency (NF), and Normalized Median Evenness (NME) [83].
Table: Quantitative Metrics for Antibody Validation in Whole-Mount IF
| Metric | Calculation Method | Interpretation | Acceptance Criteria |
|---|---|---|---|
| Knockout Efficiency | (1 - SignalKO/SignalWT) × 100% | Measures completeness of target ablation | >80% for strong validation; >95% ideal |
| Signal-to-Background Ratio | SignalWT / SignalKO | Compares specific signal to non-specific background | ≥5:1 for acceptable validation; ≥10:1 ideal |
| Spatial Distribution Index (SDI) | Mathematical analysis of cell distribution patterns [83] | Determines if staining pattern is consistent with known biology | Should match expected biological pattern |
| Coefficient of Variation | (SD/Mean) × 100% across replicates | Measures reproducibility | <20% for technical replicates; <30% for biological replicates |
Integration with Other Validation Methods
While knockout/knockdown represents the gold standard for antibody validation, the IWGAV recommends complementary approaches using multiple pillars of validation [59] [86]. These include:
- Orthogonal validation: Using non-antibody-based methods such as mass spectrometry to verify target protein expression patterns.
- Independent antibody validation: Comparing results with antibodies targeting different epitopes on the same protein.
- Tagged protein expression: Expressing tagged versions of the target protein and comparing with antibody signal.
- Immunocapture followed by mass spectrometry: Using the antibody to pull down the target protein and confirming identity through mass spectrometry.
For whole-mount immunofluorescence specifically, correlation with other protein localization methods such as protein trapping with fluorescent tags or in situ hybridization can provide additional confirmation of antibody specificity.
Validating antibody specificity using knockout/knockdown controls is essential for generating reliable data in whole-mount immunofluorescence studies. This approach provides the most direct evidence of antibody specificity by directly linking genetic information to protein detection. When properly implemented with appropriate controls and quantitative assessment, KO/KD validation significantly enhances research reproducibility and confidence in experimental results, particularly for complex three-dimensional tissue analyses that form the basis of many drug development and mechanistic studies.
The integration of CRISPR-Cas9 technology with advanced whole-mount imaging and analysis methods represents a powerful combination for precise protein localization studies in intact tissues. As the field moves toward higher standards of antibody validation, researchers should prioritize genetically validated reagents and implement the multipillar approach recommended by the International Working Group for Antibody Validation to ensure the highest data quality in their whole-mount immunofluorescence research.
Whole mount immunofluorescence (WMIF) staining is a powerful technique that enables researchers to visualize protein localization and expression within intact three-dimensional tissue samples, such as embryos, organoids, and tissue explants [23] [25]. Unlike traditional methods that require sectioning, WMIF preserves spatial relationships and tissue architecture, providing a comprehensive view of biological processes in their native context [23]. This technique has become indispensable in developmental biology, neurobiology, and organoid research, where three-dimensional context is critical for understanding structure-function relationships [23] [25].
The effectiveness of WMIF hinges critically on antibody specificity. The technique presents unique challenges compared to conventional immunohistochemistry, including increased sample thickness, limited antibody penetration, and the impossibility of antigen retrieval in delicate samples [23]. These technical constraints amplify the consequences of antibody choice, making the decision between catalog and custom antibodies not merely a procurement consideration but a fundamental determinant of experimental success, data reproducibility, and research credibility [88] [89]. Within this context, researchers working with non-model species or studying novel epitopes face particularly complex decisions when selecting antibody strategies.
Fundamental Differences Between Catalog and Custom Antibodies
Defining Catalog and Custom Antibodies
Catalog antibodies are pre-existing, off-the-shelf reagents developed and manufactured for broad commercial distribution. These antibodies are typically generated against conserved epitopes in model organisms (human, mouse, rat) and validated for common applications and species [88]. Their primary advantages are immediate availability and lower upfront costs, making them attractive for preliminary studies or well-established targets in model systems [89].
Custom antibodies are bespoke reagents specifically developed for a researcher's unique requirements. These antibodies are generated against researcher-specified antigens, typically peptides or protein fragments corresponding to the exact sequence of the target protein in the species of interest [88] [89]. The custom development process involves antigen design, animal immunization, serum collection, and purification, all tailored to the researcher's specific experimental needs [89].
Key Comparative Characteristics
Table: Fundamental Comparison of Catalog and Custom Antibodies
| Characteristic | Catalog Antibodies | Custom Antibodies |
|---|---|---|
| Development Approach | Pre-developed for broad use; target conserved epitopes in model organisms | Bespoke development targeting researcher-specified sequences |
| Availability | Immediate delivery | Weeks to months for development and production |
| Specificity Basis | Relies on cross-reactivity with homologous proteins | Designed for exact epitope and species specificity |
| Validation | Typically validated for common applications in model organisms | Validated for researcher's specific target, species, and applications |
| Reproducibility | Variable between lots; manufacturer-dependent consistency | High lot-to-lot consistency through sequence-defined production |
| Cost Structure | Lower upfront cost, but potential hidden costs from failed experiments | Higher initial investment but potentially lower long-term costs |
The Critical Role of Antibody Specificity in Whole Mount Immunofluorescence
Technical Challenges of WMIF That Amplify Specificity Concerns
Whole mount immunofluorescence presents several unique technical challenges that elevate the importance of antibody specificity:
- Penetration Limitations: The thickness of whole mount samples restricts antibody access to internal structures, requiring extended incubation times and extensive permeabilization [23]. These conditions can increase non-specific binding if antibody specificity is not optimal.
- Impossibility of Antigen Retrieval: Unlike sectioned samples, fragile whole mount specimens such as embryos cannot withstand the harsh heat-induced epitope retrieval methods that often rescue cross-reactive antibody binding [23]. This limitation makes epitope compatibility absolutely critical.
- Three-Dimensional Complexity: The preservation of 3D architecture means that non-specific binding can occur throughout the sample volume, creating substantial background noise that obscures legitimate signal and complicates image interpretation [23] [25].
- Fixation Sensitivity: WMIF typically uses cross-linking fixatives like paraformaldehyde (PFA), which can mask epitopes and alter antibody binding characteristics [23]. Antibodies must recognize their targets despite these modifications.
Consequences of Poor Specificity in WMIF
Suboptimal antibody specificity in WMIF manifests in several detrimental ways:
- False Negatives: Due to epitope sequence divergence in non-model species, even antibodies with high homology to the target protein may fail to bind, resulting in undetectable signal and erroneous conclusions about protein absence [89].
- High Background Noise: Non-specific binding creates diffuse fluorescence throughout the sample, obscuring legitimate signal and complicating image analysis [89].
- Misleading Localization Patterns: Cross-reactivity with unrelated proteins can produce staining patterns that misrepresent the true subcellular distribution of the target protein [90].
- Uninterpretable Results: The combination of weak specific signal and strong non-specific binding can render experiments uninterpretable, wasting significant time and resources [88] [89].
Decision Framework: When to Choose Catalog vs. Custom Antibodies
Scenario Analysis: Catalog Antibody Applications
Catalog antibodies represent a viable option in these specific scenarios:
- High Epitope Conservation: When working with well-conserved epitopes in species closely related to the antibody's target species (e.g., using a mouse-derived antibody in rat tissue) [88].
- Previously Validated Targets: When the antibody has been empirically validated by other researchers in the same species and application, with published data demonstrating specificity [91].
- Preliminary Exploratory Studies: During initial feasibility studies when the primary goal is protocol optimization rather than definitive data generation.
- Abundant Target Expression: When the target protein is highly expressed and produces strong, easily distinguishable signal over background.
- Budget and Time Constraints: When immediate reagent availability is critical and resources for custom development are unavailable.
Scenario Analysis: Custom Antibody Applications
Custom antibodies become strategically necessary in these research contexts:
- Non-Model Organism Research: When working with species evolutionarily distant from common model organisms, where epitope conservation is low [88] [89].
- Novel Protein Targets: When studying previously uncharacterized proteins or isoforms without commercially available specific reagents [88].
- Critical Specificity Requirements: When research conclusions depend on absolute specificity, such as distinguishing between highly similar protein isoforms or post-translationally modified forms [89].
- Long-Term Projects: When studies span multiple years and require consistent reagent performance across multiple experimental phases [89].
- Unique Application Needs: When antibodies must be optimized for unusual conditions, such as specific fixation methods or specialized detection systems.
Strategic Decision Algorithm
The following diagram illustrates a systematic approach to the catalog versus custom antibody decision process, particularly within the context of whole mount immunofluorescence research:
Experimental Evidence: Case Studies and Performance Data
Direct Performance Comparison in Non-Model Species
Experimental data consistently demonstrates the superiority of custom antibodies in non-model organism research. A comprehensive comparison evaluating catalog antibodies with >80% sequence homology against zebrafish proteins revealed significant performance limitations compared to custom alternatives [89]:
Table: Experimental Comparison of Catalog vs. Custom Antibodies in Zebrafish
| Target Protein | Antibody Type | Signal Strength | Specificity | Background | Result Quality |
|---|---|---|---|---|---|
| HMGB1 | Catalog Antibody | Undetectable | Non-specific binding | High | Failed experiment |
| HMGB1 | Custom Zebrafish Antibody | Strong, clear | High specificity | Low | Clean, interpretable data |
| SOD1 | Catalog Antibody | Weak | Multiple non-specific bands | Moderate | Difficult interpretation |
| SOD1 | Custom Zebrafish Antibody | Strong | Single specific band | Low | Clean, reproducible results |
In the HMGB1 experiment, the catalog antibody failed entirely to detect the target in zebrafish tissues, despite producing expected results in human cell lines, highlighting the risk of relying on cross-reactivity assumptions. For SOD1, the catalog antibody detected the target but with weak signal and multiple non-specific bands, whereas the custom antibody produced a strong, clean band at the expected molecular weight [89].
Success Rates of Catalog Antibodies in Non-Standard Applications
The challenges with catalog antibodies extend beyond model organisms to non-standard applications. A systematic study screening 105 commercial monoclonal antibodies for their ability to enrich target peptides from trypsin-digested human cell lysates found that only 11% of pan-specific antibodies and 17% of phospho-specific antibodies successfully captured their intended targets [91]. This low success rate (8-24% after applying selection criteria) underscores the risk of assuming catalog antibodies will perform adequately in applications beyond their initial validation.
Validation Requirements for Whole Mount Immunofluorescence Applications
Specialized Validation Considerations for WMIF
Antibody validation for whole mount immunofluorescence requires additional rigor beyond standard immunohistochemistry protocols. Key considerations include:
- Penetration Validation: Demonstrating that antibodies reach internal structures within thick specimens, often requiring sectioning of a subset of stained samples for verification [23].
- Epitope Stability Assessment: Confirming that fixation conditions (often extended for whole mounts) do not destroy or mask the target epitope [23] [25].
- Specificity Verification: Implementing multiple validation approaches, including genetic controls (knockout/knockdown), orthogonal methods, and isotype controls [92] [90].
- Background Characterization: Distinguishing specific signal from non-specific background, which is more challenging in three-dimensional samples [23].
Comprehensive Validation Framework
Robust antibody validation for WMIF should incorporate these essential elements, with particular emphasis on techniques marked as critical for three-dimensional applications:
Table: Essential Antibody Validation Methods for Whole Mount Immunofluorescence
| Validation Method | Description | Importance for WMIF |
|---|---|---|
| Genetic Controls | Using knockout/knockdown specimens to confirm absence of staining | Critical for establishing specificity in complex 3D samples |
| Orthogonal Methods | Correlating with other detection methods (e.g., mRNA in situ hybridization) | High value for verifying localization patterns |
| Blocking Peptides | Pre-incubating antibody with immunogen peptide to compete binding | Essential for demonstrating epitope specificity |
| Application-Specific Testing | Validating under actual WMIF conditions (extended incubations, permeabilization) | Mandatory for predicting actual performance |
| Cross-Reactivity Profiling | Testing against related proteins and common off-targets | Important for minimizing false positives |
| Lot Consistency Testing | Comparing multiple antibody lots for reproducibility | Critical for long-term studies |
Technical Protocols: Implementation Guidelines
Whole Mount Immunofluorescence Staining Protocol
The following protocol adapts established whole mount staining methods for optimal results with both catalog and custom antibodies [23] [25] [93]:
Stage 1: Sample Preparation and Fixation
- Sample Collection: Isolate tissues of interest using fine dissection tools under a stereomicroscope. For embryos, remove surrounding membranes (e.g., dechorionation for zebrafish embryos) [23].
- Fixation: Immerse samples in 4% paraformaldehyde (PFA) in PBS. Fixation time varies with sample size: 30-60 minutes for small specimens (<500μm), 2-4 hours for medium specimens (500μm-1mm), or overnight at 4°C for larger specimens [23] [25].
- Permeabilization: Treat fixed samples with permeabilization buffer (PBS + 0.1-0.5% Triton X-100) for 4-48 hours depending on sample size and density [25].
- Blocking: Incubate samples in blocking buffer (PBS + 0.3% Triton X-100 + 5% serum from secondary antibody host species + 1% BSA) for 4 hours to overnight at 4°C with gentle agitation [25] [93].
Stage 2: Antibody Staining
- Primary Antibody Incubation: Dilute primary antibody in blocking buffer. incubation times are significantly extended for whole mounts: 24-72 hours at 4°C with gentle agitation [23] [25].
- Washing: Remove unbound antibody with multiple extended washes (6-8 changes over 24-48 hours) using PBS + 0.1% Triton X-100 [25] [93].
- Secondary Antibody Incubation: Incubate with fluorophore-conjugated secondary antibodies diluted in blocking buffer for 24-48 hours at 4°C, protected from light [25].
- Final Washes: Perform extensive washing (8-10 changes over 24-48 hours) to reduce background [93].
- Nuclear Counterstaining: Incubate with DAPI (5μg/mL) for 2-4 hours followed by final washes [25].
- Mounting and Clearing: Mount samples in specialized clearing solutions (e.g., fructose-glycerol) or aqueous mounting media for imaging [93].
Antibody Validation Protocol for WMIF
Implement this validation workflow before commencing primary experiments:
Specificity Testing:
WMIF Optimization:
Control Experiments:
Research Reagent Solutions for Whole Mount Immunofluorescence
Successful WMIF requires specialized reagents and materials beyond standard immunohistochemistry. The following toolkit represents essential components for robust whole mount staining experiments:
Table: Essential Research Reagent Solutions for Whole Mount Immunofluorescence
| Reagent Category | Specific Examples | Function and Importance |
|---|---|---|
| Fixatives | 4% Paraformaldehyde (PFA), Methanol | Preserve tissue architecture and antigenicity; PFA is standard but methanol may help with epitope masking [23] |
| Permeabilization Agents | Triton X-100, Tween-20, Saponin | Enable antibody penetration by disrupting membranes; concentration and time critical for balance between access and preservation [23] [93] |
| Blocking Reagents | Normal serum, BSA, non-fat dry milk | Reduce non-specific antibody binding; serum should match secondary antibody host species [25] [93] |
| Buffers and Solutions | PBS-Glycine, IF-Wash Buffer (PBS + BSA + Triton X-100 + NaN₃) | Maintain pH and osmolarity; specialized wash buffers reduce background and preserve sample integrity [93] |
| Clearing Agents | Fructose-glycerol solutions, commercial mounting media | Improve optical clarity for imaging by reducing light scattering in thick samples [93] |
| Validation Tools | Blocking peptides, isotype controls, knockout tissues | Verify antibody specificity and distinguish true signal from artifacts [92] [90] |
Cost-Benefit Analysis and Resource Allocation
Comprehensive Cost Considerations
The financial implications of antibody selection extend beyond initial purchase price to encompass multiple hidden costs:
Table: Comprehensive Cost Analysis of Catalog vs. Custom Antibodies
| Cost Factor | Catalog Antibodies | Custom Antibodies |
|---|---|---|
| Initial Acquisition | $200-$600 | $600-$2,000+ |
| Validation Expenses | $500-$1,500 (extensive testing required) | $200-$500 (targeted validation) |
| Risk of Failed Experiments | High (40-60% failure rate in non-standard applications) [91] | Low (<10% with proper antigen design) |
| Project Delay Costs | Significant (weeks to months of troubleshooting) | Moderate (built into development timeline) |
| Publication Risks | Higher (reviewer skepticism, reproducibility issues) | Lower (well-documented specificity) |
| Long-Term Reliability | Variable (lot-to-lot inconsistencies common) | High (sequence-defined consistency) |
Strategic Resource Allocation
For research groups working with non-model species or novel targets, these evidence-based resource allocation strategies optimize outcomes:
- Pilot Studies: Allocate 15-20% of total antibody budget for testing multiple catalog antibodies with thorough validation before committing to custom development.
- Validation Resources: Dedicate sufficient personnel time and materials for comprehensive antibody testing, recognizing that inadequate validation often costs more than the antibodies themselves.
- Custom Development Timeline: Plan for 3-6 months for custom antibody development, including antigen design, immunization, purification, and validation.
- Bulk Production Consideration: For long-term projects, consider producing larger quantities of custom antibodies to ensure lot consistency and potentially lower per-use costs.
The strategic choice between catalog and custom antibodies represents a critical decision point in whole mount immunofluorescence research, particularly for investigations involving non-model species, novel targets, or requiring definitive specificity. While catalog antibodies offer apparent advantages in cost and availability, these benefits often prove illusory when balanced against the substantial risks of failed experiments, uninterpretable results, and compromised research credibility.
The converging trends of decreasing custom antibody costs (now starting at approximately $600 [89]) and increasing emphasis on antibody validation and reproducibility [90] are shifting the strategic balance toward custom solutions for critical applications. Researchers must evaluate their specific needs through the dual lenses of technical requirements and resource constraints, recognizing that antibody specificity fundamentally underpins data quality in the technically challenging environment of whole mount immunofluorescence.
As the research community continues to address reproducibility challenges through enhanced validation standards [92] [90], the strategic deployment of custom antibodies tailored to specific research contexts will increasingly become a hallmark of rigorous, impactful science, particularly in the visually compelling but technically demanding realm of three-dimensional imaging.
Whole-mount immunofluorescence (WM-IF) represents a transformative approach in spatial biology that enables three-dimensional immunolabeling of intact tissues and organs, thereby preserving structural context that is lost in traditional sectioning methods. Unlike conventional immunohistochemistry on thin sections, which provides a two-dimensional snapshot of cellular architecture, WM-IF allows researchers to visualize protein localization and expression patterns within the complete volumetric context of tissue specimens [25]. This technical advancement is particularly valuable for studying complex biological systems where three-dimensional architecture fundamentally influences function—including organ development, tumor microenvironments, and neural circuits.
The fundamental premise of WM-IF rests on its ability to overcome the limitations of traditional section-based methods, which inherently fragment continuous tissue structures and necessitate reconstruction from multiple discontinuous sections. By preserving spatial relationships in three dimensions, WM-IF provides unparalleled insights into cellular networks, gradient formations, and structural continuities that remain obscured in sectioned material [94]. This methodological framework has emerged as a superior approach for marker localization studies, particularly when analyzing complex tissue architectures or rare cell populations distributed throughout a tissue volume.
Comparative Advantages of WM-IF Over Traditional Methods
Structural and Analytical Benefits
Table 1: Qualitative advantages of WM-IF over section-based immunostaining
| Parameter | Whole-Mount IF | Section-Based IF |
|---|---|---|
| Spatial Context | Preserves complete 3D architecture | Limited to 2D plane; reconstruction required |
| Structural Integrity | Maintains intact cell-cell connections and long-range projections | Disrupts continuous structures at section planes |
| Orientation Independence | No sectioning plane bias; entire specimen available for analysis | Highly dependent on sectioning orientation and angle |
| Rare Cell Analysis | Enables comprehensive mapping of sparsely distributed cells | Risk of missing rare cells between sections |
| Cellular Quantification | Accurate counts within entire volumes | Potential for over-/under-estimation due to partial cells |
| Molecular Gradient Analysis | Continuous visualization of signaling gradients | Discontinuous assessment of graded distributions |
WM-IF offers several distinct advantages that make it particularly suitable for comprehensive marker localization studies. As demonstrated in corneal research, WM-IF "emerged as a more effective method when compared to tissue sections for visualizing the expression" of limbal stem cell markers within their native architectural context [33]. This enhanced effectiveness stems from the method's ability to preserve the intact tissue microenvironment while allowing antibody penetration throughout the entire specimen.
The three-dimensional capability of WM-IF proves especially valuable for studying tubular structures and complex organ systems. In studies of Wolffian duct development, WM-IF enabled researchers to "visualize the process of WD coiling and development" in its entirety, revealing morphological features that would be difficult to reconstruct from serial sections [25]. Similarly, in vascular biology, WM-IF has permitted complete visualization of blood and lymphatic vessel networks in murine small intestine, providing insights into their spatial relationships and connectivity patterns [94].
Technical Considerations and Limitations
Table 2: Technical considerations for implementing WM-IF
| Consideration | Challenge | Potential Solution |
|---|---|---|
| Antibody Penetration | Limited diffusion into thick tissues | Tissue clearing, extended incubation, enhanced permeabilization |
| Background Signal | Autofluorescence in deep tissue layers | Chemical quenching, advanced clearing techniques |
| Imaging Depth | Light scattering in opaque specimens | Tissue clearing, light-sheet microscopy |
| Processing Time | Longer protocol duration | Optimized workflows, active clearing methods |
| Data Management | Large volumetric datasets | Efficient compression, computational resources |
| Quantification Complexity | 3D analysis requirements | Specialized software, automated segmentation |
Despite its significant advantages, WM-IF presents unique technical challenges that researchers must address. Antibody penetration remains a primary concern, particularly in dense tissues with limited permeability. Studies have shown that "prolonged storage significantly influences the expression of LSC markers" in corneal tissues, highlighting the importance of proper tissue handling and processing for maintaining antigen integrity [33]. Similarly, background fluorescence and light scattering can complicate imaging and analysis, necessitating optimized clearing and mounting protocols.
Recent advancements in tissue clearing techniques have substantially addressed many of these limitations. Methods such as hCLARITY have been shown to "increase sensitivity and specificity of fluorescence immunostaining" in challenging specimens like human brain tissue, enabling researchers to achieve high-quality results even in long-term archived samples [95]. These improvements have expanded the application range of WM-IF to include previously intractable tissues and research questions.
Experimental Framework: WM-IF Methodologies
Core Protocol for Whole-Mount Immunofluorescence
The successful implementation of WM-IF requires careful optimization of each procedural step to balance tissue preservation, antibody penetration, and signal preservation. Based on established methodologies across multiple tissue types, the following core protocol provides a foundation for WM-IF staining:
Tissue Preparation and Fixation: Isolate intact tissues or organs, taking care to preserve structural integrity. Fixation conditions must be optimized for each tissue type; for example, embryonic gonadal ridges are typically fixed with 4% paraformaldehyde (PFA) overnight at 4°C or for 1 hour at room temperature [25]. Fixation time should be sufficient to preserve antigenicity without excessive cross-linking that might impede antibody penetration.
Permeabilization and Blocking: Permeabilize tissues with appropriate detergents (e.g., Triton X-100) to facilitate antibody access to intracellular epitopes. This is followed by blocking with proteins such as bovine serum albumin (BSA) to minimize non-specific antibody binding. A typical blocking buffer might contain "PBS + 1% BSA + 0.2% non-fat dry milk powder + 0.3% Triton X-100" [25].
Antibody Incubation: Primary antibody incubation is typically performed overnight at 4°C with gentle agitation to ensure uniform penetration throughout the tissue specimen. Antibody concentrations often need optimization for whole-mount applications and may differ from those used for sectioned material. Secondary antibody incubation follows similar principles, with fluorophore-conjugated antibodies selected based on their penetration capabilities and spectral properties.
Clearing and Mounting: For thicker specimens, tissue clearing may be necessary to reduce light scattering and improve imaging depth. Various clearing methods are available, including organic solvent-based approaches and hydrogel-based techniques like CLARITY. Cleared specimens are typically mounted in specialized media that maintain tissue transparency while preserving fluorescence signals.
Specialized Applications and Modifications
Table 3: WM-IF protocol variations for different tissue types
| Tissue Type | Fixation | Permeabilization | Clearing | Key Applications |
|---|---|---|---|---|
| Embryonic Tissues | 4% PFA, 1h-4°C | 0.3-1.0% Triton X-100 | Organic solvents | Developmental studies, organogenesis |
| Neural Tissues | 4% PFA, 24h-4°C | 0.5% Triton X-100 | hCLARITY | Circuit mapping, synapse analysis |
| Epithelial Tissues | 4% PFA, 2-4h-RT | 0.1-0.5% Triton X-100 | ClearSee | Barrier function, cell polarity |
| Plant Tissues | 4% PFA, 1h-vacuum | Cell wall enzymes | ClearSee | Gene expression, development |
| Tumor Samples | 4% PFA, 24h-4°C | 0.5-1.0% Triton X-100 | Organic solvents | Microenvironment, immune infiltration |
Different tissue types and research applications often require specific modifications to the core WM-IF protocol. For plant tissues, researchers have successfully combined WM-IF with single-molecule RNA fluorescence in situ hybridization (smFISH), enabling simultaneous detection of proteins and transcripts in intact specimens [96]. This approach requires specialized permeabilization strategies to overcome the additional barrier presented by plant cell walls.
For challenging specimens like human brain tissue, the hCLARITY method has proven particularly effective. This technique involves "hydrogel-stabilized tissue cleared in a 4% sodium dodecyl sulfate (SDS) solution," which simultaneously enhances epitope accessibility while reducing tissue opacity [95]. The method has enabled successful immunostaining with more than 30 different antibodies in human brain tissue, demonstrating its utility for comprehensive marker localization studies.
Research Applications and Case Studies
Developmental Biology Applications
WM-IF has revolutionized developmental biology by enabling three-dimensional visualization of morphogenetic processes. In studies of male reproductive system development, WM-IF has allowed researchers to visualize the complex process of Wolffian duct coiling and development in its entirety [25]. This approach revealed how "balanced Wnt signaling" regulates the transformation of a simple straight embryonic precursor into the highly coiled adult epididymis, a process essential for male fertility.
The method has proven particularly valuable for analyzing signaling pathways and their spatial regulation during organogenesis. By culturing embryonic gonadal ridges in vitro and subjecting them to WM-IF, researchers can manipulate signaling pathways in real-time and observe the resulting morphological and molecular changes [25]. This experimental paradigm provides unprecedented access to developmental processes that were previously difficult to study in mammalian systems.
Biomedical and Clinical Research Applications
In corneal research, WM-IF has emerged as a critical tool for evaluating tissue integrity and stem cell populations. Studies comparing fresh and stored corneas demonstrated that "storage duration was a significant factor influencing the expression of LSC markers," with prolonged storage leading to epithelial degeneration and loss of stem cell markers [33]. This finding has important implications for corneal transplantation and regenerative medicine.
In cancer research, advanced multiplexed WM-IF approaches like tissue-based cyclic immunofluorescence (t-CyCIF) enable comprehensive characterization of tumor microenvironments. This method "generates up to 60-plex images using an iterative process" that assembles high-dimensional representations from conventional fluorescence images [21]. Such approaches allow simultaneous visualization of tumor antigens, immune markers, and signaling molecules within the spatial context of intact tumor specimens.
Advanced Technical Considerations
Multiplexed Imaging and Computational Analysis
Recent advances in WM-IF have focused on increasing multiplexing capabilities to enable comprehensive molecular profiling within tissue contexts. Cyclic immunofluorescence methods represent a particularly promising approach, as they "require no specialized instruments or reagents" while enabling highly multiplexed imaging [21]. These methods work through iterative rounds of staining, imaging, and fluorophore inactivation, gradually building a high-dimensional representation of the tissue's molecular architecture.
The computational analysis of WM-IF data presents both challenges and opportunities. For plant tissues, researchers have developed "a computational workflow to quantify mRNA and protein levels at single-cell resolution" that combines cell segmentation with molecular quantification [96]. Similar approaches are being adapted for animal tissues, enabling comprehensive analysis of cellular heterogeneity within volumetric contexts.
Integration with Complementary Techniques
WM-IF increasingly serves as a platform for integrating multiple analytical modalities. The combination of WM-IF with smFISH allows "simultaneous detection of mRNA and protein quantity, as well as subcellular distribution, in single cells" [96]. This integrated approach provides unprecedented insights into the relationship between transcription and translation within native tissue contexts.
Similarly, WM-IF is compatible with super-resolution microscopy techniques, enabling visualization of subcellular structures at unprecedented resolution. Studies using hCLARITY-treated human brain tissue have demonstrated compatibility with "super-resolution microscopy (stimulated emission depletion microscopy (STED), direct stochastical optical reconstruction microscopy (dSTORM)) for imaging human cortical synapses" [95]. This combination of volumetric imaging with nanoscale resolution opens new possibilities for subcellular localization studies.
Diagram 1: Experimental workflow for whole-mount immunofluorescence and advanced applications. The core protocol progresses from sample preparation through staining to imaging, with optional advanced applications including multiplexed imaging, RNA-protein co-detection, and super-resolution microscopy.
The Scientist's Toolkit: Essential Research Reagents
Table 4: Essential reagents for WM-IF experiments
| Reagent Category | Specific Examples | Function | Technical Notes |
|---|---|---|---|
| Fixatives | 4% Paraformaldehyde (PFA), Methanol | Tissue preservation and antigen stabilization | Concentration and duration must be optimized for each tissue type |
| Permeabilization Agents | Triton X-100, Tween-20, Saponin | Enable antibody access to intracellular epitopes | Concentration critical for balance between access and structure preservation |
| Blocking Reagents | BSA, normal serum, non-fat dry milk | Reduce non-specific antibody binding | Serum should match secondary antibody host species |
| Primary Antibodies | Monoclonal and polyclonal antibodies | Target-specific antigen recognition | Validation for WM-IF essential; penetration may be size-dependent |
| Secondary Antibodies | Fluorophore-conjugated (Alexa Fluor series) | Signal generation via fluorophore emission | Spectral properties should match imaging system capabilities |
| Clearing Reagents | SDS, fructose-based solutions, organic solvents | Reduce light scattering for improved imaging depth | Choice depends on tissue type and compatibility with fluorophores |
| Mounting Media | ProLong Gold, custom hydrogel formulations | Preserve fluorescence and tissue transparency | Anti-fade agents essential for fluorescence preservation |
The successful implementation of WM-IF depends critically on appropriate reagent selection and optimization. Fixation conditions must balance structural preservation with antigen accessibility, as "some antibodies are extremely fixation-sensitive" and may require specific conditions for optimal detection [97]. Similarly, permeabilization strategies must be tailored to tissue density and composition, with dense tissues often requiring more aggressive treatments.
Antibody validation represents a particularly important consideration for WM-IF applications. Researchers should "use antibodies already used in previously published articles" when possible, critically evaluating published examples for signal-to-noise ratio and specificity [97]. For novel antibodies, validation experiments including Western blot, blocking peptides, and negative controls are essential to establish specificity.
Whole-mount immunofluorescence has established itself as a superior method for marker localization studies that require preservation of three-dimensional architectural context. By enabling comprehensive volumetric analysis of protein distribution patterns within intact tissues, WM-IF provides insights that are fundamentally inaccessible through traditional section-based approaches. The continuing development of tissue clearing methods, multiplexed imaging strategies, and computational analysis tools promises to further expand the applications and capabilities of this powerful technique.
As WM-IF methodologies become increasingly accessible and robust, they are poised to transform our understanding of biological systems across diverse fields including developmental biology, neuroscience, and cancer research. The ability to localize markers within their native volumetric context will continue to drive discoveries in basic biological mechanisms while providing critical insights for diagnostic and therapeutic applications.
Histopathological assessment, primarily using hematoxylin and eosin (H&E) staining, remains the cornerstone of cancer diagnosis and biomedical research due to its affordability, accessibility, and effectiveness for discerning morphologically relevant features [98] [6]. However, a significant limitation of H&E staining is its inability to directly inform about specific molecular markers, which are increasingly crucial for modern precision medicine [98]. While pathologists can identify diverse cell types from H&E, computational approaches typically distinguish only a few broad categories—endothelial, epithelial, stromal, and immune cells—thus missing detailed aspects of the cellular microenvironment, such as protein expression profiles and specific immune cell identities [98].
In contrast, multiplex immunofluorescence (mIF) techniques like Co-Detection by Indexing (CODEX) enable in situ detection of dozens of proteins simultaneously, offering unattainable insights into tissue microenvironments [98] [6]. The clinical application of these techniques is hampered by high costs, time-intensive protocols, and limited adoption in clinical labs [98]. To address this gap, artificial intelligence (AI) has emerged as a transformative tool, capable of generating in silico immunofluorescence stains from standard H&E images. This approach leverages deep learning to extract hidden molecular information from conventional histology slides, potentially enhancing diagnostic and research potential without requiring additional costly and complex wet-lab procedures [98] [99].
Technical Foundations: From H&E Morphology to Multiplex Biomarker Prediction
The Core AI Framework: ROSIE
The ROSIE (RObust in Silico Immunofluorescence from H&E images) framework represents a significant advance in this field [98] [99]. It is a deep-learning model trained on a massive dataset of over 1,300 paired and aligned H&E and CODEX samples from over a dozen tissues and disease conditions, spanning more than 16 million cells [98]. This dataset's scale and diversity are unprecedented, significantly surpassing previous studies limited to single clinical sites or a few stains.
ROSIE utilizes a ConvNext convolutional neural network (CNN) architecture that operates on the patch level [98]. The model takes a 128 × 128 pixel H&E patch as input and produces predictions for the average expressions of a 50-biomarker panel across the center 8 × 8 pixels. Using a sliding window approach, ROSIE generates predictions across entire samples, which are then stitched together to form a contiguous, virtual multiplex immunofluorescence image [98].
Key Technological Differentiators
Several key features distinguish ROSIE from previous attempts at virtual staining:
- Same-Slice Co-staining: The model was trained on H&E and CODEX co-stained on the exact same samples, allowing for direct pixel-level alignment and prediction, unlike methods using adjacent slices [98].
- Broad Biomarker Panel: The model predicts up to 50 protein biomarkers, including CD45, CD68, PD1, FoxP3, CD8, CD4, CD20, and PDL1, which are crucial for identifying immune cell subtypes and functional states [98] [99].
- Simplified Training Objective: Unlike earlier GAN-based methods, ROSIE uses a straightforward mean squared error (MSE) objective for training, resulting in more stable and robust performance [98].
Table 1: Core Components of the ROSIE Framework
| Component | Specification | Significance |
|---|---|---|
| Architecture | ConvNext CNN | Outperformed Vision Transformer models despite smaller size [98] |
| Input | 128×128 pixel H&E patch | Captures sufficient contextual morphological information [98] |
| Output | 50-protein biomarker panel | Enables comprehensive cellular phenotyping [98] |
| Training Dataset | >1,300 co-stained samples, >16M cells | Largest dataset of its kind, ensuring robust generalizability [98] |
| Prediction Resolution | 8×8 pixel blocks (native resolution possible) | Balances computational efficiency with spatial precision [98] |
Experimental Validation and Performance Metrics
Quantitative Assessment of Prediction Accuracy
ROSIE's performance was rigorously validated on four held-out evaluation datasets comprising 485 samples and nearly 5 million cells [98]. The results demonstrated a Pearson R correlation of 0.285 and a Spearman R correlation of 0.352 when comparing ground truth and computationally generated expressions across all 50 biomarkers. More importantly, the model achieved a sample-level C-index of 0.706, indicating its strong utility for clinical tasks that involve ordering cells or samples by biomarker expression levels [98].
The C-index (concordance index) is particularly noteworthy as it measures the model's ability to correctly rank samples by biomarker expression—a crucial capability for identifying immune markers in patient cohorts. A C-index of 0.5 represents random chance, making ROSIE's performance statistically significant for practical applications [98].
Comparative Performance Against Baselines
ROSIE significantly outperformed two baseline methods. The "H&E expression" baseline, which used average RGB channel intensity as a direct proxy for protein expression, performed at near-random levels. Similarly, a "cell morphology" baseline using morphology features derived from cell segmentations plus RGB channels as inputs to a multi-layer perceptron also failed to achieve meaningful predictive accuracy [98]. These comparisons confirm that ROSIE's predictive capability stems from sophisticated feature extraction rather than simple correlation with staining intensity.
Table 2: Performance Metrics of ROSIE on Held-Out Test Datasets
| Metric | Score | Interpretation |
|---|---|---|
| Pearson R Correlation | 0.285 | Indicates a linear predictive relationship between predicted and actual protein expression [98] |
| Spearman R Correlation | 0.352 | Demonstrates usefulness for ranking expressions (a common clinical task) [98] |
| Sample-Level C-index | 0.706 | Significantly outperforms random chance (0.5), indicating clinical utility [98] |
| Baseline Comparison | Significant improvement | Outperformed H&E expression and cell morphology baselines, which showed near-random performance [98] |
Integration with Whole-Mount Immunofluorescence and 3D Culture Models
The AI-driven approach to immunofluorescence prediction aligns with parallel advancements in whole-mount immunofluorescence staining for complex 3D cell cultures, including organoids, spheroids, and co-culture models [52]. These three-dimensional models offer unparalleled insights into spatial biology, organogenesis, and disease mechanisms within physiologically relevant contexts [52].
Traditional methods for whole-mount immunofluorescence often suffer from sample damage, loss, and lengthy, complex protocols involving multiple steps and reagent preparations [52]. Novel approaches are being developed to overcome these limitations by preserving sample integrity, minimizing manipulation, and eliminating the need for multiple reagents [52]. When combined with AI-based in silico staining, these techniques could enable more efficient and comprehensive analysis of 3D models, accelerating research in drug development and disease modeling.
The convergence of these technologies—AI-powered in silico immunofluorescence and simplified whole-mount staining—creates a powerful framework for maximizing data extraction from precious biological samples while minimizing experimental complexity and cost.
Research Reagent Solutions for Multiplex Immunofluorescence
Implementing high-plex immunofluorescence imaging requires carefully selected reagents and markers. The following table details essential components used in advanced multiplex imaging platforms like Orion, which performs one-shot, whole-slide, 16- to 18-channel IF imaging [6].
Table 3: Essential Research Reagents for Multiplex Immunofluorescence Imaging
| Reagent Category | Specific Examples | Function and Application |
|---|---|---|
| Nuclear Stains | DAPI | Fundamental for identifying and segmenting cell nuclei; included in ROSIE's predicted biomarkers [98] |
| Immune Cell Markers | CD45, CD3e, CD4, CD8, CD20, CD68, CD163 | Identify major immune lineages (T cells, B cells, macrophages) and their spatial distribution [98] [6] |
| Checkpoint Markers | PD1, PDL1, LAG3, TIGIT, ICOS | Critical for assessing immune exhaustion and potential response to immunotherapy [98] [6] |
| Epithelial & Stromal Markers | PanCK, EpCAM, E-Cad, aSMA, Vimentin | Differentiate tumor cells from stromal components and define tissue architecture [98] [6] |
| Proliferation & Functional Markers | Ki67, GranzymeB, HLA-DR | Reveal cellular proliferation status and functional activation states [98] |
| Specialized Fluorophores | ArgoFluor dyes (18-plex panel) | Engineered for minimal spectral overlap, high quantum efficiency, and photostability for one-shot imaging [6] |
Workflow Visualization: From H&E to In Silico Multiplex Imaging
The following diagram illustrates the integrated workflow for generating and validating in silico immunofluorescence data, incorporating both computational and experimental methods.
Trustworthiness and Uncertainty Quantification in AI Predictions
For AI-based in silico staining to gain traction in mission-critical applications like drug screening and clinical diagnostics, establishing trust in its predictions is essential [100]. A significant challenge with deep neural networks is their "black box" nature, making it difficult to evaluate prediction confidence [100].
Ensemble-based methods have emerged as a promising solution for quantifying uncertainty in AI image translation [100]. These methods use multiple independently trained models to generate a distribution of predictions, with the standard deviation across model outputs serving as an uncertainty metric. This approach can effectively identify when AI predictions are likely to be erroneous, particularly when dealing with out-of-distribution input images that differ from the training data [100].
The implementation of such uncertainty quantification is crucial for clinical translation, as it provides pathologists and researchers with a measure of confidence for each prediction, flagging areas where manual verification may be necessary. This is especially important when analyzing samples from tissue types or disease states not well-represented in the training data.
Future Directions and Clinical Translation
The field of in silico immunofluorescence is rapidly evolving, with several promising directions for future development. Combining H&E with near-infrared fluorescence immunostaining on a single tissue section is already proving valuable for direct correlation between morphological features and molecular marker expression [101]. Furthermore, platforms like Orion that perform both high-plex IF and H&E imaging on the same cells enable one-to-one comparison of cell morphologies and molecular properties [6].
For clinical adoption, future systems must address several challenges:
- Validation: Extensive clinical validation across diverse patient populations and disease states
- Interpretability: Developing methods to explain AI predictions to build trust among pathologists
- Integration: Seamless incorporation into existing clinical workflows and pathology laboratory systems
- Regulatory Approval: Navigating regulatory pathways for AI-based diagnostic tools
As these technical and regulatory challenges are addressed, in silico immunofluorescence promises to make multiplexed tissue imaging more accessible and cost-effective, potentially enabling deeper molecular profiling of routine clinical samples and accelerating the development of image-based biomarkers for precision medicine.
Whole-mount immunofluorescence (WM-IF) staining represents a critical methodological approach in biomedical research that enables the comprehensive visualization of antigen distribution within intact, three-dimensional tissue specimens. Unlike traditional methods that require sectioning, WM-IF preserves the native spatial architecture of biological structures, providing unparalleled insights into the organizational relationships between cells and their microenvironment. This technique has proven particularly valuable for studying complex anatomical contexts such as the vasculature and lymphatic systems in organs like the murine small intestine [94]. The fundamental principle underlying immunofluorescence involves using antibodies conjugated with fluorophores to target specific epitopes, allowing researchers to visualize virtually any component within tissues or cells through various microscopy platforms [26].
As research questions have grown more sophisticated, the limitations of single-modality imaging have become increasingly apparent. The integration of WM-IF with complementary analytical techniques has emerged as a powerful strategy to overcome these constraints, creating multidimensional datasets from individual samples. This whitepaper examines current methodologies, technical considerations, and innovative approaches for multiplexing WM-IF with other modalities, providing researchers with a comprehensive technical guide for implementing these advanced co-detection strategies in their experimental workflows.
Technical Foundations of Whole-Mount Immunofluorescence
Core Principles and Methodological Considerations
The successful implementation of WM-IF requires careful attention to several critical steps that influence both signal quality and morphological preservation. Fixation serves as the essential first step, preventing autolysis and putrefaction while maintaining antigenicity and cellular architecture. Cross-linking reagents like formaldehyde or organic solvents such as methanol and acetone constitute the primary fixative options, with selection dependent on the target antigen and sample type [26]. A key challenge involves balancing adequate immobilization of cellular components with preserving epitope accessibility for antibody binding.
For whole-mount specimens, permeability represents another crucial consideration. The staining process requires antibodies to penetrate throughout the entire tissue, necessitating optimized permeabilization steps that maintain structural integrity while allowing reagent access. Following fixation and permeabilization, antigen retrieval often becomes necessary, particularly when cross-linking fixatives have masked epitopes. Two primary retrieval methods include Protease-Induced Epitope Retrieval (PIER) using enzymes like proteinase K or trypsin, and Heat-Induced Epitope Retrieval (HIER) that employs elevated temperatures in buffer solutions to reverse protein cross-links [26].
Detection Methods: Direct vs. Indirect Immunofluorescence
WM-IF employs two primary detection methodologies, each with distinct advantages and limitations:
Direct IF: Utilizes primary antibodies directly conjugated to fluorophores, offering simplified procedures with reduced incubation times and minimal non-specific binding. This approach provides faster protocols but typically yields lower signal intensity and limited flexibility [26].
Indirect IF: Employs an unlabeled primary antibody followed by fluorophore-conjugated secondary antibodies that recognize the primary antibody. This method offers significant signal amplification through multiple secondary antibodies binding to a single primary antibody, greatly enhancing sensitivity. Additionally, indirect IF provides greater flexibility as the same secondary antibody can be used with various primary antibodies from the same host species [26].
For multiplexed WM-IF, the indirect method generally proves more suitable due to its superior signal amplification and capacity for detecting multiple targets simultaneously through carefully selected antibody host species and fluorophore combinations.
Table 1: Comparison of Direct and Indirect Immunofluorescence Methods
| Parameter | Direct IF | Indirect IF |
|---|---|---|
| Procedure Complexity | Simple, one-step incubation | Complex, two-step incubation |
| Time Requirement | Shorter (~few hours) | Longer (several hours to overnight) |
| Signal Amplification | Limited | Excellent (multiple secondaries per primary) |
| Sensitivity | Lower | Higher |
| Flexibility | Lower (requires conjugated primaries) | Higher (same secondary with different primaries) |
| Multiplexing Potential | Limited | Excellent |
| Cost | Higher (conjugated primaries for each target) | Lower (versatile secondary antibodies) |
Advanced Multiplexing Strategies with WM-IF
Spectral Multiplexing with Environmental-Sensitive Dyes
Conventional multiplexing approaches relying on specific fluorescence labeling face intrinsic limitations due to spectral overlap and the practical constraints of simultaneously distinguishing multiple markers. Innovative strategies now leverage environment-sensitive dyes whose emission properties change based on local biochemical characteristics, enabling expanded multiplexing capacity from limited fluorophore channels.
Recent breakthroughs demonstrate how a single lipid-sensitive dye like Nile Red can stain multiple membrane-associated organelles simultaneously. When imaged with spinning-disk microscopes offering extended resolution (~143 nm), and exploiting the dye's chromatic polarity sensitivity, researchers can discriminate subcellular structures based on their membrane lipid composition. By employing dual emission channels (617nm and 685nm bands) to create ratiometric measurements, this approach provides "optical fingerprints" for different organelles. When combined with deep convolutional neural networks (DCNN), this methodology has successfully segmented up to 15 distinct subcellular structures using just one laser excitation, far exceeding the limits of conventional multicolor approaches [102].
This "one-to-many" staining strategy, complemented by computational analysis, represents a paradigm shift from traditional "one-to-one" fluorescence labeling, particularly beneficial for organelles sharing similar surface and chemical properties. The approach demonstrates high robustness across different cell types, microscope systems, and imaging conditions, maintaining consistent emission ratios that reflect the intrinsic lipid polarity of organelle membranes [102].
Spectral Ratiometric Multiplexing Workflow: This diagram illustrates the integrated process from Nile Red (NR) staining through deep convolutional neural network (DCNN) analysis for multi-organelle segmentation.
Integration with Genomic and Transcriptomic Modalities
The convergence of WM-IF with single-cell multi-omics technologies represents another frontier in multiplexed analysis. Recent advances in co-detection assays enable simultaneous measurement of multiple molecular modalities from individual cells, providing unprecedented resolution of cellular heterogeneity and gene regulation networks. These integrated approaches combine protein localization data from WM-IF with transcriptional or epigenetic information from the same cellular context [103].
CRISPR/Cas systems have particularly transformed this landscape by offering unparalleled programmability for nucleic acid recognition in biosensing applications. When merged with DNA nanomachines—dynamic structures with precise structural control and multifunctional capabilities—these integrated platforms significantly enhance sensitivity, specificity, and multiplexing potential. For example, CRISPR/Cas12a systems coupled with DNA walkers create powerful bioanalytical tools that can operate within fixed cells or tissues previously subjected to WM-IF analysis [104].
The strategic integration of these technologies addresses a critical bottleneck in spatial biology: correlating protein localization and organizational context with functional genomic information. While promising, this convergence presents unique engineering challenges including signal leakage, complex assay assembly, and in vivo applicability constraints that require careful experimental design [104].
Table 2: Multiplexed Co-detection Technologies Compatible with WM-IF
| Technology | Mechanism | Compatible Modalities | Key Advantages |
|---|---|---|---|
| Spectral Ratiometric Imaging | Environment-sensitive dyes with ratiometric measurement | Protein localization, Membrane composition | Dramatically increases multiplexing capacity from limited channels |
| CRISPR/DNA Nanomachines | Programmable nucleic acid recognition with structural DNA | RNA/DNA detection, Protein co-localization | High sensitivity and specificity for nucleic acids in situ |
| Single-Cell Multi-omics | Cellular indexing and partitioning | Transcriptomics, Epigenetics, Proteomics | Resolves cellular heterogeneity within tissue architecture |
| Hybrid PET/CT Imaging | Metabolic and structural imaging | Tissue composition, Cellular activity | Provides correlative macroscopic context for microscopic findings |
Experimental Protocols for Integrated Approaches
WM-IF with Spectral Ratiometric Imaging
This protocol outlines the procedure for combining conventional WM-IF with advanced spectral ratiometric imaging to achieve extended multiplexing capabilities.
Sample Preparation and Staining:
- Fixation: Immerse whole-mount tissues in 4% paraformaldehyde for 12-24 hours depending on tissue size and density.
- Permeabilization: Treat with 0.5% Triton X-100 in PBS for 6-12 hours to ensure antibody penetration.
- Blocking: Incubate with protein blocking solution (5% BSA in PBST) for 6-12 hours to reduce non-specific binding.
- Primary Antibody Incubation: Apply species-specific primary antibodies diluted in blocking buffer for 24-48 hours at 4°C with gentle agitation.
- Washing: Perform 6-8 washes over 12-24 hours with PBST to remove unbound antibodies.
- Environment-Sensitive Dye Staining: Incubate with Nile Red (or similar environmental-sensitive dye) at 0.5-1 μg/mL concentration for 4-6 hours.
- Secondary Antibody Incubation: Apply fluorophore-conjugated secondary antibodies for 24-48 hours at 4°C, protected from light.
- Final Washes: Perform extensive washing (8-10 changes over 24 hours) before mounting for imaging.
Image Acquisition and Processing:
- Microscope Setup: Utilize spinning-disk confocal microscope with extended resolution capability (~143 nm).
- Dual-Channel Acquisition: Collect emission simultaneously at 617/73 nm and 685/40 nm bands with 473 nm or 488 nm laser excitation.
- Ratiometric Calculation: Generate ratio images from the two emission channels using image analysis software.
- DCNN Processing: Train deep convolutional neural networks using ground truth images from GFP-labeled organelles, then apply to ratiometric images for multi-organelle segmentation.
This integrated approach successfully segments up to 15 subcellular structures, far exceeding conventional multiplexing limits [102].
WM-IF with CRISPR-Activated Biosensing
This protocol describes the integration of WM-IF with CRISPR/Cas-based detection systems for correlative protein and nucleic acid analysis.
Simultaneous Protein and Nucleic Acid Detection:
- Standard WM-IF Processing: Complete steps 1-5 from the basic WM-IF protocol above.
- CRISPR/Cas System Preparation: Precomplex Cas12a or Cas13 enzymes with crRNA targeting specific nucleic acid sequences of interest.
- Hybrid Incubation: Apply primary antibodies for protein targets simultaneously with CRISPR/Cas complexes in appropriate reaction buffer for 24-48 hours.
- Signal Amplification: For DNA targets, include single-stranded DNA reporters with fluorophore-quencher pairs that activate upon Cas12a recognition. For RNA targets, utilize RNA-activated Cas12a nanorobots or Cas13 systems.
- Secondary Detection: Complete WM-IF with secondary antibody incubation as previously described.
- Imaging and Analysis: Acquire fluorescence signals using appropriate filter sets for both immunofluorescence and CRISPR-activated signals.
This integrated approach enables correlative analysis of protein localization with specific DNA or RNA molecules within the intact tissue context, valuable for studying cellular heterogeneity and gene expression patterns [104].
Research Reagent Solutions for Integrated WM-IF
Table 3: Essential Reagents for Multiplexed WM-IF Applications
| Reagent Category | Specific Examples | Function | Application Notes |
|---|---|---|---|
| Fixatives | Paraformaldehyde, Methanol, Acetone | Preserve tissue architecture and antigenicity | Cross-linking fixatives may require more extensive antigen retrieval |
| Permeabilization Agents | Triton X-100, Tween-20, Saponin | Enable antibody penetration throughout tissue | Concentration and duration must be optimized for each tissue type |
| Blocking Reagents | BSA, Normal Serum, Commercial Protein-Free Blocks | Reduce non-specific antibody binding | Normal serum should match secondary antibody host species |
| Environment-Sensitive Dyes | Nile Red, BODIPY, Laurdan | Report on local biochemical environment | Emission spectrum shifts with lipid polarity enable ratiometric imaging |
| CRISPR/Cas Components | Cas12a, Cas13, crRNA, DNA Nanomachines | Nucleic acid detection and signal amplification | Can be engineered for activation by specific RNA/DNA targets in fixed tissues |
| Signal Amplification Systems | Biotin-Streptavidin, Tyramide Signal Amplification | Enhance detection sensitivity | Particularly valuable for low-abundance targets in thick specimens |
Emerging Technologies and Future Directions
Novel Imaging Platforms
The ongoing development of advanced imaging technologies continues to expand the possibilities for multiplexed WM-IF applications. Hybrid imaging approaches such as PET-enabled Dual-Energy CT represent innovative platforms that could provide correlative macroscopic context for microscopic WM-IF findings. This technology, which combines metabolic information from PET scans with tissue composition data from dual-energy CT, allows visualization of both where cellular activity occurs and the tissue characteristics at that location [105].
Similarly, Magnetic Particle Imaging (MPI) emerges as a promising modality for tracking immune cell migrations in cancer research. This technology uses magnetic nanoparticles as non-invasive cellular tracers, offering an alternative to radiative imaging methods. When correlated with WM-IF analysis of tissue samples, MPI could provide dynamic information about cellular trafficking while maintaining detailed structural context [106].
Computational Integration and Artificial Intelligence
The growing complexity of multimodal datasets necessitates advanced computational approaches for integrated analysis. Deep learning methodologies now enable not only the segmentation of multiple organelles from ratiometric images but also the prediction of subcellular structures from label-free images or the correlation of patterns across entirely different modalities [102].
Transfer learning approaches demonstrate particular promise, allowing models trained on one type of microscope or cell line to be adapted to different imaging systems or tissue types. This capability enhances the reproducibility and generalizability of integrated WM-IF approaches across experimental conditions and research platforms [102].
The integration of whole-mount immunofluorescence with complementary analytical modalities represents a powerful paradigm for extracting multidimensional information from biological systems. By combining WM-IF with spectral ratiometric imaging, genomic profiling, CRISPR-based biosensing, and novel imaging technologies, researchers can overcome the inherent limitations of any single technique while preserving the structural context essential for understanding biological function. As these methodologies continue to evolve, they will undoubtedly yield increasingly sophisticated insights into the complex architecture and dynamic processes of biological systems, advancing both basic research and therapeutic development.
Conclusion
Whole-mount immunofluorescence staining stands as an indispensable technique in modern biomedical research, providing an unrivaled capacity to analyze protein expression and cellular organization within an intact 3D context. Its successful application hinges on a rigorous methodology, from specimen preparation and antibody validation to advanced imaging and computational analysis. The future of 3D tissue analysis is being shaped by the convergence of robust experimental protocols like WM-IF and powerful new computational tools, including AI-powered in silico staining. This synergy promises to deepen our understanding of organoid development, tumor microenvironments, and disease mechanisms, ultimately accelerating drug discovery and the advancement of personalized medicine.
References
- 1. Whole-Mount Immunofluorescence Staining, Confocal ... [https://www.jove.com/t/62058/whole-mount-immunofluorescence-staining-confocal-imaging-3d]
- 2. Dissection and Whole-Mount Immunofluorescent Staining ... [https://en.bio-protocol.org/en/bpdetail?id=5315&type=0]
- 3. Protocol for immunofluorescent staining, high-resolution ... [https://pmc.ncbi.nlm.nih.gov/articles/PMC12212140/]
- 4. Whole-Mount Fluorescent IHC Protocol [https://www.creative-bioarray.com/support/whole-mount-fluorescent-ihc-protocol.htm]
- 5. Immunofluorescence Staining | A Typical Workflow [https://ibidi.com/content/365-immunofluorescence-staining-a-typical-workflow]
- 6. High-plex immunofluorescence imaging and traditional ... [https://www.nature.com/articles/s43018-023-00576-1]
- 7. Protocol for immunofluorescent staining, high-resolution ... [https://www.sciencedirect.com/science/article/pii/S2666166725003120]
- 8. Dissection and Whole-Mount Immunofluorescent Staining ... [https://pubmed.ncbi.nlm.nih.gov/40432760/]
- 9. Optimizing Tissue Clearing Methods for Improved Imaging ... [https://pubmed.ncbi.nlm.nih.gov/40902674/]
- 10. Immunolabeling | Thermo Fisher Scientific - US [https://www.thermofisher.com/us/en/home/life-science/cell-analysis/cell-analysis-learning-center/molecular-probes-school-of-fluorescence/imaging-basics/labeling-your-samples/immunolabeling.html]
- 11. Detection & Visualization of Antibody Binding [https://www.rndsystems.com/resources/protocols/detection-visualization-antibody-binding]
- 12. Immunohistochemistry Protocols [https://www.antibodies.com/applications/immunohistochemistry/ihc-protocol]
- 13. Different approaches for interpretation and reporting of ... [https://pmc.ncbi.nlm.nih.gov/articles/PMC4260254/]
- 14. Histopathological Considerations for IHC-based Studies [https://waxitinc.com/histopathological-considerations-for-ihc-based-studies/]
- 15. Quantitative Immunofluorescent Imaging of Immune Cells ... [https://pmc.ncbi.nlm.nih.gov/articles/PMC12269647/]
- 16. A quantitative pipeline for whole-mount deep imaging and ... [https://elifesciences.org/reviewed-preprints/107154]
- 17. Organoids | Nature Reviews Methods Primers [https://www.nature.com/articles/s43586-022-00174-y]
- 18. Protocol for whole-mount immunofluorescence staining of ... [https://www.sciencedirect.com/science/article/pii/S2666166724002971]
- 19. Optimized multiplex immunofluorescence for the ... [https://pmc.ncbi.nlm.nih.gov/articles/PMC10409948/]
- 20. EZ Clear for simple, rapid, and robust mouse whole organ ... [https://elifesciences.org/articles/77419]
- 21. Highly multiplexed immunofluorescence imaging of human ... [https://elifesciences.org/articles/31657]
- 22. Novel approach for quantification of multiple ... [https://www.nature.com/articles/s41598-021-88101-1]
- 23. IHC staining protocol for whole mount samples [https://www.abcam.com/en-us/technical-resources/protocols/wholemount-staining-for-ihc]
- 24. Immunofluorescence staining: Visualizing cellular structures [https://www.abcam.com/en-us/knowledge-center/immunocytochemistry/immunofluorescence-staining]
- 25. Organ Culture and Whole Mount Immunofluorescence ... [https://pmc.ncbi.nlm.nih.gov/articles/PMC5352256/]
- 26. An introduction to Performing Immunofluorescence Staining [https://pmc.ncbi.nlm.nih.gov/articles/PMC6918834/]
- 27. A spheroid whole mount drug testing pipeline with machine ... [https://pmc.ncbi.nlm.nih.gov/articles/PMC11658419/]
- 28. Advanced 3D Imaging and Organoid Bioprinting for ... - PMC [https://pmc.ncbi.nlm.nih.gov/articles/PMC11031334/]
- 29. Human fetal brain self-organizes into long-term expanding ... [https://www.sciencedirect.com/science/article/pii/S0092867423013442]
- 30. Advanced neural activity mapping in brain organoids via ... [https://www.frontiersin.org/journals/neuroscience/articles/10.3389/fnins.2025.1634582/full]
- 31. An Intro to Immunofluorescence Staining in Histopathology [https://www.leicabiosystems.com/us/knowledge-pathway/introduction-to-immunofluorescence/]
- 32. Fundamentals of Immunofluorescence Staining [https://www.antibodiesinc.com/pages/the-fundamentals-of-immunofluorescence-staining?srsltid=AfmBOoq7gWfJfiMDwW0tERTnZeekXrRDAQbQK1xpYKybuy4G5U0TpbrY]
- 33. Whole mount immunofluorescence analysis of fresh and ... [https://www.sciencedirect.com/science/article/pii/S1542012424000673]
- 34. Direct vs Indirect Immunofluorescence: Which is the Better ... [https://www.creative-diagnostics.com/direct-vs-indirect-immunofluorescence-which-is-the-better-technique.htm]
- 35. Which one is better, indirect IF or dierect IF? [https://www.sinobiological.com/category/if-icc-faq-indirect-dierect-if]
- 36. Direct vs indirect assays [https://www.abcam.com/en-us/technical-resources/guides/conjugation-guide/direct-vs-indirect-assays]
- 37. Quantitative Whole-mount Immunofluorescence Analysis of ... [https://app.jove.com/v/56446/quantitative-whole-mount-immunofluorescence-analysis-cardiac]
- 38. Antibody-labeled fluorescence imaging of dendritic cell ... [https://pmc.ncbi.nlm.nih.gov/articles/PMC2596711/]
- 39. Protocol for AI-supported immunofluorescence ... [https://www.sciencedirect.com/science/article/pii/S2666166725002345]
- 40. Antibodies 101: Introduction to Immunofluorescence [https://blog.addgene.org/introduction-to-immunofluorescence]
- 41. Ten Approaches That Improve Immunostaining: A Review of ... [https://pmc.ncbi.nlm.nih.gov/articles/PMC8836139/]
- 42. Tech Tip: Combined Direct and Indirect IF Using Primary ... [https://biotium.com/tech-tips-protocols/tech-tip-combined-direct-and-indirect-immunofluorescence-using-primary-antibodies-from-the-same-host/]
- 43. Background in Fluorescence Imaging [https://www.thermofisher.com/us/en/home/life-science/cell-analysis/cell-analysis-learning-center/molecular-probes-school-of-fluorescence/imaging-basics/protocols-troubleshooting/troubleshooting/background-fluorescence.html]
- 44. Overview of Immunostaining [https://www.cellsignal.com/applications/immunofluorescence/overview-immunofluorescence-techniques?srsltid=AfmBOorBzz2HA4FDaeu2uthQlsN5q-rdzKZpVhTg4tAH8TuDddL9HN-N]
- 45. Whole-Mount Confocal Microscopy for Vascular Branching ... [https://pmc.ncbi.nlm.nih.gov/articles/PMC4199634/]
- 46. Alvetex Scaffold Protocol: Immunofluorescence Confocal ... [https://www.reprocell.com/resources/protocols/alvetex-scaffold/d053-immunofluorescence-confocal-microscopy]
- 47. Specimen Preparation Using Synthetic Fluorophores and ... [https://evidentscientific.com/en/microscope-resource/knowledge-hub/techniques/confocal/applications/protocols/cellscytokeratin]
- 48. Deep-tissue high-sensitivity multimodal imaging and ... [https://www.nature.com/articles/s41467-025-61532-4]
- 49. Advances in two-photon imaging for monitoring neural ... [https://www.frontiersin.org/journals/neuroscience/articles/10.3389/fnins.2025.1597151/full]
- 50. Comparison of conventional and confocal adaptive optics ... [https://opg.optica.org/abstract.cfm?uri=NTM-2025-NTu4C.3]
- 51. Integrated two-photon imaging platform for spatiotemporal ... [https://www.sciencedirect.com/science/article/abs/pii/S095656632500675X]
- 52. A Simplified and Robust Immunofluorescence Labeling ... [https://pubmed.ncbi.nlm.nih.gov/40465186/]
- 53. Digital labeling for 3D histology: segmenting blood vessels ... [https://pmc.ncbi.nlm.nih.gov/articles/PMC10278624/]
- 54. A novel workflow for 3D imaging and spatial analysis of ... [https://pmc.ncbi.nlm.nih.gov/articles/PMC12538399/]
- 55. Single cell resolution 3D imaging and segmentation within ... [https://www.nature.com/articles/s44303-025-00099-7]
- 56. Deep learning-based virtual staining, segmentation, and ... [https://www.nature.com/articles/s41377-024-01554-7]
- 57. Protocol for rapid 5-plex 3D imaging and single-cell ... [https://pmc.ncbi.nlm.nih.gov/articles/PMC12423407/]
- 58. Advanced immunostaining approaches to study early male ... [https://pmc.ncbi.nlm.nih.gov/articles/PMC5894494/]
- 59. Knockout (KO) Validation [https://www.antibodies.com/primary-antibodies/knockout-validation]
- 60. The Curious Case Of The Staining That Went Wrong [https://vectorlabs.com/blog/the-curious-case-of-the-staining-that-went-wrong/?srsltid=AfmBOopcGmB_hSIHwsfcrYABUkVbxv5YALpZnmQfFlMml8cEaNucD48i]
- 61. Generation and immunofluorescent validation of gene ... [https://pmc.ncbi.nlm.nih.gov/articles/PMC9826973/]
- 62. Immersion‐Based Clearing and Autofluorescence ... [https://pmc.ncbi.nlm.nih.gov/articles/PMC12589860/]
- 63. Efficient removal of naturally-occurring lipofuscin ... [https://www.sciencedirect.com/science/article/pii/S1526590025005863]
- 64. A customized affordable multiplexed immunofluorescence ... [https://www.frontiersin.org/journals/cellular-neuroscience/articles/10.3389/fncel.2025.1553058/full]
- 65. - Whole of mesenchymal... mount immunofluorescence staining [https://pmc.ncbi.nlm.nih.gov/articles/PMC9356158/]
- 66. TrueBlack® IF Background Suppressor System ... [https://biotium.com/product/trueblack-if-background-suppressor-system-permeabilizing/]
- 67. Fluorescence-based Single-cell Analysis of Whole-mount- ... [https://pmc.ncbi.nlm.nih.gov/articles/PMC8260262/]
- 68. A simple method for quantitating confocal fluorescent images [https://pmc.ncbi.nlm.nih.gov/articles/PMC7856428/]
- 69. Article TDAExplore: Quantitative analysis of fluorescence ... [https://www.sciencedirect.com/science/article/pii/S2666389921002294]
- 70. Custom vs Catalog Antibodies for Non-Model Species [https://www.betalifesci.com/blogs/news/custom-vs-catalog-antibodies-for-non-model-species?srsltid=AfmBOopAXCWb6IuNp2f0XNrh-aR0Ip4RrE74rP7XICc0Y3JeUYhCXpbv]
- 71. How to choose and use antibodies [https://www.abcam.com/en-us/technical-resources/guides/antibody-basics/how-to-choose-and-use-antibodies]
- 72. How to Choose and Use an Antibody [https://www.antibodies.com/antibody-basics/how-to-choose-and-use-an-antibody]
- 73. Quantitative three-dimensional evaluation of ... [https://pmc.ncbi.nlm.nih.gov/articles/PMC5330556/]
- 74. Immunofluorescence Staining of Bacterial Samples [https://www.protocols.io/view/immunofluorescence-staining-of-bacterial-samples-frrbbm52p.html]
- 75. - Whole Imaging: A Fixing and mount ... Immunofluorescence Staining [https://www.jove.com/t/30036/whole-mount-immunofluorescence-imaging-fixing-staining-technique-to]
- 76. Overview of Tissue Clearing Methods and Applications [https://andor.oxinst.com/learning/view/article/overview-of-tissue-clearing-methods-and-applications]
- 77. A beginner's guide to tissue clearing - PMC - PubMed Central [https://pmc.ncbi.nlm.nih.gov/articles/PMC5336404/]
- 78. Tissue Clearing Techniques [https://www.jacksonimmuno.com/secondary-antibody-resource/immuno-techniques/tissue-clearing-techniques/]
- 79. Protocol Guide: Immunofluorescent Staining of Whole - Mount ... [https://www.sigmaaldrich.com/US/en/technical-documents/protocol/cell-culture-and-cell-culture-analysis/3d-cell-culture/organoid-antibody-staining]
- 80. Fluorescence Mounting Mounting Media [https://cite.hms.harvard.edu/resources/media/]
- 81. Mounting Media and Antifades [https://www.thermofisher.com/us/en/home/life-science/cell-analysis/cellular-imaging/fluorescence-microscopy-and-immunofluorescence-if/mounting-medium-antifades.html]
- 82. Mounting Media [https://vectorlabs.com/browse/mounting-media/?srsltid=AfmBOopJPggEDxzdBry1YVf4LRz-opqLTfIsYoAF3NsEGsmCm2QphjaI]
- 83. Skin Whole-Mount Immunofluorescent Staining Protocol, 3D Visualization, and Spatial Image Analysis - PubMed [https://pubmed.ncbi.nlm.nih.gov/37338194/]
- 84. A whole-mount immunofluorescence protocol for three-dimensional imaging of the embryonic mammary primordium - PubMed [https://pubmed.ncbi.nlm.nih.gov/23649699/]
- 85. Knockout and Knockdown Antibody Validation [https://www.thermofisher.com/us/en/home/life-science/antibodies/invitrogen-antibody-validation/knockout-knockdown-antibody-validation.html]
- 86. Guide to Antibody Validation Techniques [https://www.neobiotechnologies.com/resources/antibody-validation-methods/?srsltid=AfmBOoq6mITsumTOXCZW7HnzhIlaII58e0Le5E1wCWaN1tCILIiPQrlM]
- 87. Immunohistochemistry (IHC): The Complete Guide [https://www.antibodies.com/applications/immunohistochemistry]
- 88. Custom vs Catalog Antibodies for Non-Model Species [https://www.betalifesci.com/blogs/news/custom-vs-catalog-antibodies-for-non-model-species?srsltid=AfmBOoqjPQdFO3CP_gSVofce_fQjW8mZez3amQqmZkl-YqrJ3kn4kjEB]
- 89. A Strategic Choice for Non-Model Organism Research [https://www.bosterbio.com/blog/post/custom-antibodies-vs-catalog-antibodies-a-strategic-choice-for-non-model-organism-research?srsltid=AfmBOorBS0zj2GhD8txjILMyn3X0E1Saw_-gHBh9_5ewawzMUdDtpjoo]
- 90. Antibody validation - PMC [https://pmc.ncbi.nlm.nih.gov/articles/PMC3891910/]
- 91. Commercially available antibodies can be applied in ... [https://pmc.ncbi.nlm.nih.gov/articles/PMC5024709/]
- 92. Antibody Validation for Immunofluorescence [https://www.cellsignal.com/about-us/our-approach-process/antibody-validation-immunofluorescence?srsltid=AfmBOooARsiitmjDVtZDht2Q5w31cLPcUBJOXV719JMfKGOzP1czs1Or]
- 93. Protocol for whole-mount immunofluorescence staining of ... [https://pmc.ncbi.nlm.nih.gov/articles/PMC11227007/]
- 94. Whole-mount immunofluorescence staining of blood and ... [https://www.sciencedirect.com/science/article/pii/S2666166723002770]
- 95. CLARITY increases sensitivity and specificity of fluorescence ... [https://bmcbiol.biomedcentral.com/articles/10.1186/s12915-023-01582-6]
- 96. Whole-mount smFISH allows combining RNA and protein ... [https://www.nature.com/articles/s41477-023-01442-9]
- 97. Immunofluorescence Staining of Paraffin Sections Step by ... [https://www.frontiersin.org/journals/neuroanatomy/articles/10.3389/fnana.2020.582218/full]
- 98. ROSIE: AI generation of multiplex immunofluorescence staining from... [https://www.nature.com/articles/s41467-025-62346-0?error=cookies_not_supported&code=ddef367b-2c8a-461d-aae7-7fce2449a268]
- 99. ROSIE: AI generation of multiplex immunofluorescence ... [https://pmc.ncbi.nlm.nih.gov/articles/PMC12357954/]
- 100. Trustworthy in silico cell labeling via ensemble-based image ... [https://pmc.ncbi.nlm.nih.gov/articles/PMC10663640/]
- 101. Imaging both H&E and immunofluorescence staining ... [https://www.microscope.healthcare.nikon.com/en_AOM/resources/application-notes/imaging-staining-patterns-on-tissue-section]
- 102. Fast segmentation and multiplexing imaging of organelles ... [https://www.nature.com/articles/s41467-025-57877-5]
- 103. Methods for multiplexing single-cell multi-omics | Nature Methods [https://www.nature.com/articles/s41592-025-02657-8]
- 104. A multifunctional approach: merging CRISPR/Cas technology with DNA nanomachines for advanced biosensing | Analytical and Bioanalytical Chemistry [https://link.springer.com/article/10.1007/s00216-025-06182-7]
- 105. New hybrid imaging breakthrough could transform ... [https://health.ucdavis.edu/news/headlines/new-hybrid-imaging-breakthrough-could-transform-detection-of-cancer-and-other-diseases/2025/08]
- 106. New imaging method helps immune cells zero in on cancer [https://news.ufl.edu/2025/10/nanoparticle-imagine-research-/]